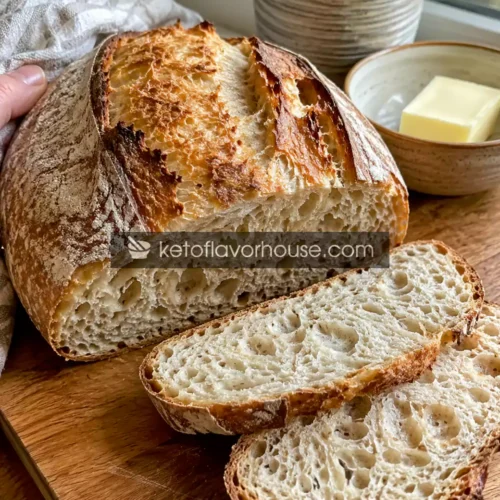
High-Protein Sourdough Bread Recipe
This High-Protein Sourdough Bread Recipe (Why High-Protein Flour Makes a Huge Difference) creates bakery-style artisan bread with a chewy texture, crispy crust, and higher protein content than traditional sourdough. The stronger gluten structure from high-protein flour produces better rise, open crumb texture, and deeply satisfying flavor. Whether you use it for breakfast toast, sandwiches, or meal prep, this loaf combines comfort-food quality with practical high-protein nutrition.
Ingredients
- 400 g bread flour
- 100 g high-protein flour
- 15 g vital wheat gluten
- 100 g active sourdough starter
- 375 g warm water
- 10 g salt
- 1 tablespoon honey or maple syrup
Instructions
- About 4–6 hours before you plan to mix the dough, feed your sourdough starter so it becomes active, bubbly, and strong enough to properly ferment the bread. The starter should visibly rise, develop lots of bubbles throughout, and ideally double in size before using. A healthy active starter is one of the most important parts of successful sourdough because it directly affects the rise, texture, flavor, and overall structure of the bread. If your kitchen is cold, it may take slightly longer to become fully active. You can test readiness by placing a small spoonful into water — if it floats, it’s usually ready to bake with.
- In a large mixing bowl, combine the warm water, active sourdough starter, and honey or maple syrup if using. Stir thoroughly using your hands or a wooden spoon until the starter mostly dissolves into the water. The liquid should look cloudy and evenly mixed without large clumps remaining. Using slightly warm water helps wake up the fermentation process and encourages stronger gluten development later. Be careful not to use hot water because excessive heat can weaken or damage the natural yeast in the starter.
- Add the bread flour, high-protein flour, and vital wheat gluten directly into the bowl with the liquid mixture. Use your hands, a sturdy spoon, or a dough whisk to mix everything together until a rough, shaggy dough forms. Make sure there are no dry flour pockets hiding at the bottom of the bowl. The dough will look messy and somewhat sticky at this stage, which is completely normal for high-hydration sourdough. Avoid the temptation to add extra flour too early because the dough will strengthen naturally as it rests and ferments.
- Cover the bowl using a clean kitchen towel, plastic wrap, or lid and allow the dough to rest for about 30 minutes. This resting period is called the autolyse stage and gives the flour time to fully absorb the water while beginning gluten development naturally. During this stage, the dough becomes smoother, more elastic, and easier to handle later. Even though it seems simple, this resting period makes a huge difference in texture and dough strength.
- After the resting period, sprinkle the salt evenly over the dough. Using slightly damp hands, gently squeeze and fold the dough repeatedly until the salt becomes fully incorporated. At first, the dough may feel slippery or uneven, but continue folding gently until the texture smooths out again. Salt strengthens the gluten network while also improving flavor and fermentation balance, so make sure it gets evenly distributed throughout the dough.
- Over the next 2 hours, perform a series of stretch-and-folds every 30 minutes to build structure and strength inside the dough. To do this, grab one side of the dough, gently stretch it upward without tearing, then fold it back over itself. Rotate the bowl and repeat the process several times until all sides have been folded. You’ll notice the dough gradually becoming smoother, stronger, and more elastic after each round. This technique replaces heavy kneading while helping create the airy artisan texture sourdough is known for.
- Once the stretch-and-fold process is complete, cover the bowl again and allow the dough to bulk ferment at room temperature for about 4–6 hours, depending on the warmth of your kitchen. During this stage, the dough should become noticeably puffier, softer, and full of air bubbles while nearly doubling in size. A properly fermented dough will look airy and slightly jiggly when the bowl is moved gently. If your kitchen is cooler, fermentation may take longer, so focus more on how the dough looks and feels rather than strictly watching the clock.
- Lightly flour your work surface and carefully transfer the dough onto it, trying not to deflate too much of the trapped air. Using your hands or a dough scraper, gently shape the dough into a tight round loaf by folding the edges inward and rotating it against the counter to create surface tension. Proper shaping helps the loaf hold its structure during baking and improves oven spring. Be gentle during this process because preserving the air bubbles inside helps create the beautiful open crumb texture.
- Place the shaped dough seam-side up into a generously floured banneton basket or a bowl lined with a clean floured kitchen towel. Cover the dough well so it does not dry out, then place it into the refrigerator overnight for 8–16 hours. This cold fermentation stage develops deeper sourdough flavor, improves texture, and makes the dough easier to score and bake the next day. The slow fermentation also helps create the rich artisan-style taste that makes homemade sourdough so special.
- About 45 minutes before baking, place your Dutch oven with its lid into the oven and preheat everything to 475°F. Fully preheating the Dutch oven is extremely important because the intense heat creates steam and strong oven spring once the dough goes inside. This step helps form the crispy crust and dramatic rise that artisan sourdough is famous for. Be careful when handling the Dutch oven later because it will become extremely hot.
- Remove the dough from the refrigerator and carefully flip it onto a sheet of parchment paper. Using a bread lame or very sharp knife, score the top of the dough with one confident slash or decorative pattern. Scoring controls how the bread expands while baking and prevents random cracking. Carefully lower the dough into the hot Dutch oven using the parchment paper as support, then immediately place the lid on top to trap steam inside.
- Bake the bread covered for 25 minutes to allow steam to develop and help the loaf rise fully. Then carefully remove the lid and continue baking another 20 minutes until the crust becomes deeply golden brown, crisp, and beautifully blistered. The kitchen will smell incredible during this stage. If you prefer an even darker artisan crust, you can bake for an additional few minutes while watching carefully to prevent burning.
- Remove the finished bread from the Dutch oven and transfer it onto a wire cooling rack. Allow the loaf to cool completely for at least 1–2 hours before slicing, even though it will be tempting to cut into it immediately. The inside of the bread continues setting as it cools, and slicing too early can make the crumb gummy or dense. Once cooled, slice using a serrated bread knife and enjoy the chewy texture, crisp crust, and rich homemade sourdough flavor.