This post may contains Amazon affiliate and other affiliate links. If you make a purchase through these links, I may earn a small commission at no extra cost to you. Your support helps me continue to provide quality content. I only recommend products I personally trust and believe will add value to your experience. For more details, please visit my Privacy Policy.
Introduction
There are certain cravings that keto just doesn’t prepare you for.
Not the obvious ones like sugar or bread—but that deep, satisfying craving for something crispy, warm, cheesy, and wrapped. Something you can hold in your hands, take a bite from, and instantly feel like you’re eating comfort food.
For me, that craving was always chimichangas.
Before keto, they were one of my go-to indulgences—crispy on the outside, creamy and savory on the inside. But once I switched to a low-carb lifestyle, traditional chimichangas were completely off the table.
Or so I thought.
That’s when I started experimenting with a keto version. Something that could capture that same crispy exterior and rich, cheesy filling… but without the carbs.
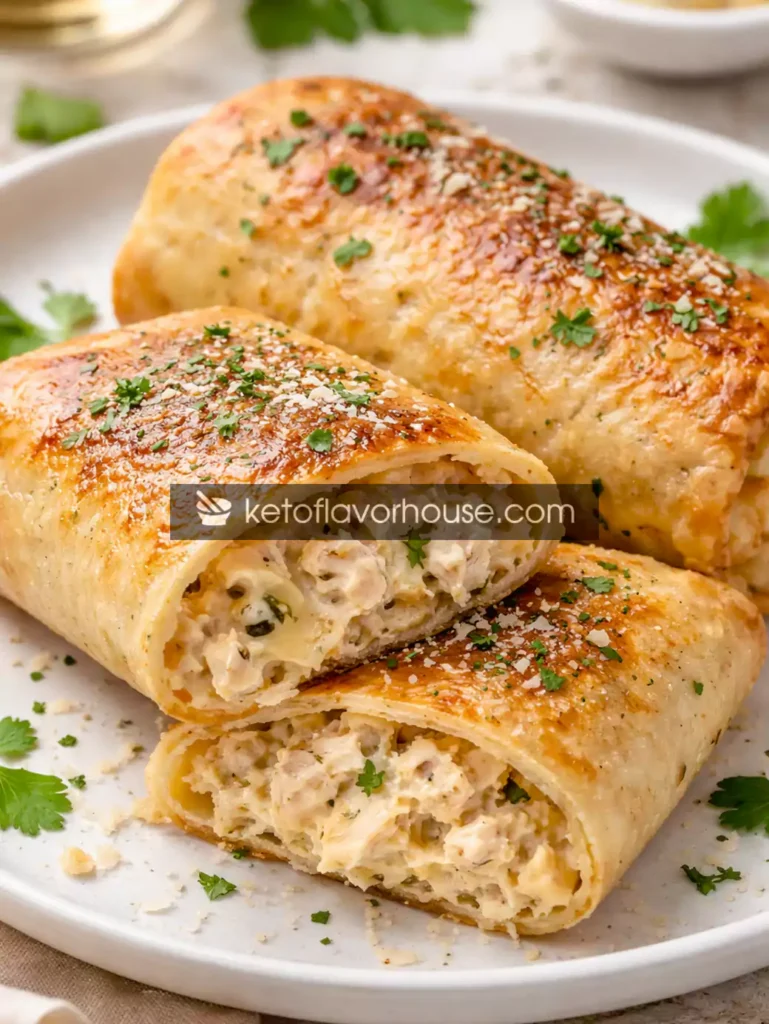
And that’s exactly how this Keto Garlic Butter Cream Cheese Chimichanga (Low-Carb Crispy Wrap) was born.
This recipe brings together everything you love—golden crisp texture, rich garlic butter flavor, creamy cheese filling, and a satisfying wrap—all while staying completely keto-friendly. It’s one of those meals that doesn’t feel like a “replacement”… it feels like an upgrade.
Whether you’re craving comfort food, planning a cozy dinner, or just want something exciting on keto, this recipe delivers.
Why You’ll Love This Recipe
- 🌯 Crispy outside, creamy inside – The perfect texture contrast
- 🧄 Rich garlic butter flavor – Deep, savory, and satisfying
- 🧀 Ultra cheesy filling – Creamy, melty, and indulgent
- 🔥 Keto-friendly and low-carb – No traditional tortillas needed
- ⏱️ Quick and simple – Easy enough for weeknights
- 🍗 High in protein and fats – Keeps you full longer
- 🍽️ Restaurant-style at home – Feels like a cheat meal
My Personal Experience
The first time I made these, I wasn’t expecting them to turn out this good.
I remember biting into one and hearing that slight crisp on the outside… followed by that warm, creamy, garlicky filling.
It didn’t feel like keto food.
It felt like something I would have ordered at a restaurant—something indulgent, satisfying, and honestly a little addictive.
Now, it’s one of my favorite recipes when I want something comforting but still aligned with my goals. It’s also one of the first recipes I share with anyone who says keto food is boring.
Because this? This proves it’s not.
Required Equipment
Skillet or Pan
Used to cook the filling and create that golden crispy exterior.
Mixing Bowl
Helps combine the creamy filling ingredients smoothly.
Spatula
For flipping and handling the chimichangas without breaking them.
Baking Sheet (Optional)
Useful if you choose to bake instead of pan-frying.
Ingredients & Substitutions
Main Ingredients
- 2 low-carb tortillas (almond flour or keto wraps)
- 1 cup cooked shredded chicken
- ½ cup cream cheese (softened)
- ½ cup shredded mozzarella cheese
- 2 tbsp butter
- 3 cloves garlic (minced)
- ½ tsp paprika
- ¼ tsp black pepper
- Salt to taste
Why Each Ingredient Matters
- Low-carb tortillas – Replace traditional wraps while keeping structure
- Chicken – Adds protein and makes the filling hearty
- Cream cheese – Creates that rich, creamy texture
- Mozzarella – Adds meltiness and stretch
- Garlic & butter – Build deep, savory flavor
Substitutions
- Chicken → Ground beef or turkey
- Mozzarella → Cheddar or Monterey Jack
- Tortilla → Cheese wrap or egg wrap
- Butter → Ghee for richer flavor
How to Make Keto Garlic Butter Cream Cheese Chimichanga
Step 1: Prepare the Filling
In a bowl, combine shredded chicken, cream cheese, mozzarella, paprika, salt, and pepper. Mix until creamy and well combined.
Step 2: Make Garlic Butter
Melt butter in a pan over medium heat. Add minced garlic and cook for 30–60 seconds until fragrant.
Step 3: Warm the Tortillas
Heat tortillas slightly so they become flexible and easier to roll.
Step 4: Fill the Wraps
Place filling in the center of each tortilla. Don’t overfill—this helps prevent tearing.
Step 5: Roll into Chimichanga Shape
Fold the sides inward, then roll tightly into a wrap. Don’t worry if it’s not perfect—just make sure it’s sealed.
Step 6: Cook Until Crispy
Place wraps seam-side down in the pan with garlic butter. Cook until golden and crispy on all sides, turning gently.
Step 7: Rest Briefly
Let them sit for 2–3 minutes before serving so the filling settles.
Step 8: Serve
Serve warm and enjoy the crispy, creamy texture.
Common Mistakes to Avoid
- ❌ Overfilling → wraps break
- ❌ Not sealing properly → filling leaks
- ❌ Cooking on low heat → no crispiness
- ❌ Skipping garlic butter → less flavor
Pro Tips for Best Results
- ✔ Cook seam-side down first
- ✔ Use medium-high heat for crispiness
- ✔ Don’t rush flipping
- ✔ Add extra butter for golden finish
Keto Benefits of Chicken
Chicken is a keto staple—high in protein, low in carbs, and incredibly versatile. It helps keep meals filling while supporting muscle maintenance and energy levels.
Variations You Can Try
- 🌶️ Spicy version with jalapeños
- 🧀 Extra cheesy filling
- 🥩 Beef chimichanga version
- 🍳 Breakfast version with eggs
Tips for This Recipe
- Use soft tortillas to prevent cracking
- Keep filling balanced—not too wet
- Cook evenly on all sides
Optional Additions
- Sour cream
- Avocado slices
- Keto salsa
- Fresh herbs
Serving Ideas
- Serve with keto dips
- Pair with salad
- Great for dinner or lunch
- Perfect for gatherings
Storage Recommendations
- Fridge: Up to 3 days
- Freezer: Up to 1 month
Reheating
- Air fryer: Best crispiness
- Oven: Even heating
- Pan: Quick crisp
Frequently Asked Questions
1. Can I bake instead of fry?
Yes, bake until golden and crispy.
2. Are low-carb tortillas necessary?
Yes, for keto compliance.
3. Can I freeze them?
Yes, before or after cooking.
4. How do I keep them crispy?
Reheat in air fryer or pan.
5. Can I make them dairy-free?
Use dairy-free cheese alternatives.
6. What protein works best?
Chicken, beef, or turkey.
7. Can I air fry them?
Yes, great for crispiness.
Nutritional Breakdown (Per Serving)
- Calories: 420
- Protein: 28g
- Fat: 32g
- Total Carbs: 7g
- Net Carbs: 4g
Recipe Snapshot
- Prep Time: 10 minutes
- Cook Time: 15 minutes
- Total Time: 25 minutes
- Course: Main
- Cuisine: Fusion
- Servings: 2
- Calories: 420

Keto Garlic Butter Cream Cheese Chimichanga Recipe
Ingredients
- Low-carb tortillas – 2
- Chicken – 1 cup
- Cream cheese – ½ cup
- Mozzarella – ½ cup
- Butter – 2 tbsp
- Garlic – 3 cloves
Instructions
- In a mixing bowl, add the shredded chicken, softened cream cheese, shredded mozzarella, paprika, black pepper, and a pinch of salt. Use a spoon or spatula to mix everything together until the filling becomes creamy and well combined. Make sure the cream cheese is fully blended so there are no lumps—this helps create that smooth, rich texture inside the chimichanga.
- Place a pan over medium heat and add the butter. Once melted, add the minced garlic and stir continuously for about 30–60 seconds until it becomes fragrant. Be careful not to let the garlic brown too much, as it can turn bitter. Turn the heat to low once done so the butter stays warm and ready for cooking the wraps.
- Warm the low-carb tortillas slightly to make them soft and flexible. You can do this by placing them in a dry pan for 10–15 seconds on each side or microwaving them for a few seconds. This step is important because warm tortillas are much easier to roll without cracking.
- Lay each tortilla flat and place a portion of the filling in the center. Spread it slightly but keep it away from the edges. Fold the sides inward first, then roll tightly from the bottom up to form a secure wrap. Don’t worry if it’s not perfectly shaped—just make sure it’s sealed well so the filling doesn’t leak out while cooking.
- Place the rolled chimichangas seam-side down into the pan with the garlic butter. Cook over medium heat, letting them sit undisturbed for a minute or two so a golden crust forms. Gently turn them and continue cooking on all sides until they are evenly crispy and golden brown. Add a little extra butter if needed for more crispiness and flavor.
- Once cooked, remove them from the pan and let them rest for 2–3 minutes. This helps the filling set slightly and makes them easier to handle. Serve warm while the outside is crispy and the inside is creamy and rich for the best texture and flavor.