This post may contains Amazon affiliate and other affiliate links. If you make a purchase through these links, I may earn a small commission at no extra cost to you. Your support helps me continue to provide quality content. I only recommend products I personally trust and believe will add value to your experience. For more details, please visit my Privacy Policy.
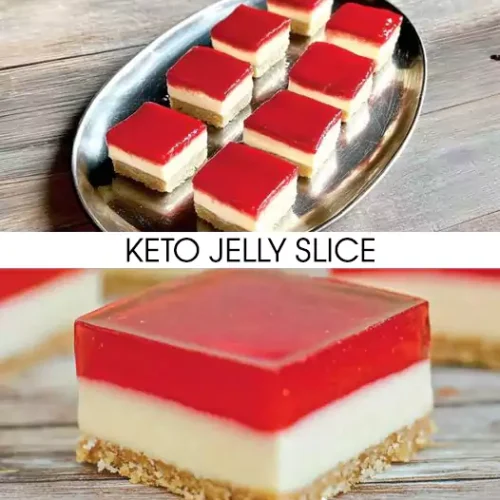
This Keto Jelly Slice is a delightful no-bake dessert that’s perfect for any occasion! With a buttery almond flour base, a creamy cheesecake layer, and a refreshing sugar-free jelly topping, this slice is a guilt-free way to satisfy your sweet tooth. It’s a great low-carb dessert that’s as beautiful as it is delicious.
Why You’ll Love This Recipe
- Layered Goodness: Combines a crunchy base, creamy filling, and fruity jelly for a perfect texture blend.
- No-Bake Recipe: Ideal for days when you don’t want to turn on the oven.
- Customizable: Use your favorite sugar-free jelly flavors for endless variations.
- Keto-Friendly: Low in carbs, making it a sweet treat you can enjoy while staying on track.
My Personal Experience
When I first made this jelly slice, I wasn’t sure how the layers would turn out, but it was so simple to assemble! The almond flour crust was buttery and held up perfectly under the creamy cheesecake layer. The jelly topping added a burst of refreshing flavor that tied it all together. It’s such a crowd-pleaser that even non-keto friends loved it. Plus, it stores well, so it’s great for meal-prepping dessert for the week.
What You’ll Need: Essential Equipment for This Recipe
- Square or Rectangular Pan
Once I got my hands on this pan, I never looked back. It’s perfect for creating even layers in no-bake desserts like this jelly slice. Plus, it makes portioning and slicing super easy! - Mixing Bowls
A good set of mixing bowls is essential for this recipe. They’re great for combining the crust, filling, and jelly layers without mixing flavors. - Hand Mixer or Whisk
This tool is a lifesaver for creating a smooth, lump-free cheesecake layer. Whether you’re using a hand whisk or an electric mixer, it ensures perfect consistency every time. - Measuring Cups and Spoons
Precision matters when making layered desserts. These are indispensable for getting the right balance of ingredients in each layer. - Refrigerator
The fridge plays a critical role in setting each layer of the slice. Without it, you wouldn’t achieve that firm, beautiful texture.
Ingredients & Substitutions
For the Base:
- Almond Flour (1 1/2 cups): Creates a crunchy, low-carb crust. Substitute with coconut flour (use 1/3 cup, as it’s more absorbent).
- Butter (1/2 cup, melted): Binds the base. You can use coconut oil for a dairy-free option.
- Sweetener (2 tbsp): Choose a powdered sweetener like erythritol or allulose for a smoother texture.
For the Filling:
- Cream Cheese (8 oz): The creamy star of the cheesecake layer. Use a dairy-free alternative if needed.
- Heavy Cream (1/2 cup): Adds richness. Coconut cream is a great substitute.
- Powdered Sweetener (1/3 cup): Keeps the filling keto-friendly.
- Vanilla Extract (1 tsp): Enhances the flavor beautifully.
For the Jelly Layer:
- Sugar-Free Jelly (1 packet): Pick your favorite flavor! Raspberry, strawberry, or lime work wonderfully.
- Boiling Water (1 cup): To dissolve the jelly mix.
- Cold Water (1 cup): Helps set the jelly layer without it being too firm.
How to Make Keto Jelly Slice
Step 1: Prepare the Base
- Combine almond flour, melted butter, and sweetener in a mixing bowl. Mix until it forms a sandy texture.
- Press the mixture firmly into the base of your prepared pan (lined with parchment paper for easy removal).
- Refrigerate for 20 minutes to set.
Step 2: Make the Filling
- In a mixing bowl, beat cream cheese until smooth.
- Add heavy cream, powdered sweetener, and vanilla extract. Continue mixing until creamy and well combined.
- Spread the filling evenly over the chilled base. Smooth the top with a spatula.
- Place the pan back in the refrigerator for 1 hour to set.
Step 3: Add the Jelly Layer
- Dissolve the sugar-free jelly mix in 1 cup of boiling water. Stir until completely dissolved.
- Add 1 cup of cold water to the mix and stir well. Let the jelly cool slightly (but don’t let it set).
- Gently pour the jelly over the cheesecake layer.
- Refrigerate for 2-3 hours or until the jelly is fully set.
Step 4: Slice and Serve
- Remove the slice from the pan and cut into squares.
- Serve chilled and enjoy!
Optional Additions
- Berries: Add fresh raspberries or blueberries on top of the cheesecake layer before pouring the jelly.
- Chocolate Drizzle: Drizzle melted sugar-free chocolate over the jelly for a decorative touch.
- Coconut Flakes: Sprinkle unsweetened coconut on the base for extra texture.
Serving Ideas
- As a Dessert: Serve this jelly slice as a sweet ending to any meal.
- For Parties: Cut into bite-sized squares for easy party treats.
- With Whipped Cream: Add a dollop of keto-friendly whipped cream for extra indulgence.
Storage Recommendations
- Refrigerator: Store slices in an airtight container for up to 5 days.
- Freezer: Freeze individual slices for up to 1 month. Thaw in the refrigerator before serving.
Common Questions and Helpful Answers
1. Can I make this dairy-free?
Yes! Use coconut cream and dairy-free cream cheese for a similar texture and taste.
2. Can I use a different sweetener?
Absolutely. Just make sure it’s powdered for a smoother consistency in the filling.
3. What if my jelly layer doesn’t set properly?
Ensure you allow the jelly to cool before pouring over the cheesecake layer. Also, follow the package instructions carefully.
Nutritional Breakdown (Per Slice)
- Calories: 200
- Fat: 18g
- Protein: 5g
- Net Carbs: 3g
- Total Carbs: 4g
Keto Jelly Slice Recipe
Equipment
- Square or Rectangular Pan
- Mixing Bowls
- Hand Mixer or Whisk
- Measuring cups and spoons
- Refrigerator
Ingredients
- Almond Flour: 1 1/2 cups
- Butter: 1/2 cup
- Sweetener: 2 tbsp
- Cream Cheese: 8 oz
- Heavy Cream: 1/2 cup
- Powdered Sweetener: 1/3 cup
- Vanilla Extract: 1 tsp
- Sugar-Free Jelly: 1 packet
Instructions
- Mix almond flour, melted butter, and sweetener in a bowl until combined.
- Press the mixture into a parchment-lined pan to form an even base. Chill for 20 minutes in the refrigerator.
- Beat cream cheese until smooth in a separate bowl.
- Add heavy cream, powdered sweetener, and vanilla extract to the cream cheese, mixing until creamy and well combined.
- Spread the cheesecake filling evenly over the chilled base and smooth the surface with a spatula. Chill for 1 hour.
- Dissolve sugar-free jelly mix in 1 cup of boiling water, stirring until completely dissolved.
- Add 1 cup of cold water to the jelly mixture and stir well. Allow to cool slightly.
- Pour the jelly layer gently over the cheesecake filling.
- Refrigerate for 2-3 hours or until the jelly is fully set.
- Remove the slice from the pan, cut into squares, and serve chilled.
Enjoyed This Recipe?
Drop a comment below with your feedback, follow us on Facebook for more keto recipes, and bookmark our site for all your low-carb favorite
Subscribe to our newsletter!


