This post may contains Amazon affiliate and other affiliate links. If you make a purchase through these links, I may earn a small commission at no extra cost to you. Your support helps me continue to provide quality content. I only recommend products I personally trust and believe will add value to your experience. For more details, please visit my Privacy Policy.
💫 Introduction
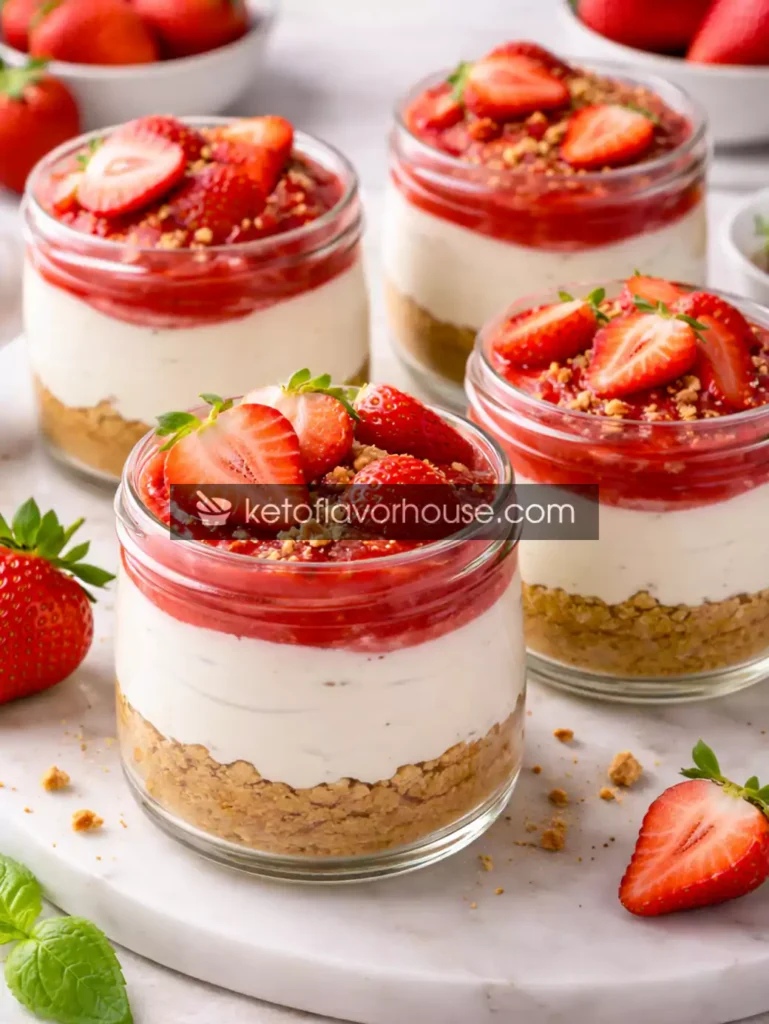
If you’ve ever wanted to enjoy a rich, creamy slice of cheesecake without the guilt, you’re in for a treat — literally. This High-Protein Cheesecake has all the luscious flavor and silky texture of a bakery-style dessert, but it’s secretly packed with protein, low in sugar, and designed to keep your fitness goals intact.
I created this recipe one Sunday evening after a week of intense gym sessions and meal prep. I had hit that point where all I wanted was something sweet — not just a spoon of Greek yogurt or a protein bar, but something that felt like dessert. Something I could sit down with, savor slowly, and feel good about afterward.
That’s when this high-protein cheesecake came to life.
Instead of cream cheese and sugar, I blended cottage cheese, Greek yogurt, and vanilla whey protein — the holy trinity of fitness desserts. When baked low and slow, it turns into a smooth, custard-like cheesecake that’s almost impossible to believe is healthy. One slice gives you over 20g of protein, barely any sugar, and enough creamy satisfaction to kill any craving dead in its tracks.
This isn’t “diet food.” This is smart indulgence.
Whether you’re following keto, tracking macros, or just trying to balance fitness with flavor, this High-Protein Cheesecake is your go-to dessert.
💖 Why You’ll Love This Recipe
- 🍰 Creamy & Indulgent – All the flavor of classic cheesecake without the sugar crash.
- 💪 High in Protein – Over 20g per slice, perfect for muscle recovery and satiety.
- 🍯 No Sugar Added – Sweetened naturally with your favorite low-carb sweetener.
- 🕒 Easy to Make – Simple, blend-and-bake recipe — no fancy skills needed.
- 🧊 Meal-Prep Friendly – Keeps well in the fridge for up to 5 days.
- 🥣 Customizable Flavors – Add cocoa, berries, or caramel for endless variations.
👩🍳 My Personal Experience
The first time I made this cheesecake, I was skeptical. Cottage cheese? In cheesecake? That sounded like a disaster waiting to happen. But once I took my first bite — smooth, slightly tangy, perfectly sweet — I was blown away.
It didn’t taste like “healthy food.” It tasted like something I shouldn’t be allowed to eat while tracking macros.
From that day on, I started experimenting — chocolate, lemon, berry swirl, even pumpkin spice — and every version worked like a charm. The trick is all in the blending and baking: smooth batter, low temperature, and a gentle chill afterward to firm it up into that signature cheesecake texture.
Now, this recipe has become my weekend ritual. I bake it Sunday night, slice it into portions, and store it for the week. It’s my post-workout dessert, my late-night treat, and sometimes even breakfast (yes, cheesecake for breakfast — no shame here!).
If you’ve ever struggled to satisfy your sweet tooth without falling off track, this recipe is a game changer.
🧰 Required Equipment
Blender or Food Processor
For blending cottage cheese and Greek yogurt into a silky-smooth base. This is the secret to a perfect texture.
Mixing Bowl
To combine the wet and dry ingredients evenly.
Measuring Cups & Spoons
Precision matters for protein powder and sweetener.
Springform Pan (6 or 7 inch)
The best for cheesecakes — easy release and professional presentation.
Oven
Bakes the cheesecake slowly and evenly for that creamy finish.
Cooling Rack
Prevents condensation and sogginess as the cheesecake cools.
Parchment Paper
Makes removing the cheesecake easier and cleaner.
🧁 Ingredients & Substitutions
Servings: 6 | Prep Time: 10 mins | Cook Time: 40 mins | Total Time: 50 mins
| Ingredient | Amount | Role / Nutrition Purpose |
|---|---|---|
| Low-Fat Cottage Cheese | 1 cup (225g) | Protein base, creamy texture, replaces heavy cream cheese. |
| Greek Yogurt (2% or fat-free) | ½ cup (120g) | Adds moisture, protein, and tang. |
| Vanilla Whey Protein Powder | 1 scoop (25–30g) | Sweetness, flavor, and major protein boost. |
| Eggs | 2 large | Binding and richness. |
| Sweetener (erythritol, stevia, or monk fruit) | ¼ cup | Keeps it sugar-free and balanced. |
| Vanilla Extract | 1 tsp | Classic cheesecake aroma. |
| Lemon Juice | 1 tbsp | Enhances tang and balances sweetness. |
| Almond Flour (optional crust) | ½ cup | Adds crunch and fiber. |
| Butter (for crust) | 1 tbsp, melted | Holds crust together. |
🔄 Substitutions
- Cottage Cheese: Replace with ricotta for a milder flavor.
- Greek Yogurt: Use Skyr or quark for extra thickness.
- Protein Powder: Any flavor works — chocolate, caramel, or strawberry for variety.
- Sweetener: Allulose creates the smoothest texture, while stevia gives a sharper sweetness.
- Crust-Free Option: Skip the almond flour entirely for a lower-calorie crustless cheesecake.
💡 Pro tip: If using unflavored protein powder, add an extra ½ tsp of vanilla extract and a few drops of liquid stevia for flavor balance.
🥣 How to Make High-Protein Cheesecake
- Prepare the oven and pan.
Preheat your oven to 325°F (165°C). Line the bottom of a 6-inch springform pan with parchment paper. If making a crust, mix ½ cup almond flour with 1 tablespoon melted butter and press it into the bottom of the pan. Bake for 8 minutes, then set aside to cool. - Blend the creamy base.
In a blender or food processor, combine cottage cheese, Greek yogurt, vanilla extract, lemon juice, and sweetener. Blend for 30–60 seconds until smooth and creamy, scraping down the sides as needed. The texture should resemble thick pancake batter — no lumps! - Add the protein and eggs.
Add in the protein powder and eggs, blending again just until fully incorporated. Don’t overmix, or too much air will create cracks during baking. - Pour and smooth.
Pour the batter into the prepared pan, smoothing the top with a spatula for even baking. Tap lightly on the counter to release any air bubbles. - Bake gently.
Bake at 325°F for 35–40 minutes, or until the center is mostly set but still slightly wobbly. The edges should be firm and light golden. Remember, cheesecake continues to set as it cools. - Cool gradually.
Turn off the oven, crack the door slightly, and let the cheesecake cool inside for 30 minutes. This prevents cracks and helps maintain a silky texture. - Chill overnight.
Transfer the cheesecake to the fridge, cover loosely, and chill for at least 6 hours (overnight is best). This step transforms it from soft custard to rich, sliceable perfection. - Slice and serve.
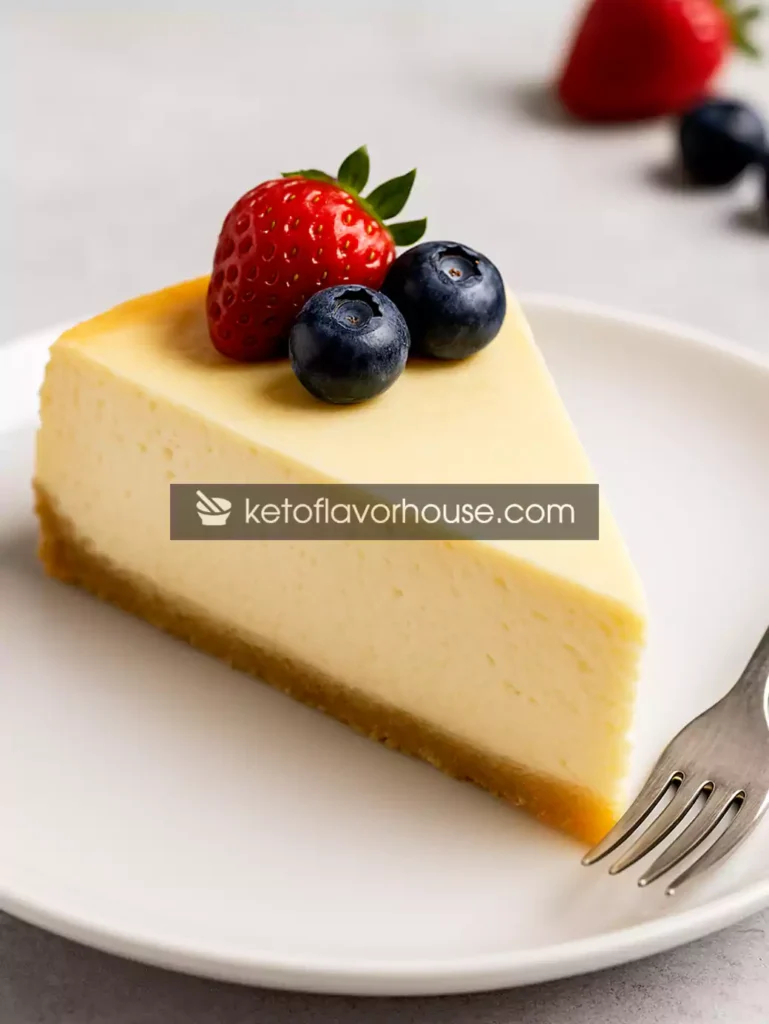
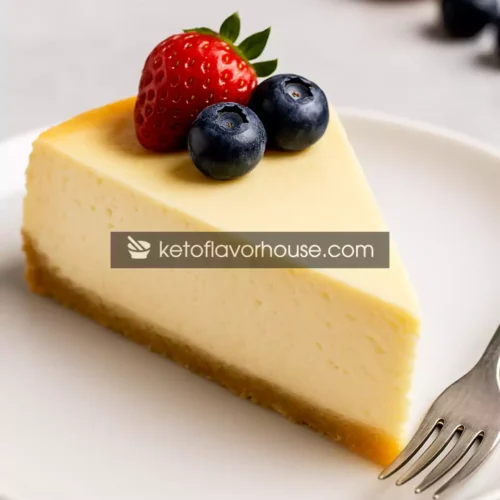
Run a knife around the edge to loosen, then release from the springform pan. Slice with a warm knife for clean cuts. Top with sugar-free syrup, berries, or protein whipped cream — and enjoy!
❌ Common Mistakes to Avoid
- Overbaking – Cheesecake should wobble slightly in the center. Overbaking makes it dry.
- Skipping the chill – It needs time to firm up; rushing this step ruins texture.
- Overmixing – Too much air leads to cracks. Blend until just combined.
- Wrong protein powder – Use whey or casein; plant protein makes it grainy.
- Not scraping blender sides – Missed clumps will ruin that silky consistency.
💡 Pro Tips for Best Results
- Use room-temperature eggs for smoother blending.
- Blend cottage cheese well — texture is key here.
- Bake low and slow. Cheesecake doesn’t like high heat.
- Let it rest in the oven — no sudden temperature changes.
- For a lighter version, use half the yolks and more whites.
🧬 High-Protein Nutrition & Strategy
Each serving offers an impressive 190–220 calories and 20–23g protein, depending on your ingredients.
This dessert isn’t just satisfying — it’s functional. The protein from whey, yogurt, and eggs supports muscle recovery, keeps you full, and prevents late-night snacking. The low-carb, sugar-free composition ensures stable blood sugar levels, making it perfect for:
- Post-workout dessert 🍽️
- Evening snack to prevent cravings 🌙
- High-protein breakfast treat ☀️
Why it works:
- Cottage cheese + whey = full amino acid profile for muscle recovery.
- Greek yogurt = gut health + creaminess.
- Low-carb sweetener = sweetness without insulin spike.
This is what I like to call a fitness dessert that loves you back.
🍫 Variations You Can Try
- Chocolate Protein Cheesecake – Add 2 tbsp unsweetened cocoa powder and chocolate whey.
- Lemon Cheesecake – Add zest from one lemon and a squeeze of juice.
- Berry Swirl Cheesecake – Swirl in sugar-free berry puree before baking.
- Salted Caramel Cheesecake – Add 1 tbsp sugar-free caramel syrup to batter.
- Peanut Butter Protein Cheesecake – Stir in 1 tbsp natural peanut butter for a nutty twist.
Each flavor variation slightly changes the macros, but all stay around 20–24g protein per slice.
🥄 Optional Additions
- 1 tbsp collagen peptides (for extra protein + gut health)
- 1 tbsp coconut flour (for thicker texture)
- Dash of cinnamon or nutmeg (for warmth)
- Sugar-free chocolate chips on top (for indulgence)
🍽 Serving Ideas
- Serve chilled with fresh berries and a drizzle of sugar-free maple syrup.
- Top with whipped Greek yogurt for extra protein.
- Crumble one slice into a jar for a “protein cheesecake parfait.”
- Pair with coffee for a post-dinner treat or breakfast-on-the-go.
🧊 Storage Recommendations
- Fridge: Store in an airtight container for up to 5 days.
- Freezer: Slice and freeze individually; thaw overnight before eating.
- Meal Prep Tip: Wrap slices in parchment and store in airtight containers for easy portion control.
❓ Frequently Asked Questions
1. Can I make this no-bake?
Yes! Just skip the eggs and bake step — add 1 tbsp gelatin to the blended mix and chill overnight.
2. Can I use plant-based protein?
You can, but texture will be less creamy. Pea protein gives the best results.
3. Is this cheesecake keto-friendly?
Absolutely! With almond flour crust and low-carb sweetener, it’s 100% keto-approved.
4. How do I prevent cracks?
Don’t overbake or mix. Cool slowly with the oven door cracked open.
5. Can I meal prep this?
Yes, store slices in the fridge or freezer for grab-and-go snacks.
6. What’s the best protein powder for cheesecake?
Whey isolate or casein blend — smooth, creamy, and bakes beautifully.
7. Can I use nonfat yogurt?
Yes, but full or 2% gives the best creamy texture.
📊 Nutritional Breakdown (Per Serving)
| Calories | Protein | Fat | Carbs | Fiber | Net Carbs | Sugar | Sodium |
|---|---|---|---|---|---|---|---|
| 210 kcal | 22 g | 9 g | 6 g | 1 g | 5 g | 2 g | 160 mg |
📌 Recipe Snapshot
Prep Time: 10 minutes
Cook Time: 40 minutes
Total Time: 50 minutes + chilling
Course: Dessert / Snack
Cuisine: High-Protein / Keto-Friendly
Servings: 6
Calories per Serving: 210
Protein per Serving: 22 g
Every bite of this High-Protein Cheesecake is creamy, tangy, and completely guilt-free. It’s more than a dessert — it’s a reward for your discipline, a reminder that healthy eating can feel indulgent, and a treat that actually fuels your goals.
High-Protein Cheesecake
Ingredients
- 1 cup cottage cheese
- ½ cup Greek yogurt
- 1 scoop vanilla protein powder
- 2 eggs
- ¼ cup sweetener
- 1 tsp vanilla extract
- 1 tbsp lemon juice
Instructions
- Begin by preheating your oven to 325°F (165°C). This slightly lower temperature helps the cheesecake bake gently and evenly, preventing cracks and ensuring a silky-smooth texture. While the oven heats, line the bottom of a 6-inch springform pan with parchment paper and lightly grease the sides with a touch of butter or nonstick spray. If you want a crust, mix ½ cup of almond flour with 1 tablespoon of melted butter, press it into the bottom of the pan, and pre-bake for 8 minutes until golden. Allow it to cool while preparing the filling.
- In a blender or food processor, add 1 cup of low-fat cottage cheese, ½ cup of Greek yogurt, ¼ cup of sweetener (like erythritol or monk fruit), 1 teaspoon of vanilla extract, and 1 tablespoon of lemon juice. Blend on medium speed for 45–60 seconds, stopping occasionally to scrape down the sides with a spatula. Continue blending until the mixture is completely smooth and creamy with no visible lumps — the texture should look like thick pancake batter. This step is crucial because any graininess from the cottage cheese will affect the final consistency of your cheesecake.
- Add 1 scoop (about 25–30g) of vanilla whey protein powder and 2 large eggs directly into the blender. Blend again on low speed just until the ingredients are combined, about 20–25 seconds. Avoid overmixing, as too much air in the batter can create cracks during baking. You want everything to look well incorporated but still dense and creamy. If the mixture seems too thick, you can add a tablespoon of milk or water to help it blend smoothly.
- Pour the cheesecake batter into the prepared springform pan. Use a spatula to spread it evenly and smooth the surface so it bakes flat and uniform. Lightly tap the pan on the counter two or three times to remove any trapped air bubbles — this small step helps prevent air pockets inside your cheesecake.
- Place the pan on the middle rack of your preheated oven and bake for 35–40 minutes. The edges should look firm and slightly golden, while the center remains just a bit wobbly when you gently shake the pan — that’s how you know it’s done. If you prefer a creamier texture, stop baking as soon as the center jiggles slightly; if you like it more firm, give it an extra 2–3 minutes.
- Once baked, turn off the oven and slightly crack the door open. Let the cheesecake cool inside the oven for 30 minutes. This gradual cooling process prevents the top from cracking and helps it settle into a silky, dense texture. After 30 minutes, remove the pan and let it reach room temperature before covering it lightly with plastic wrap.
- Transfer the cheesecake to the refrigerator and let it chill for at least 6 hours, or ideally overnight. This resting time allows the flavors to develop and the texture to firm up completely into that classic creamy, sliceable cheesecake consistency.
- When ready to serve, run a thin knife around the edges to loosen the sides, then release the springform pan. Slice using a sharp knife dipped in warm water for clean, smooth cuts. Serve your high-protein cheesecake chilled, topped with a few fresh berries or a drizzle of sugar-free syrup for extra flavor. Every bite should be cool, creamy, and perfectly balanced between sweetness and tang — a guilt-free indulgence that feels like dessert and fuels your goals at the same time.