This post may contains Amazon affiliate and other affiliate links. If you make a purchase through these links, I may earn a small commission at no extra cost to you. Your support helps me continue to provide quality content. I only recommend products I personally trust and believe will add value to your experience. For more details, please visit my Privacy Policy.
Introduction
If you’ve ever craved a sweet, indulgent treat that doesn’t derail your keto journey, this recipe for Homemade Keto Musketeer Candy Bars is for you! These bars deliver the same creamy, chocolatey satisfaction you’d expect from their sugar-laden counterpart but are entirely keto-friendly. Whether you’re looking for a decadent snack, a party treat, or a dessert to keep you on track, these candy bars hit the spot. Packed with flavor, low in carbs, and easy to make, they’re a game-changer for anyone on a low-carb lifestyle.
If you’re loving keto-friendly recipes like this, why not make cooking even easier? With a Keto Instant Pot Recipes Book, you’ll have quick, delicious, and low-carb meals at your fingertips—perfect for busy days! Take the guesswork out of keto cooking and enjoy effortless, flavorful dishes. Grab your copy today!

Why You’ll Love This Recipe
- Keto-Friendly Sweetness: A guilt-free way to satisfy your chocolate cravings.
- Simple Ingredients: Made with common keto pantry staples.
- Customizable: You can tweak the recipe to fit your flavor preferences.
- No Baking Required: Perfect for busy days or when you want a quick dessert.
- Great for Sharing: Impress your family and friends with these irresistible treats.
My Personal Experience
Making these candy bars was such a fun and rewarding process! The first time I tried the recipe, I was amazed at how close they tasted to the real thing. I tweaked the sweetness to suit my palate, and the creamy filling paired with the rich chocolate coating was heavenly. Sharing these with friends and seeing their surprised faces when I told them they were keto was the cherry on top. Trust me; these will become a staple in your keto dessert rotation.
Required Equipment
Mixing Bowls: You’ll need a couple of mixing bowls to make this recipe come together seamlessly. I prefer having at least two different sizes—one for the creamy filling and another for the melted chocolate. It keeps the process smooth and saves you from constant washing in between steps. Trust me, a good set of mixing bowls makes all the difference when you’re multitasking!
Electric Hand Mixer: This is an absolute lifesaver for whipping up the creamy filling. It makes the filling light, fluffy, and perfectly blended—something that’s hard to achieve by hand. When I first tried this recipe, I thought I could do without it, but I quickly realized that the mixer gives the filling that professional texture we all love.
Silicone Molds or a Baking Dish: These are key for shaping your candy bars. Silicone molds are my go-to because they make removing the bars so effortless—no sticking or breaking! If you don’t have molds, a baking dish works too; just line it with parchment paper so the bars are easy to lift out. I’ve tried both ways, and while molds are more convenient, the dish gives a nice rustic charm.
Microwave or Double Boiler: For melting the chocolate coating, you can go the quick route with a microwave or take your time with a double boiler. I personally love using a double boiler because it gives me more control over the heat, ensuring the chocolate doesn’t scorch or seize. But when I’m short on time, the microwave is a game-changer—it melts the chocolate in seconds!
Spatula: Don’t underestimate the power of a good spatula! It’s perfect for scraping every last bit of the creamy filling and chocolate coating. I always keep one handy, and it makes the process so much cleaner. Plus, no one wants to waste even a drop of that deliciousness!
Refrigerator or Freezer: Setting the candy bars is crucial, and this is where your fridge or freezer comes in. The cold helps the filling firm up and keeps the chocolate coating intact. I like using the freezer if I’m in a hurry—it speeds things up and gives the bars that perfect snap when you bite into them.
Ingredients & Substitutions
- Heavy Whipping Cream (1 cup): For that light, fluffy filling. Substitute with coconut cream for a dairy-free option.
- Low-Carb Sweetener (1/2 cup): Adds sweetness without the carbs. Monk fruit, erythritol, or allulose work well.
- Unsweetened Cocoa Powder (2 tbsp): Gives a chocolatey depth to the filling. For a milder flavor, use a blend of cocoa and carob powder.
- Sugar-Free Chocolate Chips (1 cup): Perfect for the outer coating. You can use a high-quality keto-friendly chocolate bar chopped into small pieces.
- Coconut Oil (1 tbsp): Helps the chocolate melt smoothly and sets with a glossy finish. Butter can be used as an alternative.
- Vanilla Extract (1 tsp): Enhances the overall flavor. For a twist, try almond or peppermint extract.
How to Make Homemade Keto Musketeer Candy Bars
- Prepare the Filling:
- In a mixing bowl, whip the heavy cream using an electric mixer until soft peaks form.
- Gradually add the sweetener and cocoa powder, mixing until the filling is light and fluffy.
- Shape the Bars:
- Spoon the mixture into silicone molds or a parchment-lined baking dish, pressing down gently to remove air pockets. Smooth the surface with a spatula.
- Freeze for at least 1 hour or until firm.
- Melt the Chocolate:
- Combine chocolate chips and coconut oil in a microwave-safe bowl. Heat in 30-second intervals, stirring until smooth. Alternatively, use a double boiler for melting.
- Coat the Bars:
- Remove the frozen filling from molds or dish and cut into bar shapes if needed.
- Dip each bar into the melted chocolate, ensuring an even coat. Place on a parchment-lined tray.
- Refrigerate or freeze until the chocolate sets completely.
Tips for This Recipe
- Chill the whisk and bowl before whipping cream for better results.
- Work quickly when dipping the bars to prevent the filling from softening.
- Add a sprinkle of sea salt on top of the chocolate coating for a gourmet touch.
Optional Additions
- Chopped nuts for added crunch.
- A drizzle of sugar-free caramel for extra indulgence.
- Sprinkle of shredded coconut for a tropical twist.
Serving Ideas
- Serve chilled as a dessert after dinner.
- Pair with a hot cup of keto-friendly coffee or tea.
- Cut into smaller pieces for a party platter.
Storage Recommendation
- Refrigeration: Store in an airtight container for up to one week.
- Freezing: Extend shelf life by freezing for up to three months. Thaw in the fridge before serving.
Frequently Asked Questions
Can I make these dairy-free?
Yes, substitute heavy cream with coconut cream and use dairy-free chocolate.
What’s the best sweetener to use?
Monk fruit or erythritol works best for a smooth texture and taste.
Why did my chocolate crack?
This can happen if the filling is too cold. Let it sit for a minute before dipping.
Nutritional Breakdown (Per Serving)
- Total Carbs: 5g
- Net Carbs: 2g
- Fat: 15g
- Protein: 2g
- Calories: 170
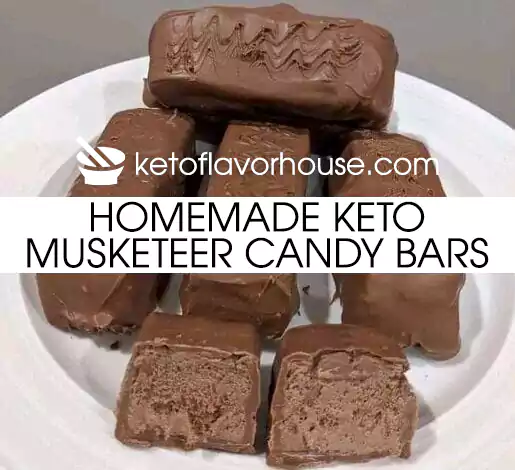
Homemade Keto Musketeer Candy Bars Recipe
Equipment
- Mixing Bowls
- Electric Hand Mixer
- Silicone Molds or a Baking Dish
- Microwave or Double Boiler
- Spatula
- Refrigerator or Freezer
Ingredients
- 1 cup heavy whipping cream
- 1/2 cup low-carb sweetener
- 2 tbsp unsweetened cocoa powder
- 1 cup sugar-free chocolate chips
- 1 tbsp coconut oil
- 1 tsp vanilla extract
Instructions
- Whip the heavy cream to soft peaks.
- Gradually mix in sweetener and cocoa powder.
- Press mixture into molds or dish; freeze for 1 hour.
- Melt chocolate and coconut oil until smooth.
- Dip frozen filling into melted chocolate.
- Refrigerate until chocolate sets.
I’m so excited to hear how this recipe turned out for you! 😊 Don’t forget to follow us on Instagram and Facebook for daily keto inspiration, tasty recipes, and all the support you need to crush your goals. Want to make keto cooking even easier? Get a Keto Instant Pot Recipes Book filled with quick, delicious, and low-carb meals—perfect for busy days! Grab your copy today! 🚀

Subscribe to our newsletter!



I made it exactly as written but it didn’t freeze solid enough to make bars so I made a “pie” with melted chocolate on top. Delicious!. Filling was light & fluffy.