This post may contains Amazon affiliate and other affiliate links. If you make a purchase through these links, I may earn a small commission at no extra cost to you. Your support helps me continue to provide quality content. I only recommend products I personally trust and believe will add value to your experience. For more details, please visit my Privacy Policy.
Introduction
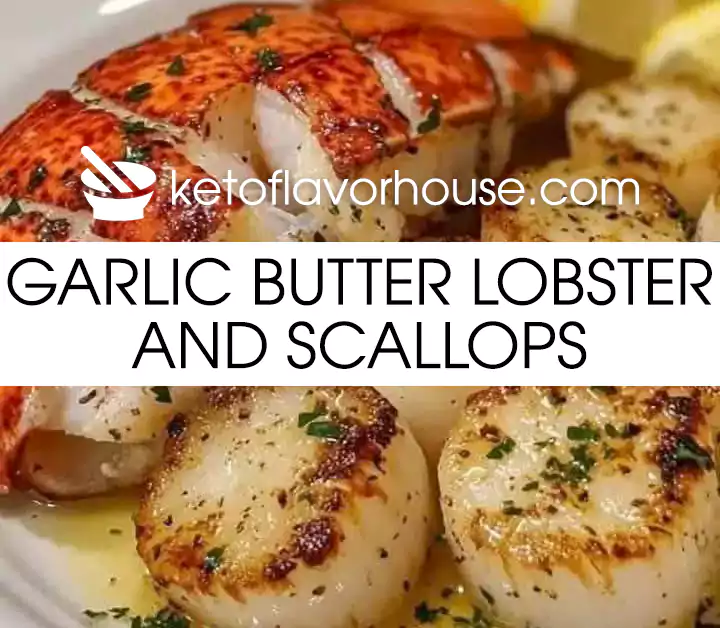
There’s something undeniably luxurious about combining tender lobster and juicy scallops, both infused with a rich garlic butter sauce. This dish is a showstopper, perfect for romantic dinners, celebratory meals, or anytime you want to treat yourself to a little indulgence. The combination of succulent seafood, fragrant garlic, and creamy butter creates a symphony of flavors that feels like fine dining at home. Whether you’re an experienced cook or just starting, this recipe is approachable yet impressive, delivering restaurant-quality results.
Why You’ll Love Garlic Butter Lobster and Scallops
- Elegant Yet Easy: You don’t need professional culinary skills to make this masterpiece. Simple techniques yield incredible results.
- Restaurant-Quality at Home: Why spend a fortune dining out when you can make this exquisite dish in your own kitchen?
- Versatile Pairings: This recipe pairs beautifully with a wide range of sides, from roasted vegetables to creamy risottos.
- Quick Cooking Time: Despite its fancy reputation, this dish comes together in under 30 minutes, making it perfect for busy weeknights or last-minute hosting.
- Rich and Flavorful: The garlic butter sauce complements the delicate sweetness of the seafood, creating a perfectly balanced dish.
My Personal Experience
When I first made this recipe, I was hosting a small dinner party for close friends. I wanted to impress them without spending hours in the kitchen, and this dish did just that. The aroma of garlic butter sizzling on the stove filled the house, creating an anticipation that was hard to ignore. Watching their faces light up with the first bite made every moment of prep worth it. The best part? I didn’t feel overwhelmed cooking it. With simple ingredients and a straightforward process, this recipe has become my go-to for special occasions.
Required Equipment
- Non-Stick Skillet or Cast-Iron Pan
A high-quality skillet is essential to sear the lobster and scallops to perfection. A good pan ensures even heat distribution, giving the seafood that gorgeous golden crust. Personally, I’ve found that a non-stick skillet makes flipping delicate scallops a breeze, while cast iron locks in incredible flavor. - Tongs
Tongs are your best friend for turning lobster tails and scallops without breaking their delicate structure. Choose a pair with a soft grip for comfortable handling. - Small Saucepan
A small saucepan is perfect for melting the butter and infusing it with garlic and herbs. This step is crucial for creating that decadent sauce that ties the dish together. - Fish Spatula
This thin, flexible spatula makes it easy to handle scallops and lobster tails without tearing them. If you’ve ever struggled flipping delicate seafood, you’ll appreciate this tool. - Sharp Knife and Cutting Board
For trimming and prepping the seafood, a sharp knife is essential. It ensures clean cuts and keeps the texture of the scallops and lobster intact. - Basting Brush
To coat the seafood evenly with garlic butter, a basting brush is incredibly helpful. It allows you to layer on the flavor while keeping things neat.
Ingredients & Substitutions
- 4 Lobster Tails (4–6 oz each)
These are the star of the dish. If unavailable, you can substitute with whole lobster or even langoustines. - 12 Large Scallops
Look for dry-packed scallops for the best flavor and sear. Frozen scallops can be used if thawed and patted dry. - 4 tbsp Unsalted Butter
Unsalted butter lets you control the saltiness. You can substitute with clarified butter for a nuttier flavor. - 4 Garlic Cloves (minced)
Fresh garlic is a must for that robust flavor. Pre-minced garlic works in a pinch but fresh is always better. - 2 tbsp Olive Oil
Helps to sear the seafood to perfection without burning the butter. Avocado oil can be used as an alternative. - Juice of 1 Lemon
Adds brightness to the dish. Lime juice works as a substitute, though it has a sharper taste. - 1 tsp Paprika
Provides subtle warmth and color. Smoked paprika can be used for a deeper flavor. - Salt and Black Pepper (to taste)
Enhances the natural flavors of the seafood. Adjust according to preference. - Fresh Parsley (chopped, for garnish)
Adds a pop of color and freshness. Optional but recommended.
How to Make Garlic Butter Lobster and Scallops
- Prep the Seafood
- Thaw the scallops and lobster tails if frozen. Pat them dry with a paper towel to ensure proper searing.
- Using kitchen shears, cut through the top of the lobster shell lengthwise. Gently lift the meat, keeping it attached at the base, and rest it on the shell.
- Sear the Lobster Tails
- Heat 1 tablespoon of olive oil in a skillet over medium heat.
- Place the lobster tails meat-side down and cook for 3-4 minutes until slightly golden. Flip and cook for another 2-3 minutes. Remove and set aside.
- Sear the Scallops
- Add another tablespoon of olive oil to the skillet. Season the scallops with salt, pepper, and paprika.
- Place the scallops in the skillet, leaving space between them. Sear for 2 minutes on each side until golden brown. Remove and set aside.
- Make the Garlic Butter Sauce
- In the same skillet, reduce heat to low. Melt butter and add minced garlic. Sauté for 1-2 minutes until fragrant.
- Stir in lemon juice and parsley, then season with salt and pepper.
- Combine and Serve
- Return the lobster and scallops to the skillet, spooning the garlic butter sauce over them. Allow to warm through for 1-2 minutes.
Tips for This Recipe
- Use fresh seafood for the best flavor and texture.
- Pat the scallops completely dry to achieve a perfect sear.
- Adjust the garlic amount based on your preference for bold flavors.
Optional Additions
- Sprinkle Parmesan cheese over the lobster for a rich, cheesy finish.
- Add a pinch of red pepper flakes for a spicy kick.
Serving Ideas
- Pair with creamy mashed potatoes or roasted asparagus for a complete meal.
- Serve alongside crusty bread to soak up the garlic butter sauce.
Storage Recommendations
- Store leftovers in an airtight container in the refrigerator for up to 2 days.
- Reheat gently in a skillet over low heat with a bit of butter to maintain the texture. Avoid microwaving as it can overcook the seafood.
Frequently Asked Questions
Can I use frozen seafood?
Yes, but make sure to thaw it completely and pat it dry before cooking.
What’s the best way to sear scallops?
Ensure the scallops are dry, the skillet is hot, and avoid overcrowding the pan.
Can I substitute butter?
You can use ghee or a vegan butter alternative for similar results.
Nutritional Breakdown (Per Serving)
- Calories: 320
- Protein: 28g
- Fats: 22g
- Carbs: 2g
- Fiber: 0g
- Net Carbs: 2g

Garlic Butter Lobster and Scallops Recipe
Ingredients
- 4 Lobster Tails
- 12 Large Scallops
- 4 tbsp Butter
- 4 Garlic Cloves
- 2 tbsp Olive Oil
- 1 Lemon
- 1 tsp Paprika
- Salt and Pepper
Instructions
- Thaw seafood if frozen and pat dry.
- Prepare lobster tails by cutting the shell and exposing the meat.
- Heat oil in a skillet, sear lobster tails, and set aside.
- Sear scallops on both sides until golden brown and set aside.
- Melt butter, sauté garlic, and stir in lemon juice and parsley.
- Combine seafood with sauce, baste, and serve warm.
If you enjoyed this recipe or gave it a try, I’d love to hear your feedback! Your thoughts and suggestions mean a lot and help make these recipes even better. Share your experience in the comments below, and don’t forget to let me know how it turned out for you. Happy cooking! 😊
Subscribe to our newsletter!

