This post may contains Amazon affiliate and other affiliate links. If you make a purchase through these links, I may earn a small commission at no extra cost to you. Your support helps me continue to provide quality content. I only recommend products I personally trust and believe will add value to your experience. For more details, please visit my Privacy Policy.
🍪 Introduction
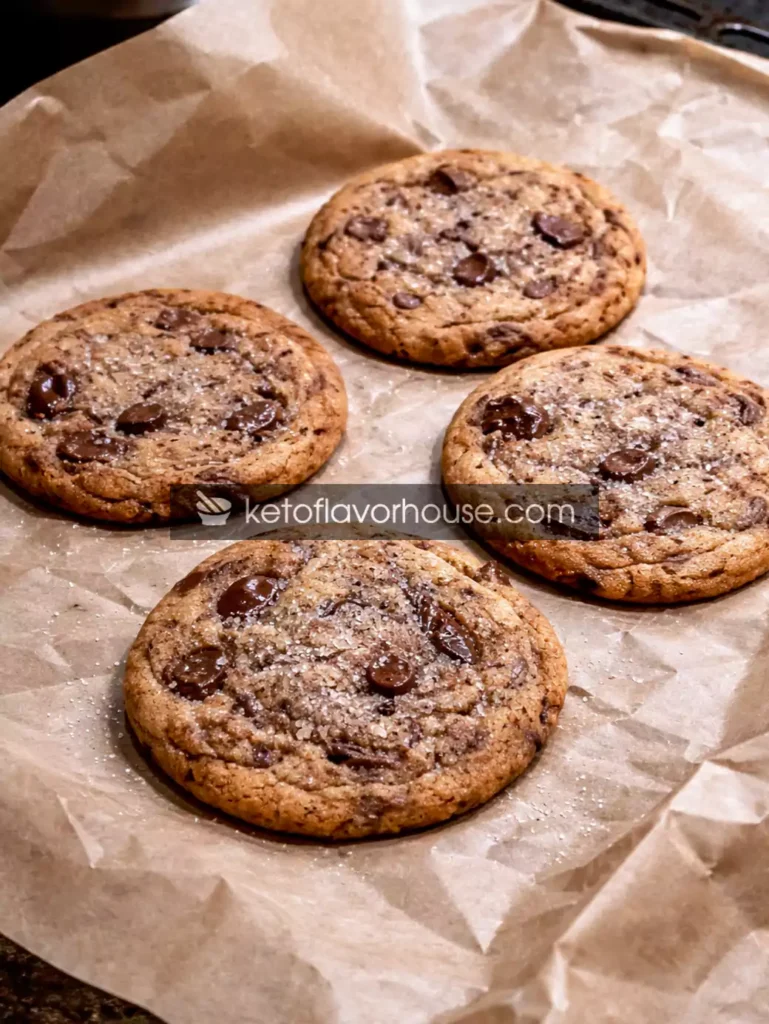
There’s something almost nostalgic about the smell of cookies baking in the oven. It takes you back instantly—late evenings in the kitchen, sneaking spoonfuls of dough, waiting impatiently for that first warm bite. But if you’ve been trying to follow a high-protein lifestyle, you probably know that classic cookies don’t exactly fit into your routine. That’s exactly why I created these High Protein Brown Butter Chocolate Chunk Cookies (Soft Centers, Crispy Edges & Bakery Style)—a recipe that lets you enjoy that same comforting experience, but smarter.
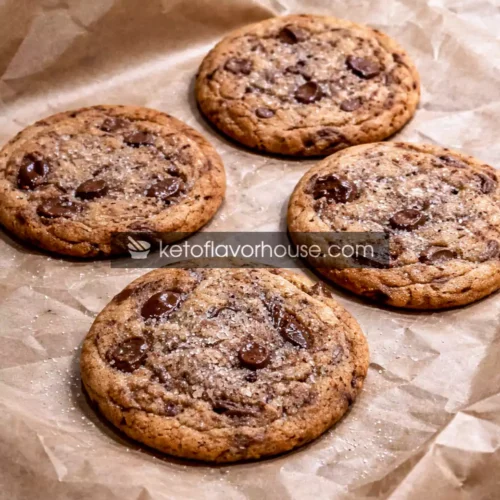
These High Protein Brown Butter Chocolate Chunk Cookies are everything a cookie should be: rich, buttery, slightly crisp on the edges, and irresistibly soft in the center with gooey chocolate pools. But unlike traditional versions, they come with a protein boost that actually supports your goals—whether that’s muscle recovery, staying full longer, or simply balancing your daily nutrition.
What makes this recipe special isn’t just the added protein. It’s the combination of deep, nutty brown butter flavor, real chopped chocolate chunks, and a carefully balanced structure that avoids the dryness most protein desserts suffer from. This is not a “healthy alternative” that feels like a compromise—this is a bakery-style upgrade.
If you’ve ever struggled to choose between enjoying dessert and sticking to your nutrition plan, this recipe is going to change that completely.
✨ Why You’ll Love This Recipe
- 🍪 Soft Centers + Crispy Edges – Perfect bakery-style texture
- 🍫 Gooey Chocolate Chunks – Melted pools, not dry chips
- 💪 High Protein Boost – Supports muscle recovery and satiety
- 🧈 Brown Butter Flavor – Deep, rich, nutty taste
- ⏱️ No Complicated Steps – Simple and beginner-friendly
- 📦 Meal Prep Friendly – Bake once, enjoy all week
- 👨👩👧 Family Approved – Tastes like real cookies, not “diet food”
❤️ My Personal Experience
I still remember the first time I browned butter for cookies. I thought I had ruined it. The smell was so intense—nutty, almost caramel-like—that I assumed I had gone too far. But when those cookies came out of the oven, everything changed.
That deep flavor? It transformed a basic cookie into something that felt… premium.
Later, when I shifted into a high-protein lifestyle, I tried to recreate that same experience. And honestly, it wasn’t easy. My early attempts were disappointing—dry cookies, strange textures, and that unmistakable “protein powder taste.”
But I kept experimenting.
I adjusted ratios. Tried different protein blends. Played with moisture levels. And finally, this version came together.
The moment I broke one open and saw the melted chocolate stretching through the center, I knew I had nailed it.
Now, these cookies are a regular part of my routine. They satisfy cravings, keep me full, and make staying consistent feel effortless.
🛠️ Required Equipment
Mixing Bowl
A deep mixing bowl is essential for combining ingredients smoothly. It gives you enough space to mix thick dough without making a mess.
Saucepan
You’ll need this for browning butter. A light-colored pan is ideal so you can clearly see when the butter reaches that perfect golden stage.
Whisk or Electric Mixer
A whisk works fine, but an electric mixer helps create a smoother dough, especially when incorporating protein powder.
Baking Tray
A sturdy tray ensures even baking. Always line it with parchment paper to prevent sticking.
Cookie Scoop
This helps maintain uniform cookie sizes, ensuring even baking and a professional look.
🥣 Ingredients & Substitutions
Main Ingredients
- Butter (200g, browned)
Provides richness and that signature nutty flavor. - Brown Sugar (100g)
Adds moisture and chewiness. - White Sugar (80g)
Creates crisp edges. - Eggs (2)
Bind the dough and contribute protein. - Vanilla Extract (1 tbsp)
Enhances flavor depth. - All-Purpose Flour (250g)
Provides structure. - Protein Powder (100g, whey-casein blend)
Boosts protein without ruining texture. - Baking Soda (1 tsp)
Helps cookies spread. - Baking Powder (½ tsp)
Adds lightness. - Milk (2–4 tbsp)
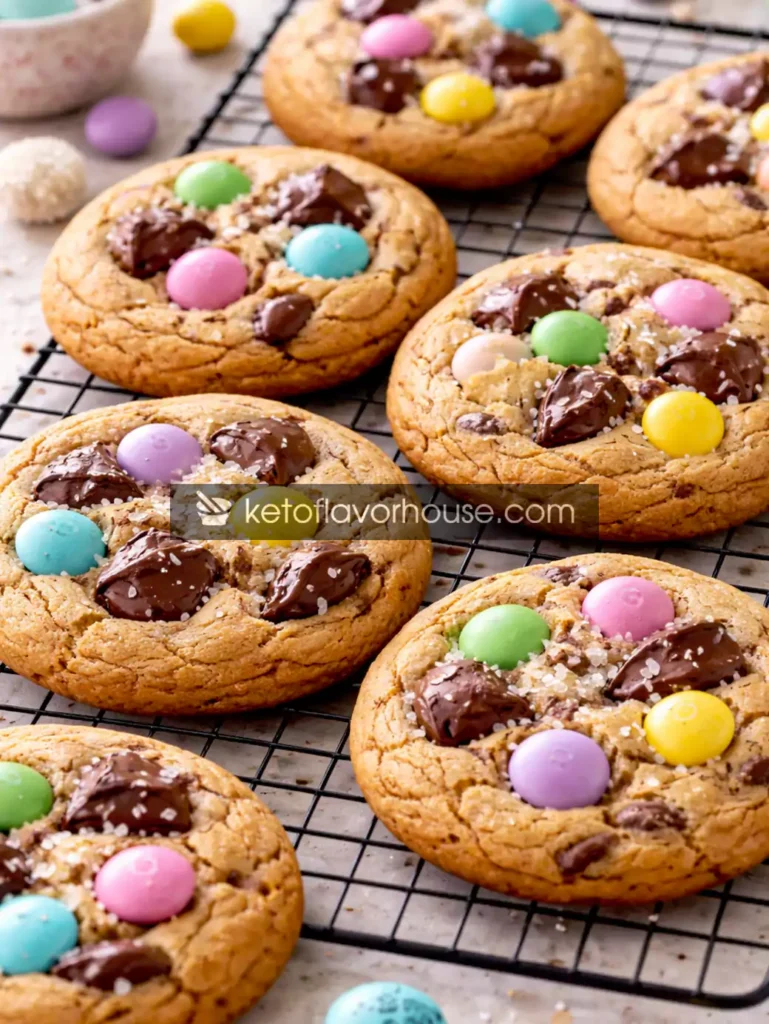
Restores moisture lost from protein powder. - Chocolate Chunks (200g mixed milk & dark)
Creates gooey, melted pockets.
🔄 Substitutions
- Greek yogurt instead of part of butter
- Plant-based protein powder (denser texture)
- Erythritol for lower carbs
- Oat flour for added fiber
👨🍳 How to Make High Protein Brown Butter Chocolate Chunk Cookies
Step 1: Brown the Butter
Heat butter until golden and nutty. Let it cool completely.
👉 Tip: Burnt butter = bitter cookies.
Step 2: Mix Wet Ingredients
Combine butter, sugars, and vanilla. Add eggs and mix until glossy.
Step 3: Combine Dry Ingredients
Mix flour, protein powder, baking soda, and baking powder.
Step 4: Combine Everything
Slowly mix dry ingredients into wet mixture.
👉 Tip: Don’t overmix.
Step 5: Add Chocolate
Fold in chopped chocolate chunks.
Step 6: Rest Dough
Let it rest for 20–30 minutes.
Step 7: Bake
Bake at 180°C for 10–12 minutes.
⚠️ Common Mistakes to Avoid
- Overmixing dough
- Using only whey protein
- Skipping resting time
- Overbaking
🔥 Pro Tips for Best Results
- Use a whey-casein blend
- Slightly underbake
- Use chopped chocolate
- Add sea salt topping
💪 High-Protein Nutrition & Strategy
Protein plays a critical role in muscle repair, satiety, and sustained energy. These cookies allow you to incorporate protein into your diet in a way that feels natural and enjoyable.
They’re perfect for:
- Post-workout recovery
- Midday snack
- Healthy dessert
🎨 Variations You Can Try
- Peanut butter chocolate
- Mocha cookies
- White chocolate raspberry
- Triple chocolate
💡 Tips for This Recipe
- Serve warm
- Pair with coffee
- Add flaky salt
➕ Optional Additions
- Chia seeds
- Nuts
- Extra egg whites
🍽️ Serving Ideas
- Post-workout snack
- Dessert platter
- Meal prep snack
🧊 Storage Recommendations
- Fridge: 5–7 days
- Freezer: 2 months
- Reheat: 10–15 seconds
❓ Frequently Asked Questions
Can I add more protein powder?
No, it will dry the cookies.
Can I use plant protein?
Yes, but texture changes.
Are these good for weight loss?
Yes, if eaten in moderation.
Can I freeze the dough?
Yes, highly recommended.
Do they taste like protein?
No.
📊 Nutritional Breakdown (Per Cookie)
- Calories: 210
- Protein: 11g
- Fat: 11g
- Carbs: 18g
- Fiber: 2g
- Net Carbs: 16g
- Sugar: 9g
- Sodium: 130mg
📌 Recipe Snapshot
- Prep Time: 15 minutes
- Cook Time: 12 minutes
- Total Time: 27 minutes
- Course: Dessert
- Cuisine: American
- Servings: 18 cookies
- Calories: 210
- Protein: 11g
High Protein Brown Butter Chocolate Chunk Cookies Recipe
Ingredients
- Butter: 200g brown it, then cool
- Sugar total 180g:
- 100 g brown sugar
- 80 g white sugar
- Eggs: 2 large
- Flour: 250g
- Protein Powder whey-casein blend: 100g
- Chocolate Chunks total 200g:
- 120 g milk chocolate
- 80 g dark chocolate
Instructions
- Place the butter in a light-colored saucepan over medium heat and let it melt completely. Stir continuously as it begins to foam. After a few minutes, you’ll notice small golden-brown bits forming at the bottom and a rich, nutty aroma developing—this is exactly what you want. As soon as the butter turns a deep golden color (not dark brown), remove it from the heat immediately to prevent burning. Pour it into a heat-safe bowl and allow it to cool completely to room temperature before using.
- In a large mixing bowl, add the cooled brown butter along with the brown sugar, white sugar, and vanilla extract. Using a whisk or electric mixer, beat everything together until the mixture becomes smooth, creamy, and slightly thick. Take your time here—proper mixing helps dissolve the sugar and improves the final cookie texture.
- Add the eggs one at a time, mixing well after each addition. Continue mixing until the mixture looks glossy, slightly fluffy, and fully combined. This step is key for achieving soft centers and a balanced structure.
- In a separate bowl, combine the flour, protein powder, baking soda, and baking powder. Mix thoroughly so everything is evenly distributed and there are no lumps of protein powder or uneven leavening.
- Gradually add the dry ingredients into the wet mixture in batches, mixing gently with a spatula or on low speed if using a mixer. Stop as soon as everything is combined and no dry streaks remain. Avoid overmixing, as this can make the cookies dense and tough.
- Add milk one tablespoon at a time, gently mixing after each addition until the dough becomes soft, smooth, and scoopable. The dough should hold its shape but not feel dry or crumbly. Be careful not to add too much liquid, as that can cause the cookies to spread too much during baking.
- Fold in the chocolate chunks using a spatula, making sure they are evenly distributed throughout the dough. Try not to overmix—just fold until combined so the dough stays tender.
- Cover the dough and let it rest at room temperature for 20–30 minutes. This resting time allows the flour and protein powder to fully hydrate, resulting in a softer dough and better texture after baking.
- Line a baking tray with parchment paper. Scoop portions of dough (about 60–70g each) and place them on the tray, leaving enough space between each one to allow for spreading.
- Preheat your oven to 180°C (350°F). Place the tray in the center rack and bake for 10–12 minutes. The edges should look set and lightly golden, while the centers may still appear slightly soft—this is ideal for a chewy texture.
- Remove the cookies from the oven and let them rest on the tray for a few minutes before transferring them to a cooling rack. This allows them to firm up slightly while keeping the inside soft and gooey. Serve warm for the best flavor and texture.