This post may contains Amazon affiliate and other affiliate links. If you make a purchase through these links, I may earn a small commission at no extra cost to you. Your support helps me continue to provide quality content. I only recommend products I personally trust and believe will add value to your experience. For more details, please visit my Privacy Policy.
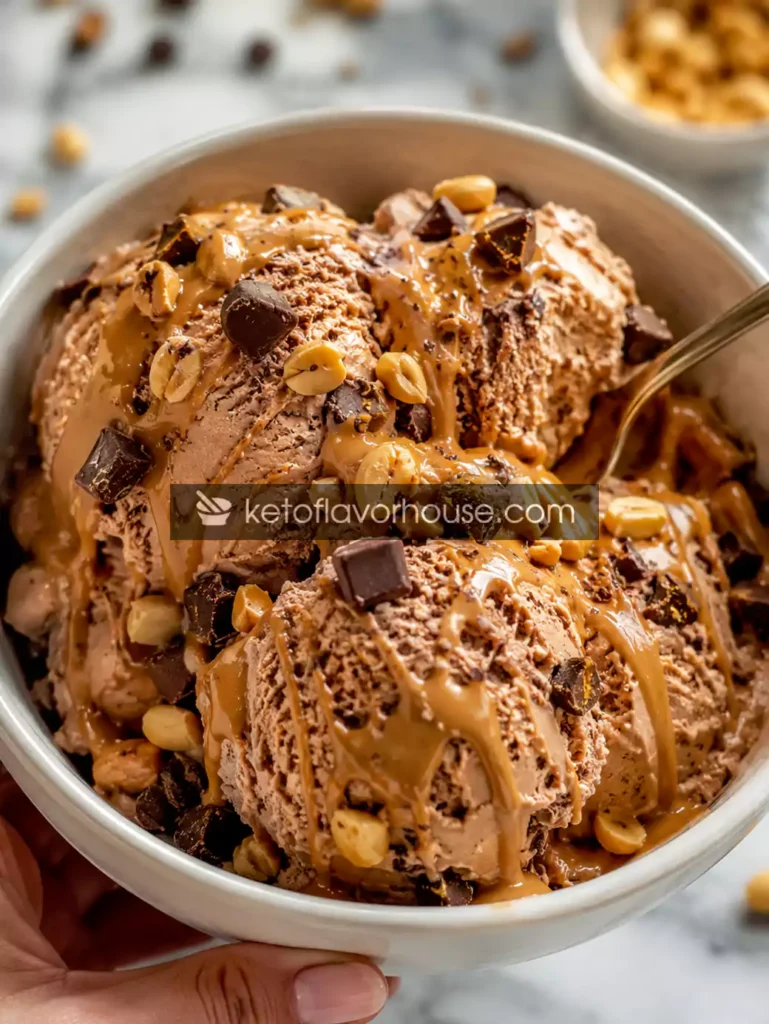
There’s something incredibly satisfying about opening the freezer after a long day and knowing a creamy, chocolatey dessert is waiting for you — especially when that dessert is packed with protein instead of sugar overload. This High-Protein Peanut Butter Chocolate Ninja Creami Ice Cream became one of my favorite late-night treats during a season when I was trying to eat healthier without giving up comfort foods. I wanted something cold, rich, and indulgent that didn’t leave me feeling sluggish afterward, and honestly, this recipe completely changed my view of “healthy ice cream.”
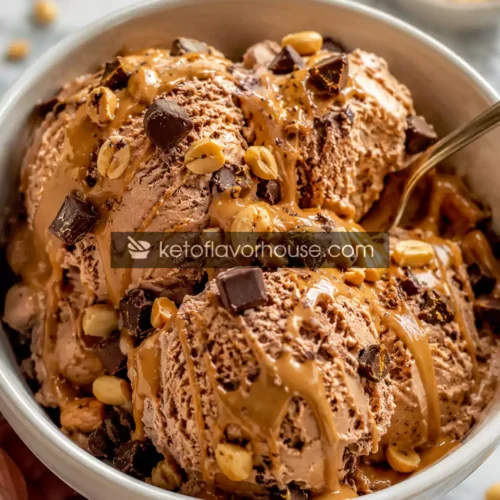
The first time I made this high-protein Ninja Creami recipe, I expected it to taste like a frozen protein shake. You know the kind — icy, chalky, and disappointing. But after that first spin in the Ninja Creami, the texture turned unbelievably creamy, almost like a peanut butter cup gelato from an ice cream shop. The mix of chocolate chunks and roasted peanuts gave it that crunchy, satisfying bite that makes every spoonful feel like dessert instead of “diet food.”
What makes this recipe even better is how practical it is for a high-protein lifestyle. Whether you’re trying to hit your macros, recover after workouts, stay fuller longer, or simply swap traditional ice cream for something more nutritious, this recipe works beautifully. With roughly 78–80 grams of protein in the full batch, it’s one of those recipes that genuinely helps you stay on track without feeling restrictive.
And if you’ve been searching for a dessert that feels indulgent while still supporting your fitness goals, this High-Protein Peanut Butter Chocolate Ninja Creami Ice Cream deserves a permanent place in your freezer.
Why You’ll Love This Recipe
- 🍨 Ultra creamy texture that tastes like real ice cream
- 💪 Packed with high-quality protein for muscle recovery and satiety
- 🥜 Peanut butter and chocolate flavor combination never gets old
- ⏱ Easy prep with just a few simple ingredients
- ❄ Perfect for meal prep and freezer-friendly desserts
- 🍫 Crunchy chocolate chunks and peanuts make every bite satisfying
- 🧁 Feels like a cheat dessert without the sugar overload
- 👨👩👧 Family-friendly and customizable for different diets
- 📦 Great post-workout snack or evening sweet treat
- 🔥 High-protein dessert that actually tastes indulgent
My Personal Experience Making This Recipe
I started experimenting with protein ice creams during one of those phases where I was tired of eating plain Greek yogurt every night for extra protein. I wanted something exciting — something that felt rewarding after workouts or long workdays. Traditional ice cream tasted amazing, of course, but I hated how quickly it could derail my calorie goals.
The first few protein ice cream recipes I tried online were honestly terrible. Some were icy. Others tasted overly artificial because of too much sweetener. One even froze so solid that my Ninja Creami struggled to process it properly.
Then I discovered the magic combination of milk, quality protein powder, powdered peanut butter, and mix-ins added at the end instead of before freezing. That changed everything.
The first spoonful of this recipe shocked me. It was thick, creamy, slightly chewy around the chocolate chunks, and had that roasted peanut flavor that makes peanut butter desserts so comforting. It instantly reminded me of eating a peanut butter cup Blizzard as a kid — except this version actually helped me hit my protein goals.
Now it’s become part of my weekly meal prep routine. I’ll freeze two or three pints at once so I always have a healthier dessert ready. It keeps me from impulse-snacking on processed sweets, and it genuinely helps with satiety at night.
There’s also something satisfying about turning a simple protein shake into an actual dessert experience. It makes healthy eating feel sustainable instead of restrictive.
Required Equipment
Ninja Creami Machine
The Ninja Creami is absolutely essential for achieving that smooth, scoopable texture. Unlike a regular blender, it shaves and churns frozen bases into creamy ice cream rather than icy slush.
If you’re serious about high-protein desserts, this machine is honestly a game changer. It transforms protein-heavy mixtures into something that feels luxurious instead of gritty.
Tip: If your mixture looks crumbly after the first spin, don’t panic. A small splash of milk and a quick re-spin usually fixes everything.
Mixing Bowl
A medium mixing bowl makes it easier to whisk everything smoothly before freezing. Protein powders can clump if added directly into the container without mixing first.
I like using a large bowl with a pouring spout because it keeps cleanup easier and prevents spills when transferring the mixture.
Alternative: A shaker bottle works too if you’re short on dishes.
Whisk
A whisk helps dissolve the protein powder properly and creates a smoother frozen texture later. Tiny clumps in the liquid mixture can become unpleasant icy bits once frozen.
A silicone whisk works especially well because it won’t scratch containers.
Measuring Cups and Spoons
Accurate measurements matter more than people think in high-protein ice cream recipes. Too much powder can make the texture chalky, while too little liquid can make it freeze too hard.
Using measuring spoons also helps keep macros consistent if you’re tracking protein intake.
Sharp Knife and Cutting Board
You’ll need these for chopping the dark chocolate and roasted peanuts into mix-in pieces.
Smaller chunks distribute more evenly throughout the ice cream, giving every bite texture without overwhelming the creamy base.
Ingredients & Substitutions
12 oz 1% Milk
Milk forms the creamy foundation of the recipe while adding natural protein and smoothness.
1% milk keeps the calories moderate while still creating a rich texture. Whole milk works if you want a creamier result, while unsweetened almond milk lowers calories but slightly reduces creaminess.
Substitutions:
- Fairlife milk for extra protein
- Almond milk for lower calories
- Oat milk for dairy-free texture
- Cashew milk for extra creaminess
2 Scoops Vanilla or Chocolate Protein Powder (60g)
Protein powder is the main protein source here and gives the recipe its high-protein profile.
A quality whey/casein blend usually creates the creamiest texture. Vanilla gives more peanut butter flavor, while chocolate creates a deeper dessert vibe.
Avoid overly chalky or low-quality protein powders because texture matters heavily in frozen desserts.
Substitutions:
- Plant-based protein powder
- Casein protein for extra thickness
- Collagen + whey blend
- Lactose-free protein powder
2 Tablespoons PB2 Powdered Peanut Butter
PB2 delivers strong peanut butter flavor without excessive calories or fat. It blends smoothly into the base and boosts protein slightly too.
Traditional peanut butter can freeze harder and create oil separation, so powdered peanut butter works better here.
Substitutions:
- Almond powder
- Cashew powder
- Regular peanut butter (reduce slightly)
2 Tablespoons Roasted Peanuts, Chopped
These add crunch, texture, and authentic roasted peanut flavor.
Without the peanuts, the recipe can feel too soft and uniform. The crunch creates contrast that makes it taste more like premium ice cream shop dessert.
Substitutions:
- Almonds
- Pecans
- Sugar-free peanut brittle pieces
- Cacao nibs
2 Tablespoons Dark Chocolate, Chopped
Dark chocolate creates rich bursts of flavor throughout the ice cream and balances the peanut butter perfectly.
Using chopped chocolate instead of chips creates softer shards that melt slightly while eating.
Substitutions:
- Sugar-free chocolate
- Lily’s chocolate chips
- White chocolate chips
- Peanut butter chips
How to Make High-Protein Peanut Butter Chocolate Ninja Creami Ice Cream
Step 1: Mix the Base
In a medium mixing bowl, whisk together:
- Milk
- Protein powder
- PB2 powder
Whisk thoroughly until smooth and fully dissolved.
Take your time here. Protein clumps can create uneven texture later.
Tip: Warm the milk slightly before mixing if your protein powder tends to clump.
Step 2: Pour Into Creami Container
Transfer the mixture into your Ninja Creami pint container.
Make sure the liquid stays below the max fill line.
Secure the lid tightly.
Step 3: Freeze Completely
Freeze for at least 18–24 hours.
The base must be completely solid before spinning. Partial freezing can damage texture and create uneven processing.
Tip: Place the container on a flat freezer surface to avoid angled freezing.
Step 4: Spin on Lite Ice Cream Setting
Remove the frozen pint from the freezer and place it into the Ninja Creami machine.
Run the Lite Ice Cream setting.
After the first spin, the texture may look crumbly or powdery. This is normal for high-protein recipes.
Step 5: Re-Spin for Creaminess
Add a small splash of milk if needed.
Usually 1–2 tablespoons is enough.
Run the Re-Spin cycle until smooth and creamy.
This step is where the magic happens.
Step 6: Add Mix-Ins
Use a spoon to create a hole down the center of the ice cream.
Add:
- Chopped peanuts
- Chopped dark chocolate
Run the Mix-In cycle.
The texture becomes incredible at this stage — creamy base with crunchy chocolate-peanut bites throughout.
Common Mistakes to Avoid
Using Too Much Protein Powder
Adding extra powder may sound smart for more protein, but it can create chalky, dense texture.
Stick close to the recommended amount.
Not Freezing Long Enough
A partially frozen base won’t spin correctly and may become slushy instead of creamy.
Always freeze fully overnight.
Skipping the Re-Spin
Many people stop after the first spin and think the recipe failed.
High-protein bases almost always need a re-spin for ideal texture.
Using Low-Quality Protein Powder
Some powders freeze poorly and become gritty.
Creamy whey blends work best.
Adding Mix-Ins Before Freezing
Chocolate and peanuts should be added after spinning, not before.
Otherwise they sink and lose texture.
Pro Tips for Best Results
For extra creaminess, use Fairlife milk or add one tablespoon of sugar-free pudding mix.
If you want stronger peanut butter flavor without more calories, add a pinch of peanut butter extract.
Freeze multiple pints at once for weekly meal prep.
Adding a teaspoon of instant pudding mix can improve texture dramatically.
Use chopped chocolate bars instead of chips for softer texture.
If calories matter, reduce chocolate slightly and use sugar-free chocolate.
High-Protein Nutrition & Strategy
One of the best things about this recipe is how easy it makes high-protein eating.
Many people struggle to hit their daily protein goals because traditional “healthy foods” can become repetitive. Chicken breast, eggs, cottage cheese, and protein shakes absolutely work, but eventually most people crave something comforting.
That’s where high-protein desserts become powerful.
This recipe delivers substantial protein while still feeling emotionally satisfying. That matters more than people realize. Sustainable nutrition usually comes from finding healthier versions of foods you genuinely enjoy.
Protein also supports:
- Muscle recovery
- Satiety
- Stable energy
- Reduced cravings
- Better body composition goals
For active people, this recipe works beautifully as a post-workout dessert because it combines protein with moderate carbs for recovery.
And because it’s frozen and portionable, it naturally slows eating speed compared to drinking a shake quickly.
Variations You Can Try
Chocolate Peanut Butter Cup Version
Add sugar-free peanut butter cups as mix-ins.
This creates a richer dessert flavor with candy-bar vibes.
Mocha Protein Ice Cream
Add 1 teaspoon espresso powder.
Chocolate and coffee together taste incredible.
Banana Peanut Butter Version
Blend in half a banana before freezing.
This adds natural sweetness and creamier texture.
Cookies and Cream Version
Use vanilla protein powder and sugar-free sandwich cookies.
Salted Peanut Butter Chocolate
Add flaky sea salt on top before serving.
The salty-sweet contrast makes flavors pop.
Tips for This Recipe
Serve immediately after spinning for best texture.
If refreezing leftovers, allow the container to soften slightly before re-spinning.
Use cold milk when mixing for smoother blending.
A little cinnamon surprisingly enhances chocolate flavor beautifully.
For more protein without affecting texture too much, use ultra-filtered milk.
Optional Additions
Chia Seeds
Boost fiber and omega-3 content while thickening texture slightly.
Collagen Peptides
Adds extra protein with minimal flavor impact.
Crushed Protein Bars
Adds chewy texture and dessert-style flavor.
Sugar-Free Syrups
Swirl chocolate or caramel syrup into the finished ice cream.
Mini Chocolate Chips
Smaller chips distribute more evenly for better bite consistency.
Serving Ideas
This recipe works beautifully:
- After workouts
- As a late-night dessert
- During meal prep weeks
- For summer gatherings
- As healthier movie-night ice cream
- Alongside protein brownies
- With fresh strawberries or bananas
You can even serve it in waffle bowls for guests who would never guess it’s high-protein.
Storage Recommendations
Store the frozen pint with the lid tightly sealed.
Best texture: within 5–7 days.
Longer storage can create icier texture.
If the ice cream freezes rock solid again after serving, simply re-spin before eating.
Avoid microwaving to soften because it melts unevenly.
Frequently Asked Questions
Can I use plant-based protein powder?
Yes, but texture may be slightly less creamy depending on the brand. Pea/casein blends tend to work better than pure pea protein.
Is this recipe good for post-workout recovery?
Absolutely. The high protein content supports muscle recovery while the carbs help replenish energy.
Can I make this without a Ninja Creami?
You can freeze and blend it in a food processor, but the texture won’t be nearly as creamy.
How much protein does this recipe contain?
The full batch contains approximately 78–80 grams of protein depending on your ingredients.
Can I reduce calories further?
Yes. Use unsweetened almond milk and sugar-free chocolate.
Why does my protein ice cream look powdery after spinning?
That’s normal. Add a splash of milk and run the re-spin cycle.
Can I add more peanut butter?
Yes, but too much can harden the texture slightly because of fat content.
Nutritional Breakdown (Per Serving)
Approximate values based on 2 servings:
- Calories: 290
- Protein: 39g
- Fat: 10g
- Total Carbs: 14g
- Fiber: 4g
- Net Carbs: 10g
- Sugar: 8g
- Sodium: 260mg
Recipe Snapshot
Prep Time: 10 minutes
Freeze Time: 24 hours
Total Time: 24 hours 10 minutes
Course: Dessert
Cuisine: American
Servings: 2
Calories: 290 per serving
Protein: 39g per serving
High-Protein Peanut Butter Chocolate Ninja Creami Ice Cream Recipe
Ingredients
- 12 oz 1% milk
- 2 scoops protein powder
- 2 tablespoons PB2 powdered peanut butter
- 2 tablespoons roasted peanuts
- 2 tablespoons dark chocolate
Instructions
- Add the 1% milk, protein powder, and PB2 powdered peanut butter to a medium mixing bowl. Whisk everything together slowly at first to prevent the protein powder from puffing out of the bowl, then continue whisking vigorously until the mixture becomes completely smooth and creamy with no dry pockets or clumps remaining. This step is extremely important because fully dissolved protein powder creates a much smoother, creamier ice cream texture after freezing. If your protein powder tends to clump, let the mixture sit for 1–2 minutes and whisk again before pouring.
- Carefully pour the blended mixture into your Ninja Creami pint container, making sure the liquid stays below the maximum fill line marked on the side of the container. Leaving enough space helps the mixture freeze evenly and prevents overflow during processing. Secure the lid tightly to keep freezer odors out and maintain the clean peanut butter chocolate flavor.
- Place the pint container on a completely flat surface inside the freezer and freeze for at least 18–24 hours, or until fully solid from top to bottom. Avoid freezing the container at an angle because uneven freezing can affect the spinning process later. The base must be thoroughly frozen for the Ninja Creami to create that signature smooth, scoopable ice cream consistency instead of an icy or slushy texture.
- Once fully frozen, remove the pint container from the freezer and take off the lid. Install the container into the Ninja Creami outer bowl according to the manufacturer’s instructions, making sure everything locks securely into place before starting the machine.
- Select the Lite Ice Cream setting and allow the machine to process the frozen base completely. After the first spin, check the texture carefully. High-protein ice cream recipes often look crumbly, powdery, or slightly dry after the initial cycle, especially when using whey-based protein powders. Don’t worry — this is completely normal and easy to fix.
- If the texture looks dry or crumbly, pour 1–2 tablespoons of milk directly into the center of the ice cream. The added liquid helps the mixture emulsify into a smoother consistency. Run the Re-Spin cycle once or twice until the ice cream becomes creamy, soft, and perfectly scoopable. Avoid adding too much milk at once because it can make the texture overly soft.
- Use the back of a spoon to create a small hole down the center of the freshly spun ice cream. Add the chopped roasted peanuts and chopped dark chocolate pieces directly into the center cavity instead of scattering them across the top. This helps the mix-ins distribute more evenly throughout the pint during the next cycle.
- Select the Mix-In cycle and allow the machine to fold the crunchy peanuts and chocolate pieces into the creamy peanut butter base. The result should be rich, creamy ice cream with little bursts of chocolate and roasted peanut crunch in every bite.
- Serve the ice cream immediately while it’s freshly spun and at its creamiest texture. For an extra indulgent finish, top with a light drizzle of melted peanut butter, a sprinkle of extra chopped peanuts, or a few chocolate shavings before serving. Enjoy cold straight from the pint or scoop into chilled bowls for the ultimate high-protein dessert experience.