This post may contains Amazon affiliate and other affiliate links. If you make a purchase through these links, I may earn a small commission at no extra cost to you. Your support helps me continue to provide quality content. I only recommend products I personally trust and believe will add value to your experience. For more details, please visit my Privacy Policy.
There’s something about the combination of chocolate and peanut butter that feels deeply comforting. It reminds me of those moments standing in the kitchen late at night, searching for “just one bite” of something sweet after dinner. Before focusing on high-protein and bariatric-friendly eating, those little cravings often turned into full dessert binges that left me feeling sluggish, overly full, and frustrated with myself afterward.
That’s exactly why these High-Protein Bariatric Chocolate Peanut Butter Fudge Cups became such a game changer in my kitchen.
The first time I made them, I wasn’t trying to create a perfect recipe for the blog. Honestly, I was simply trying to solve a craving without reaching for sugar-loaded candy or traditional fudge cups. I wanted something creamy, chocolatey, rich, and satisfying — but still aligned with the kind of eating that actually supports bariatric goals.
And somehow, after a little experimenting with peanut butter, protein powder, and sugar-free chocolate, these fudge cups turned out even better than I expected.
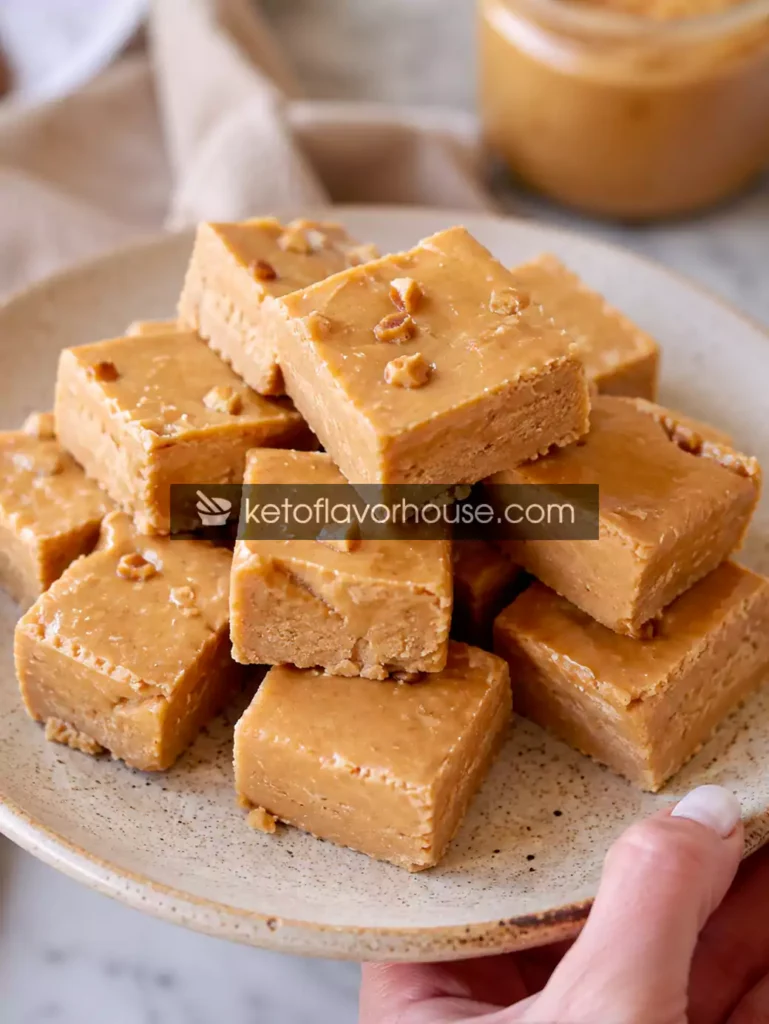
They’re smooth and creamy straight from the fridge, slightly firm around the edges, and filled with that rich peanut butter center that melts slowly on your tongue. The chocolate layer adds just enough sweetness without overpowering the protein-packed filling. Every bite feels indulgent, but unlike regular candy, these little cups are filling enough that one or two actually satisfy the craving.
That’s one of the biggest reasons this recipe works so well for bariatric eaters. Instead of triggering endless snacking, the protein and healthy fats help create fullness and balance. The portions are naturally smaller, the ingredients are lower in sugar, and the texture feels comforting without being heavy.
Whether you’re post-op, trying to increase your protein intake, following a low-carb lifestyle, or simply searching for healthier dessert options that don’t taste “diet,” these fudge cups are about to become one of your favorite freezer treats.
They’re easy to make, require minimal prep, and taste like something you’d find in a fancy dessert case — except these are designed to help support your goals instead of derail them.
Why You’ll Love This Recipe
- 🍫 Rich chocolate and peanut butter flavor without sugar overload
- 💪 Packed with protein to support bariatric nutrition goals
- 🧁 Perfectly portioned for controlled snacking
- ❄️ Freezer-friendly and ideal for meal prep
- ⏱️ Quick and easy with no complicated baking steps
- 🥜 Creamy, silky texture with satisfying peanut butter filling
- ❤️ Bariatric-friendly and lower in carbs than traditional fudge cups
- 👨👩👧 Family-friendly enough for everyone to enjoy
- ☕ Perfect with coffee or as an afternoon pick-me-up
- 🥄 Helps satisfy dessert cravings without feeling overly heavy
My Personal Experience Making This Recipe
I still remember the evening these fudge cups officially became part of my weekly routine. It was one of those long days where I’d eaten well all day, stayed on track, and then suddenly found myself craving chocolate so intensely that I could practically taste peanut butter cups in my head.
Normally, those cravings used to lead me straight toward convenience foods. But after focusing more seriously on bariatric-friendly eating, I realized how important it was to have satisfying homemade options ready before cravings hit.
So I started experimenting.
The first version was honestly a mess. The filling was too dry, the chocolate layer cracked, and the texture felt chalky because I used too much protein powder. But even then, I could tell the idea had potential.
A few adjustments later, everything changed.
The filling became creamy and soft instead of crumbly. The chocolate layer turned silky and smooth. And the balance between sweetness and peanut butter flavor finally felt just right.
What surprised me most was how satisfying they were emotionally. After bariatric surgery or during weight-loss journeys, desserts can sometimes feel complicated. You may feel nervous about sugar, worried about overeating, or frustrated that many “healthy desserts” taste disappointing.
These fudge cups didn’t feel disappointing at all.
They felt indulgent.
That’s what made them important to me. They reminded me that bariatric-friendly eating doesn’t mean giving up comfort food entirely. It just means finding smarter, protein-focused ways to enjoy those flavors while still respecting your body and goals.
Now I keep a batch in the freezer almost constantly. Some afternoons I enjoy one with iced coffee. Other nights, I’ll have a small fudge cup after dinner when everyone else is eating traditional desserts.
And honestly? I never feel deprived.
Required Equipment
Mixing Bowl
A medium mixing bowl is essential for combining the peanut butter filling smoothly without making a mess. Since the filling thickens quickly after adding protein powder, having enough room to stir comfortably makes the process easier.
If you don’t have a medium bowl, any large prep container works just fine.
Silicone Spatula
A spatula helps scrape every bit of the mixture from the bowl, which is especially important because peanut butter mixtures can become thick and sticky.
It also helps spread the filling evenly into the muffin liners without wasting ingredients.
Muffin Tin or Silicone Mold
A muffin tin creates the perfect individual portions for bariatric-friendly serving sizes.
Silicone molds work especially well because the fudge cups release more easily after chilling.
If you don’t have either, small ramekins or mini containers can work too.
Cupcake Liners
Liners make cleanup simple and help prevent sticking.
Paper liners work well, but silicone liners create the easiest release and give the cups a prettier shape.
Microwave-Safe Bowl
You’ll need this for melting the chocolate layer.
A heat-safe bowl allows gentle melting without burning the chocolate, which is important because sugar-free chocolate can scorch quickly.
Refrigerator or Freezer
Chilling is what transforms the soft filling into firm, creamy fudge cups.
The freezer creates a firmer candy-like texture, while the refrigerator keeps them slightly softer and creamier.
Ingredients & Substitutions
Natural Peanut Butter – 1 Cup
Natural peanut butter creates the rich, creamy center of these fudge cups. It also provides healthy fats and protein that help make the dessert more filling and satisfying for bariatric eaters.
Look for peanut butter with minimal ingredients for the best texture.
Substitution Options
- Almond butter for a nuttier flavor
- Sunflower seed butter for a nut-free option
- Cashew butter for extra creaminess
Each option still provides healthy fats and creates a rich texture.
Vanilla Protein Powder – 1/2 Cup
Protein powder transforms these fudge cups into a bariatric-friendly dessert instead of regular candy.
It boosts protein intake while helping the filling firm up beautifully.
Substitution Options
- Chocolate protein powder for deeper chocolate flavor
- Unflavored protein powder for less sweetness
- Collagen peptides for a softer texture
Protein is especially important after bariatric surgery because it helps support fullness and muscle maintenance.
Sugar-Free Chocolate Chips – 1 Cup
These create the smooth chocolate shell without adding large amounts of sugar.
They melt beautifully and help give the cups that classic candy-style texture.
Substitution Options
- Sugar-free dark chocolate
- Keto chocolate bars chopped into pieces
- Dairy-free chocolate for lactose sensitivity
Coconut Oil – 1 Tablespoon
Coconut oil helps the chocolate melt smoothly and creates a glossy finish.
It also prevents the chocolate from becoming too brittle after freezing.
Substitution Options
- Butter for a richer flavor
- Avocado oil for a neutral taste
Greek Yogurt – 1/4 Cup
Greek yogurt adds creaminess while boosting protein content.
It also softens the filling texture so it feels silky instead of dry.
Substitution Options
- Blended cottage cheese
- Dairy-free yogurt alternatives
Greek yogurt is extremely useful in bariatric recipes because it adds protein without excessive calories.
Powdered Monk Fruit or Erythritol – 1/4 Cup
This sweetens the filling while keeping the recipe sugar-free and lower in carbs.
Powdered sweeteners work best because they blend smoothly.
Substitution Options
- Allulose for softer texture
- Stevia blends for lower-carb sweetness
Vanilla Extract – 1 Teaspoon
Vanilla rounds out the flavor and gives the filling a more dessert-like taste.
Even a small amount makes the entire recipe taste richer.
Pinch of Sea Salt
Salt balances the sweetness and intensifies the peanut butter flavor beautifully.
Never skip this ingredient — it makes a noticeable difference.
How to Make High-Protein Bariatric Chocolate Peanut Butter Fudge Cups
Step 1: Prepare the Muffin Pan
Line a muffin tin or silicone mold with cupcake liners.
This helps the fudge cups release easily later and keeps cleanup simple.
If using silicone molds, lightly spraying them can help even more.
Step 2: Melt the Chocolate
Add the sugar-free chocolate chips and coconut oil to a microwave-safe bowl.
Microwave in short intervals, stirring between each one until smooth and glossy.
Be patient here. Sugar-free chocolate burns more easily than regular chocolate.
Step 3: Create the Bottom Chocolate Layer
Spoon a small amount of melted chocolate into each liner.
Spread it slightly up the sides using the back of a spoon.
This creates the “cup” shape.
Place the tray in the freezer for about 10 minutes so the chocolate can firm up.
Step 4: Make the Peanut Butter Filling
In a mixing bowl, combine peanut butter, Greek yogurt, vanilla extract, sweetener, and protein powder.
Stir until thick, creamy, and smooth.
If the filling feels too thick, add a spoonful of yogurt.
Don’t worry if the mixture looks dense — it firms up beautifully after chilling.
Step 5: Fill the Cups
Remove the tray from the freezer.
Add a spoonful of peanut butter filling into each chocolate shell.
Leave a little room at the top for the final chocolate layer.
Try to keep the filling centered for prettier layers.
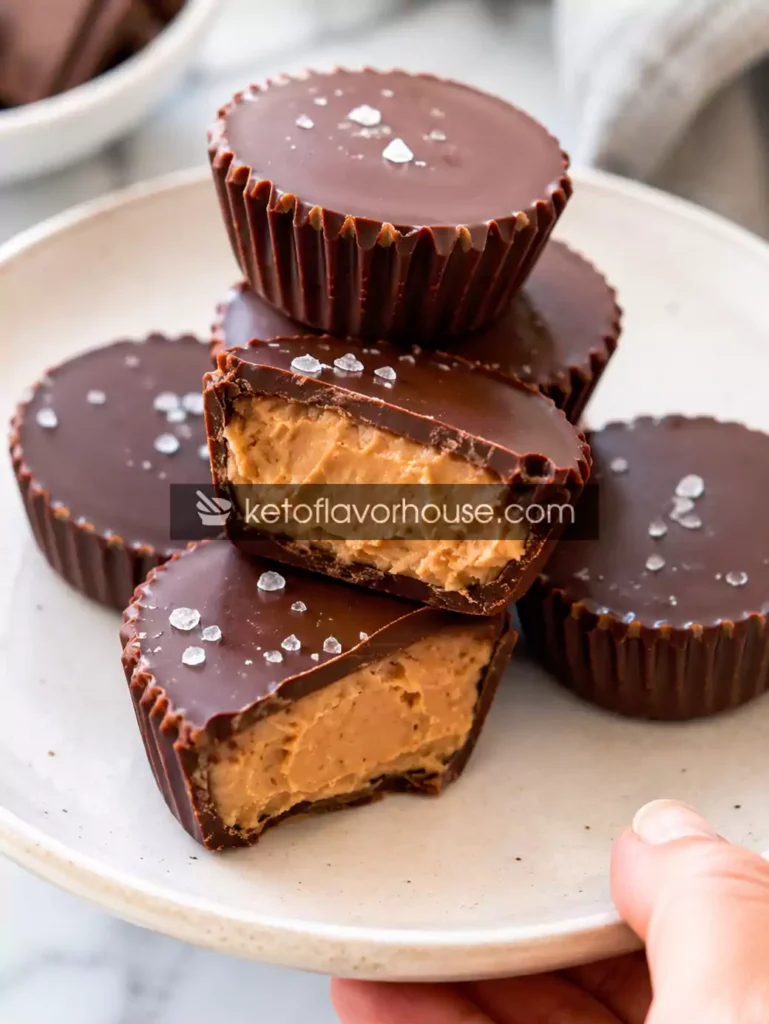
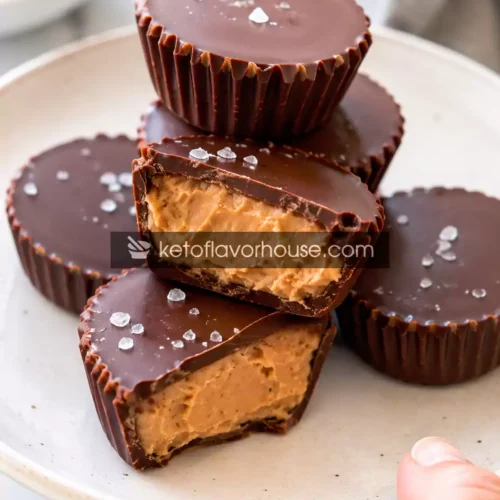
Step 6: Add the Top Chocolate Layer
Spoon remaining melted chocolate over each cup until fully covered.
Gently tap the tray on the counter to smooth the tops.
If desired, sprinkle flaky salt or crushed peanuts on top.
Step 7: Chill Until Firm
Refrigerate for about 2 hours or freeze for 30–40 minutes.
The cups should feel firm when touched.
Once chilled, peel away the liners and enjoy.
Air Fryer, Oven, and No-Bake Variations
No-Bake Version
This is the easiest and most popular method.
The texture stays creamy and soft while requiring almost no effort.
Freezer Cup Version
Store the cups in the freezer for a firmer, candy-bar texture.
This version feels especially refreshing during warmer weather.
Oven Variation
You can lightly bake the peanut butter filling before adding chocolate if you prefer a denser texture.
However, most people prefer the no-bake version because it stays creamier.
Common Mistakes to Avoid
Overheating the Chocolate
Sugar-free chocolate burns quickly.
Always melt it slowly and stir often.
Using Too Much Protein Powder
Too much protein powder creates a chalky filling.
Stick close to the recipe measurements.
Skipping the Chill Time
Warm cups will fall apart easily.
Proper chilling is essential for structure.
Overfilling the Cups
Leave room for the top chocolate layer or the cups may overflow.
Using Runny Peanut Butter
Thin peanut butter can make the filling too soft.
If necessary, refrigerate the filling briefly before assembling.
Pro Tips for Best Results
One of my favorite tricks is adding a tiny pinch of flaky sea salt on top before chilling. It creates that irresistible sweet-and-salty flavor combination that makes these taste incredibly gourmet.
Another helpful tip is slightly warming the peanut butter before mixing the filling. Warm peanut butter blends much more smoothly and creates a silkier texture.
If you want cleaner layers, freeze the chocolate shell fully before adding the filling.
For an even richer dessert, mix a tablespoon of cocoa powder directly into the peanut butter filling.
And if you love firmer candy-style cups, store them in the freezer instead of the refrigerator.
Bariatric Nutrition & Strategy
These fudge cups work beautifully for bariatric-friendly eating because they combine protein, healthy fats, and portion control in one satisfying dessert.
After bariatric surgery, protein becomes incredibly important. Many patients struggle to reach daily protein goals, especially when cravings for sweets appear. That’s why recipes like this can be helpful — they satisfy dessert cravings while still contributing nutritional value.
The protein powder and Greek yogurt help increase fullness and make the cups more satisfying than traditional candy.
Another major advantage is portion size.
Traditional peanut butter cups are often easy to overeat because they contain high amounts of sugar and very little protein. These homemade fudge cups feel richer and more filling, which naturally encourages smaller portions.
They also pair beautifully with:
- Coffee
- Protein shakes
- Greek yogurt bowls
- Fresh berries
- Meal prep snack boxes
Variations You Can Try
Chocolate Hazelnut Version
Add a spoonful of sugar-free chocolate hazelnut spread to the filling.
This creates a dessert that tastes incredibly luxurious.
Espresso Chocolate Cups
Add espresso powder to the chocolate layer.
Perfect for coffee lovers.
Crunchy Peanut Butter Version
Use crunchy peanut butter for added texture.
This creates a more candy-bar-like feel.
Coconut Chocolate Cups
Add unsweetened shredded coconut for a tropical twist.
Tips for This Recipe
Serve the cups slightly chilled for the best creamy texture.
If frozen solid, allow them to sit at room temperature for a few minutes before eating.
For prettier presentation, place them in decorative liners before serving.
Small portions work best because the cups are rich and satisfying.
Optional Additions
Chia Seeds
Adds fiber and extra texture.
Crushed Nuts
Adds crunch and healthy fats.
Sugar-Free Caramel Drizzle
Creates a dessert-style finish while keeping sugar lower.
Cinnamon
Adds warmth and enhances sweetness naturally.
Serving Ideas
These fudge cups are perfect for:
- Meal prep desserts
- Afternoon snacks
- Holiday dessert platters
- Bariatric-friendly treat boxes
- Coffee breaks
- Family movie nights
They pair beautifully with iced coffee or hot tea.
Storage Recommendations
Refrigerator
Store in an airtight container for up to 1 week.
The texture stays creamy and smooth.
Freezer
Freeze for up to 2 months.
Separate layers with parchment paper to prevent sticking.
Reheating
No reheating needed.
Simply allow frozen cups to soften slightly before eating.
Frequently Asked Questions (FAQ)
Can I freeze these fudge cups?
Yes. Freezing actually creates a firmer candy-like texture that many people love.
Are these good for bariatric patients?
Yes. They’re high in protein, portion-controlled, and lower in sugar than traditional desserts.
Can I use almond butter instead of peanut butter?
Absolutely. Almond butter creates a slightly nuttier and smoother flavor.
Will protein powder make the filling chalky?
Not if you use the correct amount and mix thoroughly.
Too much protein powder is usually what causes dryness.
Can I make these dairy-free?
Yes. Use dairy-free yogurt and dairy-free protein powder.
How many should I eat?
Most bariatric eaters find one small cup satisfying because they’re rich and protein-packed.
Can I use dark chocolate?
Yes. Sugar-free dark chocolate works beautifully and creates a richer flavor.
Nutritional Breakdown (Per Serving)
Approximate values per fudge cup:
- Calories: 115
- Protein: 8g
- Fat: 8g
- Total Carbs: 5g
- Fiber: 2g
- Net Carbs: 3g
- Sugar: 1g
- Sodium: 90mg
Recipe Snapshot
Prep Time: 15 minutes
Cook Time: 0 minutes
Chill Time: 2 hours
Total Time: 2 hours 15 minutes
Course: Dessert / Snack
Cuisine: American
Servings: 12 fudge cups
Calories: 115 per serving
High-Protein Bariatric Chocolate Peanut Butter Fudge Cups Recipe
Ingredients
- 1 cup natural peanut butter
- 1/2 cup vanilla protein powder
- 1 cup sugar-free chocolate chips
- 1 tablespoon coconut oil
- 1/4 cup Greek yogurt
- 1/4 cup powdered monk fruit sweetener
- 1 teaspoon vanilla extract
- Pinch of sea salt
Instructions
- Place cupcake liners into each section of a muffin tin or silicone muffin tray. Make sure the liners sit flat against the sides so the chocolate layers form evenly. Silicone liners work especially well because the fudge cups release more easily after chilling, but regular paper liners also work perfectly. If you want smaller, bite-sized portions, you can use a mini muffin tray instead.
- Add the sugar-free chocolate chips and coconut oil to a microwave-safe bowl. Heat in short 20-second intervals, stirring thoroughly after each round until the chocolate becomes completely smooth, glossy, and silky. Be patient during this step because sugar-free chocolate can burn quickly if overheated. If the chocolate looks thick, continue stirring for a few seconds before reheating since the residual warmth often finishes melting it naturally.
- Spoon a small layer of melted chocolate into the bottom of each cupcake liner. Use the back of a spoon to gently spread the chocolate slightly up the sides to create a cup shape that will hold the peanut butter filling later. Try to keep the layer even so the cups set properly. Place the tray into the freezer for about 10 minutes, or until the chocolate feels firm to the touch. This quick chill helps create clean layers and prevents the filling from sinking.
- While the chocolate layer chills, prepare the peanut butter filling. In a mixing bowl, combine the peanut butter, protein powder, Greek yogurt, powdered sweetener, vanilla extract, and a pinch of salt. Stir slowly at first, then continue mixing until the filling becomes thick, creamy, and completely smooth. The texture should resemble soft fudge. If the mixture feels too dry, add a small spoonful of yogurt. If it feels too soft, let it rest for a minute so the protein powder can absorb some moisture naturally.
- Remove the muffin tray from the freezer and spoon the peanut butter filling evenly into each chocolate shell. Gently press the filling down with the back of a spoon so there are no large air pockets. Leave a little room at the top of each cup for the final chocolate layer. Don’t worry if they don’t look perfectly smooth — the top chocolate layer will help everything come together beautifully.
- Spoon the remaining melted chocolate over the top of each filled cup until the peanut butter layer is completely covered. Gently tap the muffin tray on the counter a few times to smooth the tops and help the chocolate settle evenly around the filling. If you’d like, sprinkle a tiny pinch of flaky sea salt or crushed peanuts on top before chilling for extra flavor and texture.
- Place the tray into the refrigerator for about 2 hours or freeze for 30–40 minutes until the fudge cups are completely firm and set. Once chilled, remove the liners carefully and serve cold for the best creamy texture. If frozen solid, let the cups sit at room temperature for a few minutes before eating so the filling softens slightly and becomes extra smooth and rich.