This post may contains Amazon affiliate and other affiliate links. If you make a purchase through these links, I may earn a small commission at no extra cost to you. Your support helps me continue to provide quality content. I only recommend products I personally trust and believe will add value to your experience. For more details, please visit my Privacy Policy.
Introduction
There was a time when my weekly routine felt like a cycle of either eating healthy… or eating convenient — but never both.
If I meal prepped, the food felt repetitive.
If I didn’t, I’d end up grabbing something quick that didn’t really support my goals.
That’s exactly where these high protein beef burrito bowls came into my life — and completely changed how I approach meal prep.
They’re the perfect balance.
You get flavor, convenience, and real nutrition in one bowl.
Juicy, seasoned beef.
Fluffy rice.
Fresh toppings.
Creamy finish.
And most importantly — a solid protein hit that actually keeps you full for hours.
If you’re trying to stay consistent with muscle building, fat loss, or just stable energy throughout the day, meals like this matter more than people think.
This high protein beef burrito bowls recipe is not just about food — it’s about making your week easier while still enjoying what you eat.
Why You’ll Love This Recipe
- 💪 High-protein powerhouse – Keeps you full and satisfied
- 🍱 Perfect for meal prep – Make once, eat all week
- 🌮 Bold, satisfying flavors – Like your favorite burrito in a bowl
- ⏱️ Time-saving – Batch cooking done right
- 🥗 Balanced nutrition – Protein, carbs, fats in harmony
- 👨👩👧 Customizable – Adjust to your taste and goals
My Personal Experience
The first time I tried meal prepping burrito bowls, I made a classic mistake.
I didn’t season the beef properly.
Everything looked great — rice was fluffy, toppings were fresh — but the flavor just didn’t hit.
And that taught me something important:
👉 Meal prep only works if it tastes good on day 3, not just day 1.
So I refined it.
I layered the seasoning.
Balanced the textures.
Added freshness with pico and corn.
Swapped sour cream for a lighter, protein-rich option.
And suddenly, this wasn’t just meal prep.
It became something I actually looked forward to eating.
Now, this is one of my most reliable recipes — especially during busy weeks when I need something:
- Filling
- Consistent
- And aligned with my high-protein routine
Required Equipment
Large Skillet
Used for cooking the ground beef evenly.
A wide skillet helps avoid overcrowding and improves browning.
Rice Cooker or Pot
For perfectly cooked rice every time.
Tip: Rice cooker saves time and consistency.
Mixing Bowl
Useful for prepping pico and corn mixture.
Meal Prep Containers
Essential for portioning and storing meals for the week.
Knife & Cutting Board
For chopping vegetables and prepping toppings.
Ingredients & Substitutions
Protein Base
- Ground Beef (2 lbs, lean 90/10 preferred)
Main protein source — rich in iron and amino acids
Substitute: Ground turkey or chicken
Carbohydrate Base
- White Rice (3 cups uncooked)
Provides energy and balance
Substitute: Brown rice or cauliflower rice
Add-Ons
- Red Beans (1 can, drained)
Adds fiber and extra protein - Corn (1 cup)
Sweetness and texture - Pico de Gallo (1–1½ cups)
Freshness and acidity
Creamy Element
- Greek Yogurt (1 cup total, for topping)
High-protein alternative to sour cream
Cheese
- Mexican Cheese Blend (1 bag ~2 cups)
Flavor and richness
Seasonings for Beef
- 1 tbsp olive oil
- 1 tsp paprika
- 1 tsp cumin
- 1 tsp chili powder
- ½ tsp garlic powder
- Salt & pepper to taste
How to Make High-Protein Beef Burrito Bowls
Step 1: Cook the Rice
Cook rice according to package instructions.
Tip: Let it rest after cooking for fluffier texture.
Step 2: Cook the Beef
Heat oil, cook beef, break into crumbles.
Step 3: Season the Beef
Add spices and cook until flavorful.
Step 4: Prepare Toppings
Mix corn and pico.
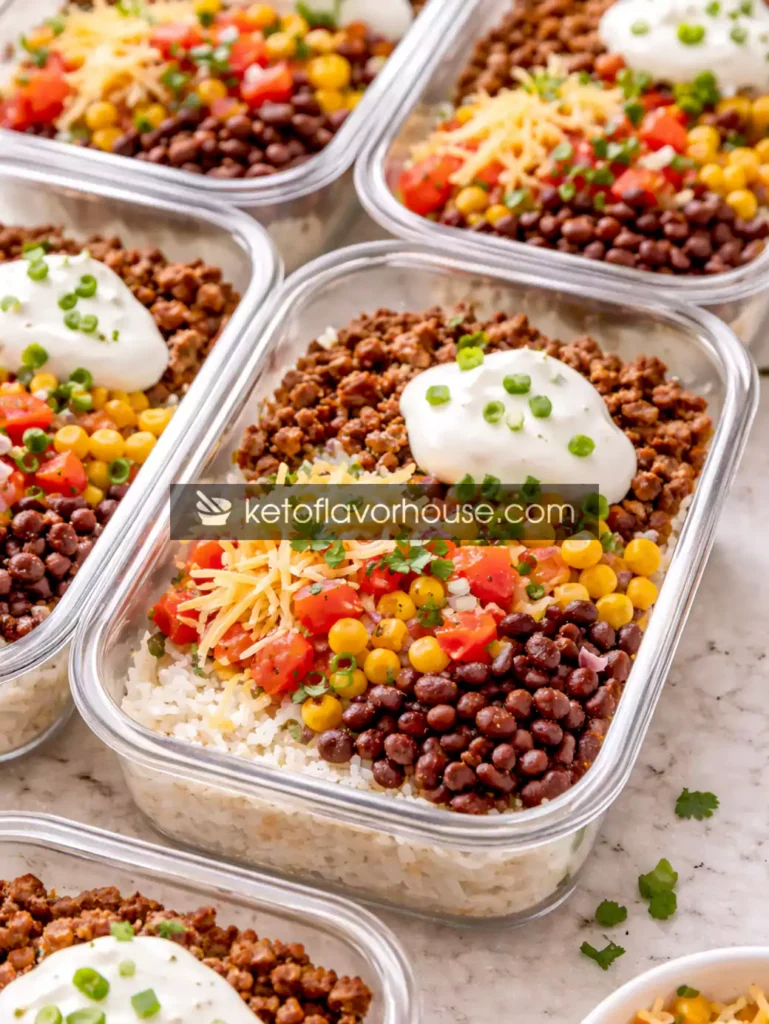
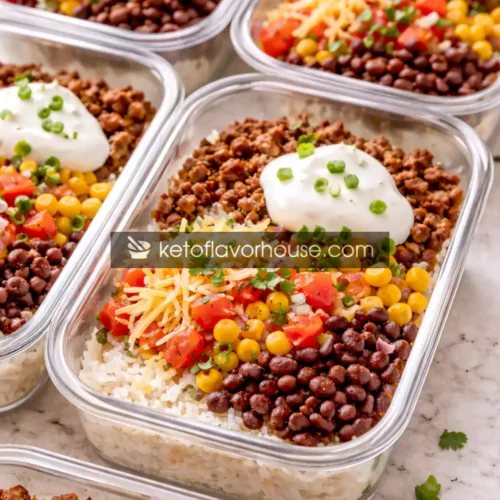
Step 5: Assemble Bowls
Rice → beef → beans → corn/pico → cheese → yogurt.
Step 6: Store
Divide into containers for meal prep.
Common Mistakes to Avoid
- ❌ Bland beef
✔ Season properly - ❌ Overcooked rice
✔ Follow water ratio
Pro Tips for Best Results
- Use lean beef
- Add yogurt after reheating
- Keep toppings fresh
High-Protein Nutrition & Strategy
Beef provides:
- Complete protein
- Iron for energy
These bowls are ideal for:
- Post-workout recovery
- Meal prep consistency
- Balanced eating
Variations You Can Try
- 🌶️ Spicy version
- 🧀 Extra cheesy
- 🥑 Add avocado
Tips for This Recipe
- Layer ingredients properly
- Keep moisture balanced
- Adjust portion sizes
Optional Additions
- Extra beans
- Cottage cheese
- Egg whites mixed in beef
Serving Ideas
- Lunch meal prep
- Dinner option
- Post-workout meal
Storage Recommendations
- Fridge: 4 days
- Freezer: beef only
Frequently Asked Questions
Can I freeze these?
Yes, but keep toppings separate.
Is it good for weight loss?
Yes with portion control.
Nutritional Breakdown (Per Serving)
- Calories: 550
- Protein: 40–45g
- Fat: 18g
- Carbs: 50g
- Fiber: 6g
- Sugar: 5g
- Sodium: 650mg
📌 Recipe Snapshot
- Prep Time: 20 min
- Cook Time: 30 min
- Total Time: 50 min
- Course: Meal Prep
- Cuisine: Mexican-inspired
- Servings: 6
- Calories: 550
- Protein: 42g
High-Protein Beef Burrito Bowls Recipe
Ingredients
- 2 lbs 900g lean ground beef
- 3 cups uncooked white rice
- 1 can 15 oz / ~1½ cups beans, drained and rinsed
- 1 cup corn fresh, canned, or frozen
- 1 cup Greek yogurt for topping
- 2 cups shredded Mexican cheese blend
- 1 tablespoon olive oil
- 1 teaspoon paprika
- 1 teaspoon cumin
- 1 teaspoon chili powder
- ½ teaspoon garlic powder
- ½ teaspoon salt or to taste
- ¼ teaspoon black pepper
Instructions
- Rinse the rice under cold running water until the water runs clear, then cook it according to the package instructions using the correct water ratio. Once fully cooked, fluff the rice gently with a fork and let it sit uncovered for a few minutes so excess steam can escape. This helps keep the rice light and prevents it from becoming mushy in meal prep.
- Place a large skillet over medium heat and add the olive oil. Once the oil is hot, add the ground beef and begin breaking it apart using a wooden spoon or spatula. Cook for about 6–8 minutes, stirring occasionally, until the beef is fully browned and no longer pink.
- Sprinkle in the paprika, cumin, chili powder, garlic powder, salt, and black pepper. Mix thoroughly so the spices coat the beef evenly. Let it cook for another 2–3 minutes, allowing the flavors to develop and slightly deepen. If there is excess grease, carefully drain a small portion while keeping enough for flavor.
- In a separate bowl, combine the corn and pico de gallo. Mix gently so the ingredients stay fresh and vibrant. This mixture adds a refreshing contrast to the warm beef and rice.
- Lay out your meal prep containers on a clean surface. Divide the cooked rice evenly among each container, spreading it out as the base layer. Try to keep portions consistent for balanced meals throughout the week.
- Spoon the cooked, seasoned beef over the rice in each container, distributing it evenly so every portion has a good amount of protein.
- Add a layer of beans on top of the beef, followed by the corn and pico mixture. This layering helps keep textures distinct and prevents everything from becoming soggy.
- Sprinkle shredded cheese over each bowl while the ingredients are still slightly warm so it melts lightly and adds a rich, creamy texture.
- Allow the bowls to cool completely before sealing the containers. This step is important to prevent condensation, which can make the food watery.
- When ready to eat, reheat the bowl in the microwave until warmed through, then add a dollop of Greek yogurt on top just before serving. This keeps the yogurt fresh, creamy, and adds a cool contrast to the warm ingredients.