This post may contains Amazon affiliate and other affiliate links. If you make a purchase through these links, I may earn a small commission at no extra cost to you. Your support helps me continue to provide quality content. I only recommend products I personally trust and believe will add value to your experience. For more details, please visit my Privacy Policy.
Introduction
There’s something about s’mores that instantly takes you back.
That warm, gooey marshmallow melting into chocolate, the slight crunch of graham crackers, the smoky campfire air—it’s not just a dessert, it’s a memory. I still remember sitting around a fire, carefully roasting marshmallows, trying not to burn them (and usually failing), then sandwiching everything together and taking that first messy, perfect bite.
But when you’re living a keto lifestyle, those traditional s’mores? They’re completely off the table.
Or at least… that’s what I used to think.
One evening, I had this intense craving—not just for chocolate, but for that full s’mores experience. The creaminess, the crunch, the layered indulgence. I didn’t want a substitute that felt like a compromise. I wanted something that felt just as satisfying.
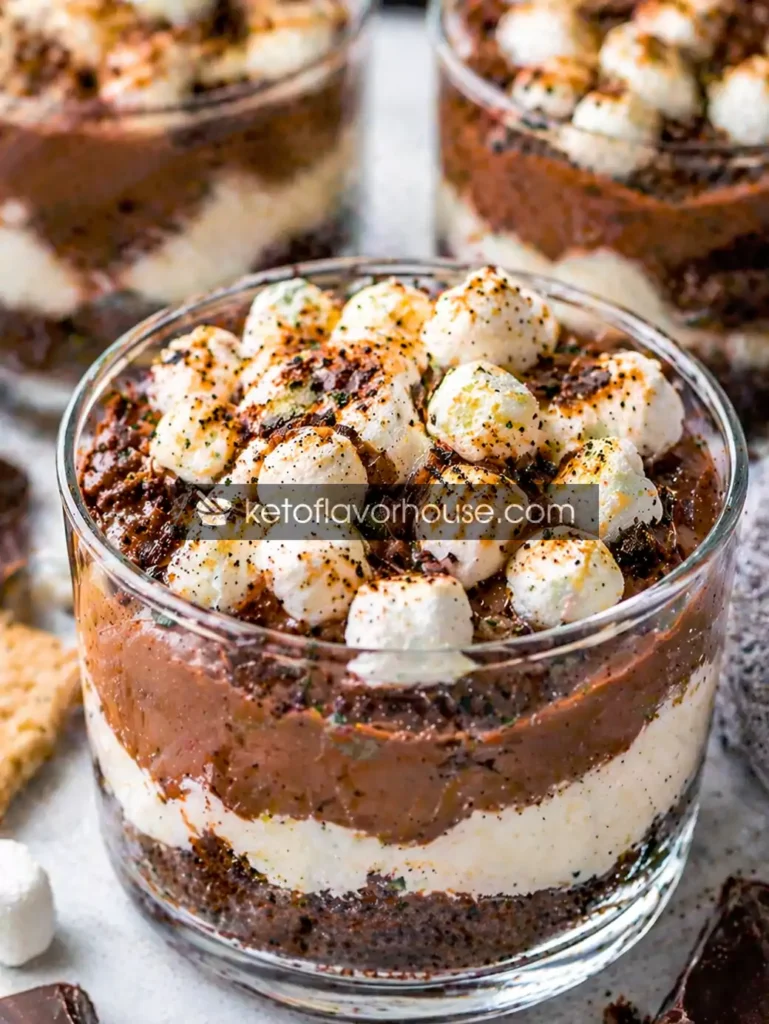
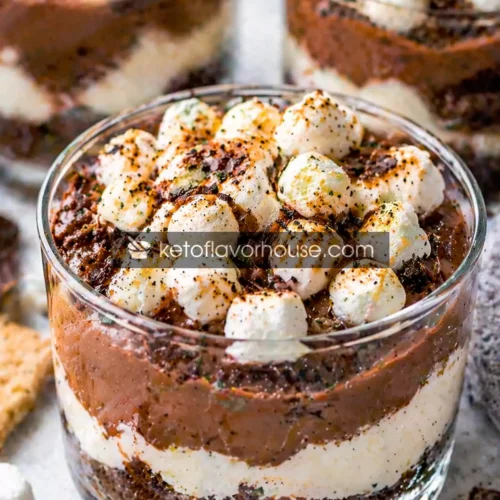
That’s when these Keto Campfire S’mores Dirt Cups (No-Bake Low-Carb Dessert Recipe) were born.
Instead of trying to recreate a traditional s’more exactly, I reimagined it. I layered rich keto chocolate mousse, buttery low-carb “crumbs” that mimic graham crackers, and a fluffy marshmallow-style topping—all in a dessert cup that looks just as fun as it tastes.
And the best part? No campfire needed.
This recipe is perfect for anyone on keto who still wants indulgent desserts without the sugar crash. It’s also ideal for busy days because there’s no baking required—just simple layering, chilling, and enjoying.
What makes this recipe truly special is the experience. Every spoonful gives you a mix of creamy, crunchy, chocolatey, and fluffy textures—just like s’mores, but elevated into something even more satisfying.
Why You’ll Love This Recipe
- 🍫 Rich Chocolate Flavor – Deep, indulgent cocoa taste without the sugar
- 🥄 Layered Texture – Creamy, crumbly, and fluffy in every bite
- ❄️ No-Bake Recipe – Perfect for quick desserts without turning on the oven
- 🥑 Keto-Friendly – Low in carbs, high in healthy fats
- ⏱️ Quick to Make – Ready in under 20 minutes (plus chill time)
- 🎉 Perfect for Parties – Beautiful presentation in cups
- 👨👩👧👦 Family Favorite – Even non-keto eaters won’t know the difference
- 📸 Pinterest-Worthy – Aesthetic, layered, and visually stunning
My Personal Experience
The first time I made these, I wasn’t aiming for perfection—I was just trying to satisfy a craving.
I layered everything into small glass cups, not expecting much. But when I took that first bite, something clicked instantly.
It wasn’t just good—it felt nostalgic.
The chocolate was rich and smooth, the crumb layer gave that familiar “graham cracker” feel, and the marshmallow topping added that soft, airy sweetness I had been missing on keto.
I ended up making a second batch the very next day.
Now, these dirt cups have become my go-to dessert whenever I want something indulgent without guilt. They’re especially perfect when I need a quick dessert that still feels special.
Required Equipment
Mixing Bowls
You’ll need a few bowls to prepare different layers separately. This keeps flavors clean and textures perfect.
Hand Mixer or Whisk
Essential for whipping cream and achieving that smooth, fluffy texture.
Spoon or Spatula
Used for mixing and layering without breaking textures.
Serving Cups or Glasses
Clear cups work best to show off the beautiful layers.
Ingredients & Substitutions
Ingredients
Chocolate Layer:
- 1 cup heavy cream
- 2 tbsp unsweetened cocoa powder
- 2 tbsp powdered erythritol or keto sweetener
- ½ tsp vanilla extract
“Dirt” Crumb Layer:
- 1 cup almond flour
- 2 tbsp butter (melted)
- 1 tbsp cocoa powder
- 1 tbsp sweetener
Marshmallow Layer:
- ½ cup heavy cream
- 2 tbsp cream cheese
- 1 tbsp powdered sweetener
- ½ tsp vanilla extract
Why Each Ingredient Matters
- Heavy cream – Creates rich, creamy texture
- Cocoa powder – Provides deep chocolate flavor
- Almond flour – Mimics graham cracker crumbs
- Butter – Adds richness to the crumb layer
- Cream cheese – Stabilizes the marshmallow layer
Substitutions
- Use coconut cream for dairy-free version
- Replace almond flour with crushed keto cookies
- Swap erythritol with monk fruit sweetener
How to Make Keto Campfire S’mores Dirt Cups (No-Bake Low-Carb Dessert Recipe)
Step 1: Prepare the Chocolate Layer
In a bowl, whip heavy cream until slightly thickened. Add cocoa powder, sweetener, and vanilla. Continue whipping until smooth and creamy.
Tip: Don’t overwhip—it should be silky, not stiff.
Step 2: Make the Crumb Layer
Mix almond flour, cocoa powder, melted butter, and sweetener until crumbly.
Tip: Texture should resemble soft cookie crumbs.
Step 3: Prepare Marshmallow Layer
Whip heavy cream with cream cheese, sweetener, and vanilla until fluffy.
Tip: This layer should be light and airy.
Step 4: Assemble the Cups
Start with a layer of crumbs, then chocolate mousse, then marshmallow layer.
Repeat layers until cups are filled.
Step 5: Chill Before Serving
Refrigerate for at least 1–2 hours to set layers.
Common Mistakes to Avoid
- ❌ Overwhipping cream – leads to grainy texture
- ❌ Too much sweetener – can overpower flavors
- ❌ Skipping chill time – layers won’t set properly
Pro Tips for Best Results
- Use cold cream for better whipping
- Layer gently for clean presentation
- Chill overnight for deeper flavor
Keto Benefits of Cocoa
Cocoa is naturally low in carbs and rich in antioxidants. It provides deep chocolate flavor without added sugars, making it perfect for keto desserts.
Variations You Can Try
- 🔥 Torch the top for real campfire feel
- 🍓 Add berries for freshness
- 🥜 Add peanut butter layer
Tips for This Recipe
- Use clear cups for presentation
- Chill well before serving
- Adjust sweetness to taste
Optional Additions
- Sugar-free chocolate chips
- Crushed nuts
- Espresso powder
Serving Ideas
- Serve at parties
- Perfect for date nights
- Great for summer desserts
Storage Recommendations
- Fridge: Up to 3 days
- Freezer: Not recommended
- Serve chilled
Frequently Asked Questions
1. Can I make this dairy-free?
Yes, use coconut cream.
2. Can I use store-bought keto cookies?
Absolutely.
3. How long should I chill it?
At least 1–2 hours.
4. Can I make it ahead?
Yes, it’s perfect for meal prep.
5. Is it very sweet?
No, it’s balanced for keto.
6. Can I torch the top?
Yes, for a campfire effect.
7. What cups should I use?
Clear glass cups work best.
Nutritional Breakdown (Per Serving)
- Calories: 320
- Protein: 6g
- Fat: 28g
- Total Carbs: 7g
- Net Carbs: 4g
Recipe Snapshot
- Prep Time: 20 minutes
- Chill Time: 2 hours
- Total Time: 2 hours 20 minutes
- Course: Dessert
- Cuisine: Keto / Low-Carb
- Servings: 4
- Calories: 320
Keto Campfire S’mores Dirt Cups Recipe
Ingredients
Chocolate Layer:
- 1 cup heavy cream
- 2 tbsp unsweetened cocoa powder
- 2 tbsp powdered erythritol or keto sweetener
- ½ tsp vanilla extract
“Dirt” Crumb Layer:
- 1 cup almond flour
- 2 tbsp butter melted
- 1 tbsp cocoa powder
- 1 tbsp sweetener
Marshmallow Layer:
- ½ cup heavy cream
- 2 tbsp cream cheese
- 1 tbsp powdered sweetener
- ½ tsp vanilla extract
Instructions
- Pour the heavy cream into a clean mixing bowl and begin whipping it using a whisk or hand mixer on medium speed. Keep an eye on the texture—you’re looking for it to thicken slightly and become creamy, not fully whipped yet. It should still be soft and smooth at this stage, not holding stiff peaks.
- Add the cocoa powder, powdered sweetener, and vanilla extract into the partially whipped cream. Continue mixing gently until everything is fully combined and the mixture turns into a smooth, rich chocolate mousse. Be careful not to overwhip, as this can make the texture grainy instead of silky.
- In a separate bowl, combine the almond flour, cocoa powder, melted butter, and sweetener. Mix everything together using a spoon or your hands until it forms a soft, crumbly texture that resembles crushed cookies. If it feels too dry, you can add a tiny bit more melted butter to bring it together.
- In another bowl, add heavy cream, cream cheese, sweetener, and vanilla extract. Whip this mixture until it becomes light, fluffy, and airy. The texture should be smooth and slightly thick, similar to a soft whipped topping. Make sure the cream cheese is fully blended with no lumps.
- Take your serving cups or glasses and begin assembling the layers. Start by adding a layer of the crumb mixture at the bottom of each cup, pressing it down lightly with the back of a spoon so it forms a stable base.
- Spoon a layer of the chocolate mousse over the crumb base. Gently spread it out to create an even layer without disturbing the crumbs underneath.
- Add a layer of the marshmallow-style cream mixture on top of the chocolate layer. Spread it smoothly so each layer remains distinct and visually appealing.
- Continue repeating the layering process—crumbs, chocolate mousse, and marshmallow cream—until the cups are filled. Try to keep the layers even and neat for the best presentation.
- Finish with a final marshmallow layer on top. Smooth it out carefully with a spoon, then sprinkle a few extra crumbs or a light dusting of chocolate shavings for a decorative, dessert-style finish.
- Place the assembled cups into the refrigerator and allow them to chill for at least 1–2 hours. This step is important because it helps the layers set properly and enhances the overall texture and flavor.
- Once chilled, remove the cups from the fridge just before serving. Serve them cold for the best experience, where each spoonful gives you a perfect mix of creamy, chocolatey, and crumbly textures.