This post may contains Amazon affiliate and other affiliate links. If you make a purchase through these links, I may earn a small commission at no extra cost to you. Your support helps me continue to provide quality content. I only recommend products I personally trust and believe will add value to your experience. For more details, please visit my Privacy Policy.
Introduction
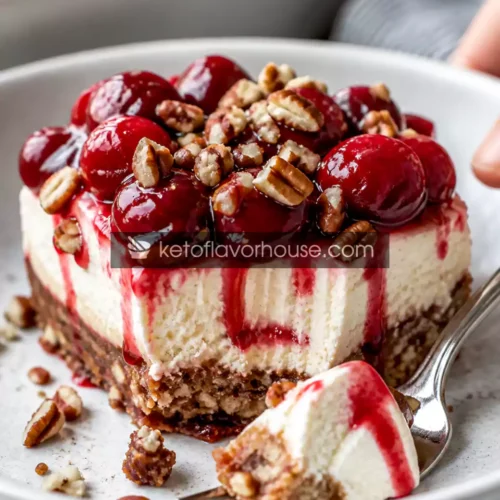
There are certain desserts that feel like a celebration the moment you take the first bite—and this Keto Cherry Pecan Cheesecake Lush (No Bake, Low Carb Dessert) is exactly that kind of treat. I still remember the first time I made it. It was one of those evenings when a strong dessert craving hit, but I didn’t want to break ketosis or spend hours baking in the kitchen. I wanted something creamy, something slightly tangy, something with texture—and most importantly, something that felt indulgent without the guilt.
That’s when this recipe was born.
It combines everything you crave in a classic cheesecake dessert: a buttery pecan crust, a silky cream cheese layer, and a sweet cherry topping that ties everything together beautifully. But unlike traditional versions loaded with sugar and carbs, this one is completely keto-friendly, low carb, and incredibly easy to make.
The best part? No oven required.
This dessert is perfect for anyone following a ketogenic lifestyle, managing blood sugar, or simply looking for a lighter dessert option that still feels rich and satisfying. Whether you’re hosting guests, preparing something special for your family, or just treating yourself after a long day, this lush dessert delivers on flavor, texture, and simplicity.
And once you make it… it becomes one of those recipes you keep coming back to.
Why You’ll Love This Recipe
This isn’t just another keto dessert—it’s a full experience layered into every bite.
✨ No bake convenience – Perfect for hot days or when you want something quick
🧀 Ultra creamy texture – Smooth, rich cheesecake filling that melts in your mouth
🍒 Sweet-tart cherry topping – Adds freshness and balance
🌰 Crunchy pecan crust – Buttery, nutty base for the perfect bite contrast
🥄 Beginner-friendly – No complicated steps or techniques
📉 Low carb & keto-approved – Keeps you on track without sacrificing taste
⏱️ Make-ahead friendly – Tastes even better after chilling
🎉 Crowd-pleaser – Even non-keto eaters will love it
My Personal Experience
I’ll be honest—this recipe came from trial and error.
The first version I made was too soft. The layers didn’t hold properly, and while it tasted good, it didn’t have that “sliceable dessert” feel I was aiming for. The second attempt? Better structure, but the sweetness was slightly off.
But when I finally got it right… it was magic.
The crust had just the right crunch, the cheesecake layer was fluffy yet stable, and the cherry topping added that perfect pop of flavor. I served it to a few friends without telling them it was keto—and not one of them noticed. In fact, someone asked for the “regular cheesecake recipe.”
That’s when I knew this was a keeper.
Now it’s one of my go-to desserts whenever I want something easy, impressive, and absolutely satisfying.
Required Equipment
Mixing Bowls
You’ll need a few bowls to keep everything organized—one for the crust, one for the filling, and one for whipping cream.
Hand Mixer or Whisk
A hand mixer makes whipping cream and blending the cheesecake layer much easier, but a whisk works too if you don’t mind the effort.
Spatula
Essential for folding ingredients gently and creating smooth layers.
Baking Dish (8×8 or similar)
This is where everything comes together. A glass or ceramic dish works best for easy layering and presentation.
Measuring Cups & Spoons
Accuracy matters in keto baking—especially for sweeteners.
Refrigerator Space
Since this is a no-bake dessert, chilling is key to setting the layers properly.
Ingredients & Substitutions
For the Pecan Crust
- 1 ½ cups pecans (finely chopped)
- 4 tbsp unsalted butter (melted)
- 2 tbsp powdered erythritol
- ½ tsp vanilla extract
Why it matters:
Pecans provide a rich, buttery base with low carbs. The butter binds everything together while the sweetener adds balance.
Substitutions:
- Almond flour instead of pecans (softer texture)
- Coconut oil instead of butter (slightly different flavor)
For the Cheesecake Layer
- 200g cream cheese (softened)
- ½ cup heavy cream
- ⅓ cup powdered erythritol
- 1 tsp vanilla extract
- 1 tbsp lemon juice
Why it matters:
This is the heart of the dessert—smooth, tangy, and creamy.
Substitutions:
- Mascarpone for a richer taste
- Monk fruit sweetener instead of erythritol
For the Cherry Layer
- 1 cup fresh or frozen cherries (pitted)
- 2 tbsp erythritol
- 1 tbsp chia seeds
- ¼ cup water
Why it matters:
Cherries bring brightness and contrast, while chia seeds thicken the mixture naturally.
Substitutions:
- Strawberries or raspberries for lower carbs
- Xanthan gum instead of chia seeds
How to Make Keto Cherry Pecan Cheesecake Lush (No Bake, Low Carb Dessert)
Step 1: Prepare the Pecan Crust
Mix chopped pecans, melted butter, sweetener, and vanilla until well combined. Press firmly into the base of your dish.
Tip: Use the back of a spoon to compress it tightly so it holds together when sliced.
Step 2: Chill the Crust
Place the crust in the refrigerator for at least 20–30 minutes.
Tip: This step prevents a crumbly base later.
Step 3: Make the Cheesecake Filling
Beat cream cheese until smooth. Add sweetener, vanilla, and lemon juice. Mix until creamy.
Tip: Make sure cream cheese is fully softened to avoid lumps.
Step 4: Whip the Cream
In a separate bowl, whip heavy cream until soft peaks form.
Step 5: Combine Layers
Gently fold whipped cream into the cheesecake mixture.
Tip: Fold, don’t stir aggressively—this keeps the texture light and airy.
Step 6: Spread Cheesecake Layer
Pour the mixture over the chilled crust and smooth evenly.
Step 7: Prepare Cherry Topping
Cook cherries, sweetener, and water on low heat until soft. Stir in chia seeds and let it thicken.
Step 8: Add Cherry Layer
Spread the cooled cherry mixture over the cheesecake layer.
Step 9: Chill to Set
Refrigerate for at least 3–4 hours (overnight is best).
Common Mistakes to Avoid
- Not softening cream cheese → leads to lumps
- Skipping chill time → layers won’t set properly
- Overmixing whipped cream → becomes dense
- Too much liquid in topping → runny texture
Pro Tips for Best Results
- Chill overnight for clean slices
- Use parchment paper for easy removal
- Taste and adjust sweetness before layering
- Toast pecans lightly for extra flavor
Keto Benefits of Pecans
Pecans are one of the most keto-friendly nuts available. They’re low in net carbs, high in healthy fats, and provide a rich, satisfying texture. They also help keep you full longer, making them perfect for desserts that won’t spike blood sugar.
Variations You Can Try
- Chocolate drizzle version
- Lemon cheesecake twist
- Strawberry or blueberry topping
- Coconut crust alternative
Tips for This Recipe
- Always chill before serving
- Slice with a warm knife for clean edges
- Store covered to maintain freshness
Optional Additions
- Whipped cream topping
- Sugar-free chocolate chips
- Crushed nuts for garnish
Serving Ideas
Serve this dessert at family dinners, gatherings, or even as a weekday treat. It pairs beautifully with keto coffee or a light whipped topping.
Storage Recommendations
- Fridge: Up to 4 days
- Freezer: Up to 1 month
- Reheat: Not needed—serve chilled
Frequently Asked Questions
Can I make this dairy-free?
Yes, use coconut cream and dairy-free cream cheese.
Can I use canned cherries?
Only if sugar-free.
Can I freeze it?
Yes, it freezes well.
Is this dessert very sweet?
Moderately sweet—adjust to taste.
Can I use almond flour instead of pecans?
Yes, but texture will be softer.
How long should it chill?
Minimum 4 hours, preferably overnight.
Can I make it ahead?
Absolutely—it’s even better the next day.
Nutritional Breakdown (Per Serving)
- Calories: 320
- Protein: 6g
- Fat: 28g
- Total Carbs: 8g
- Net Carbs: 4g
Recipe Snapshot
- Prep Time: 20 minutes
- Chill Time: 4 hours
- Total Time: 4 hours 20 minutes
- Course: Dessert
- Cuisine: Keto / Low Carb
- Servings: 8
- Calories: 320
Keto Cherry Pecan Cheesecake Lush Recipe
Ingredients
- Pecans – 1½ cups
- Butter – 4 tbsp
- Cream cheese – 200g
- Heavy cream – ½ cup
- Erythritol – ⅓ cup
- Vanilla extract – 1 tsp
- Lemon juice – 1 tbsp
- Cherries – 1 cup
- Chia seeds – 1 tbsp
Instructions
- Start by finely chopping the pecans until they resemble small, even crumbs—this helps the crust hold together better. Transfer them to a mixing bowl, then pour in the melted butter, powdered sweetener, and vanilla extract. Mix everything thoroughly until all the pecans are evenly coated and slightly glossy. The mixture should feel moist but not overly greasy.
- Pour the pecan mixture into your serving dish and begin pressing it down firmly using the back of a spoon or the bottom of a glass. Take your time here—pressing tightly is key to creating a crust that won’t crumble when sliced. Make sure the layer is even across the base, especially around the edges.
- Place the dish into the refrigerator and let the crust chill for about 20–30 minutes. This step allows the butter to solidify, helping the crust set firmly and making it easier to layer the filling later.
- While the crust is chilling, add the softened cream cheese to a mixing bowl. Beat it until completely smooth and creamy, making sure there are no lumps. If the cream cheese isn’t soft enough, it can create a grainy texture, so take a moment to ensure it’s properly softened before mixing.
- Add the powdered sweetener, vanilla extract, and fresh lemon juice to the cream cheese. Continue mixing until everything is fully incorporated and silky smooth. The lemon juice enhances the classic cheesecake flavor, so don’t skip it.
- In a separate bowl, pour in the heavy cream and whip it until soft peaks form. You’ll know it’s ready when the cream holds its shape but still looks soft and airy. Be careful not to overwhip, as it can turn dense or slightly grainy.
- Gently fold the whipped cream into the cream cheese mixture using a spatula. Do this slowly and carefully, lifting and folding rather than stirring. This keeps the mixture light, fluffy, and mousse-like—perfect for that “lush” texture.
- Remove the chilled crust from the refrigerator and spread the cheesecake mixture evenly over it. Use a spatula to smooth out the top, making sure the layer is level and reaches all corners of the dish.
- In a small saucepan, combine the cherries, sweetener, and water. Cook over low to medium heat, stirring occasionally, until the cherries soften and release their juices. This usually takes about 5–7 minutes.
- Once the cherries are soft, stir in the chia seeds and mix well. Remove the saucepan from heat and let the mixture cool. As it cools, it will naturally thicken into a jam-like consistency without needing any starch.
- After the cherry topping has cooled, gently spread it over the cheesecake layer. Try to distribute it evenly so each slice gets a perfect balance of creamy and fruity layers.
- Place the assembled dessert back into the refrigerator and let it chill for at least 4 hours, though overnight is ideal. This allows all the layers to fully set and makes slicing much cleaner and easier.
- When ready to serve, use a sharp knife to cut into portions. For cleaner slices, wipe the knife between cuts. Serve chilled and enjoy the creamy, crunchy, and fruity layers in every bite.