This post may contains Amazon affiliate and other affiliate links. If you make a purchase through these links, I may earn a small commission at no extra cost to you. Your support helps me continue to provide quality content. I only recommend products I personally trust and believe will add value to your experience. For more details, please visit my Privacy Policy.
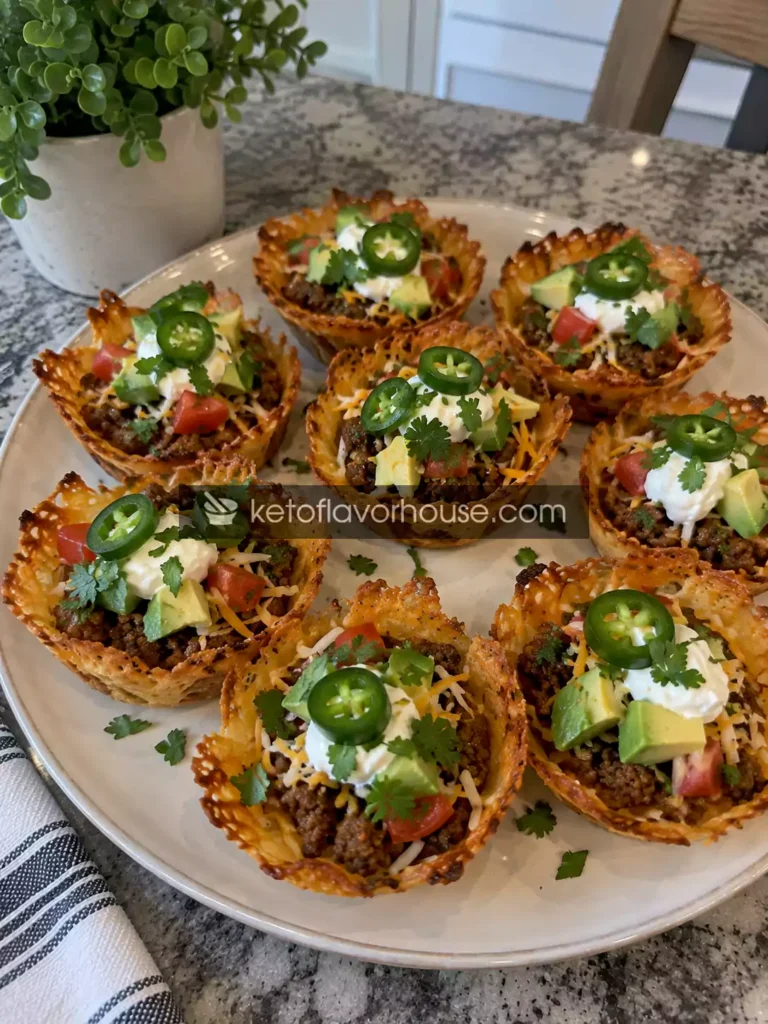
There are some days when I want something crunchy and cheesy enough to feel like a real snack, but I don’t want to make a complicated keto recipe just to satisfy that craving. That’s exactly when these Zero-Carb Taco Cheese Cups come to the rescue. Crispy baked cheese forms little edible cups, then they’re filled with juicy seasoned ground beef, jalapeño, fresh cilantro, and a few simple taco-inspired toppings. They are salty, crunchy, savory, and incredibly satisfying straight from the oven.
The idea is wonderfully simple: instead of using a tortilla or a flour-based taco shell, the cheese itself becomes the shell. As the cheese melts and spreads across the baking sheet, it develops crisp golden edges. While it’s still warm and flexible, you shape each round into a little cup and let it cool until firm. Once filled with seasoned beef, every bite gives you that combination of crispy shell and juicy taco filling that makes these so hard to stop eating.
This is a keto-friendly recipe designed around very low-carbohydrate ingredients. Because the exact carbohydrate content of cheese varies between brands and some labels round very small amounts down to zero, the nutrition should always be checked against the products you use. With the ingredients and quantities below, the estimated carbohydrates are extremely low and may round to 0g per serving depending on the labels used.
And that’s really what I love about this recipe. It doesn’t feel like you’re eating a “diet version” of tacos. The cheese gets deeply golden and crunchy, the beef is seasoned with smoky paprika, cumin, garlic, and chili, and the fresh toppings cut through all that richness. They’re perfect for keto snack plates, game nights, casual dinners, parties, or those evenings when you want something crunchy without reaching for a bag of chips.
Why You’ll Love This Recipe
- 🧀 Crispy cheese shell – Melted cheese transforms into a crunchy little taco cup without flour or tortillas.
- 🌮 All the taco flavor – Seasoned beef, cumin, paprika, garlic, chili, and fresh toppings give every bite a familiar taco-inspired taste.
- 🥩 Protein-rich – Ground beef and cheese make these much more satisfying than an ordinary cheese snack.
- 🥑 Keto-friendly ingredients – The recipe is built around very low-carbohydrate ingredients.
- 🔥 No deep frying – The cheese cups are baked until crisp instead of being fried.
- ⏱️ Simple preparation – The ingredient list is short and the technique is easier than it looks.
- 🌶️ Easy to customize – Add jalapeño, chili, avocado, sour cream, or your favorite low-carb taco toppings.
- 🎉 Great party food – The individual cups are easy to arrange on a platter and serve.
- 🍿 Perfect for snack cravings – They give you that crunchy, salty texture that can be difficult to recreate on a low-carb diet.
- ✨ Fun presentation – Everyone gets their own little edible cheese cup.
My Personal Experience
I originally thought these would be one of those recipes that looked much more complicated than it actually was.
The first time I made them, I was mostly experimenting with the idea of turning melted cheese into a taco shell. I’d seen cheese crisps before, but I wanted something more substantial—something that could actually hold taco filling.
So I grated some cheese, made small circles on a baking sheet, and put them into the oven.
For a few minutes, nothing seemed particularly exciting.
Then the cheese started bubbling.
The edges became golden brown, the center spread into a thin round, and the kitchen suddenly smelled like toasted cheese.
That’s when I realized the timing was going to matter.
I waited too long with my first batch.
By the time I tried shaping the cheese, it had already hardened.
I could barely bend it.
My second batch went much better because I stayed nearby and watched the edges instead of relying entirely on the timer. As soon as the cheese had melted completely and the edges were golden, I removed it and gave it a short rest.
Then I carefully draped each cheese round over the bottom of an upside-down small bowl.
It worked.
Not perfectly—one cracked down the middle—but that’s part of the fun with homemade recipes.
The next important discovery was the filling.
I initially made the beef too heavily seasoned. The crispy cheese shell was already salty and rich, so a very aggressive taco seasoning made the whole thing taste heavy.
Now I keep the beef flavorful but balanced with cumin, paprika, garlic, chili, black pepper, and just enough salt.
Then I add fresh toppings.
A little jalapeño.
Some cilantro.
A spoonful of sour cream.
Sometimes avocado.
That combination is what makes these cups work.
The cheese shell is rich and crunchy, while the toppings provide freshness.
It’s one of those recipes where the contrast matters just as much as the individual ingredients.
Required Equipment
Large Baking Sheet
A large baking sheet gives you enough space to spread the cheese rounds apart.
Don’t overcrowd the pan because melted cheese expands considerably.
If you have two baking sheets, you can prepare a larger batch more comfortably.
Parchment Paper
Parchment paper makes removing the baked cheese much easier.
It also helps prevent the cheese from sticking directly to the baking sheet.
Avoid wax paper because it isn’t designed for the same oven temperatures.
Small Bowl or Ramekin
You’ll use a small bowl or ramekin as a mold for shaping the warm cheese rounds.
Turn it upside down and drape the warm cheese over the bottom.
Choose a shape that gives you the cup size you want.
Large Skillet
The skillet is used to brown the ground beef and cook away excess moisture.
A wide skillet works particularly well because it allows the beef to brown instead of steam.
Spatula
A thin, flexible spatula helps lift the warm cheese rounds from the parchment and transfer them to the shaping mold.
It also makes breaking up and stirring the ground beef much easier.
Mixing Bowl
Use a small bowl to combine the taco-seasoning mixture before adding it to the beef.
This distributes the spices evenly.
Cheese Grater
Freshly grated cheese melts more evenly than many pre-shredded varieties.
A box grater works perfectly.
Ingredients & Substitutions
For the Cheese Cups
240 grams shredded sharp cheddar cheese
Cheddar is the main ingredient that creates the cups.
Sharp cheddar gives you plenty of flavor without needing a huge amount of additional seasoning.
Freshly grated cheddar usually melts beautifully and develops crisp golden edges.
You can substitute Monterey Jack, Colby Jack, or a cheddar-Monterey Jack blend.
A softer cheese may spread differently, so keep an eye on the oven during the first batch.
60 grams grated Parmesan cheese
Parmesan helps the cheese cups become especially crisp.
It also adds a nutty, salty flavor that works beautifully with the taco-seasoned beef.
You can replace it with finely grated Asiago or another hard aged cheese.
For the Taco Beef
250 grams lean ground beef
Ground beef gives the cups their main savory protein filling.
I like using approximately 90–93% lean beef because it provides enough fat for flavor without leaving the filling excessively greasy.
If you use very fatty beef, drain excess grease after browning.
Ground turkey can replace beef if you prefer a lighter flavor.
Ground chicken also works, although you’ll want to be especially careful not to overcook it.
1 teaspoon chili powder
Chili powder provides the familiar taco-style warmth.
Use a mild or hot version depending on your preference.
1 teaspoon ground cumin
Cumin gives the beef its earthy, warm flavor.
It’s one of the most important spices in the filling.
1/2 teaspoon smoked paprika
Smoked paprika adds subtle smokiness.
Regular paprika can be used if you prefer a less smoky flavor.
1/2 teaspoon garlic powder
Garlic powder spreads evenly through the beef and keeps the seasoning mixture dry.
1/4 teaspoon onion powder
Onion powder adds savory depth without introducing the moisture that fresh onion would.
1/4 teaspoon dried oregano
Oregano adds a subtle herbal note.
It also works nicely with the cheese and beef.
1/4 teaspoon black pepper
Black pepper provides a gentle bite.
1/4 teaspoon fine sea salt
Use salt conservatively because cheddar and Parmesan already contribute plenty.
Taste the cooked beef before adding additional salt.
1 tablespoon water
A small amount of water helps the spices coat the beef evenly.
The water cooks away during the final minute of cooking.
Fresh Toppings
1 small jalapeño, thinly sliced
Jalapeño adds freshness and heat.
Remove the seeds for a milder version.
2 tablespoons fresh cilantro, chopped
Cilantro provides a fresh herbal contrast to the rich cheese and beef.
If you don’t enjoy cilantro, use fresh parsley.
1/2 small avocado, diced
Avocado adds creamy texture.
It isn’t necessary, but I love it with the crispy cheese shell.
60 grams sour cream
A small spoonful of sour cream cools down the seasoned beef and adds creaminess.
For a thicker option, use full-fat Greek yogurt, although the flavor will be slightly tangier.
1 tablespoon fresh lime juice
Lime adds acidity.
Just a small amount makes the cheese and beef taste brighter.
How to Make Zero-Carb Taco Cheese Cups
Step 1: Preheat the Oven
Preheat your oven to 375°F (190°C).
Line a large baking sheet with parchment paper.
Make sure the parchment lies completely flat.
If the paper curls at the edges, place a small amount of cheese on the corners later to help hold it down.
Step 2: Prepare the Cheese
Combine the shredded cheddar and grated Parmesan in a bowl.
Mix them together lightly.
Don’t compress the cheese.
You want it loose enough to spread evenly when it melts.
Step 3: Make the Cheese Circles
Place approximately 30 grams of the cheese mixture onto the parchment for each cup.
Shape each portion into a rough circle approximately 4–5 inches wide.
Leave at least 1–2 inches between each circle.
Don’t worry about perfect circles.
The edges will naturally become irregular as the cheese melts, and those crispy uneven edges are one of the best parts.
Step 4: Bake the Cheese
Place the baking sheet in the oven.
Bake for approximately 6–9 minutes.
The exact time will depend on your cheese and oven.
Watch the first batch carefully.
The cheese should be completely melted, bubbling, and beginning to turn golden around the edges.
Don’t wait until the entire surface is dark brown.
If the cheese becomes too dark, it will be brittle and difficult to shape.
Step 5: Let the Cheese Cool Briefly
Remove the baking sheet from the oven.
Let the cheese rounds cool for approximately 30–60 seconds.
This is the tricky window.
They need to be cool enough to handle but still flexible.
If you wait several minutes, they’ll become crisp and difficult to shape.
Step 6: Shape the Cheese Cups
Turn a small bowl or ramekin upside down.
Carefully lift one warm cheese round with a thin spatula.
Drape it over the bottom of the inverted bowl.
Gently press the sides down to create a cup shape.
Don’t press too aggressively.
The cheese is hot and can tear if handled roughly.
Repeat with the remaining cheese rounds.
If a round begins hardening before you shape it, return it to the warm baking sheet for about 10–15 seconds to soften it slightly.
Step 7: Allow the Cups to Set
Leave the cheese cups on the inverted bowls for approximately 5–10 minutes.
As they cool, they will become crisp and firm.
Once fully set, carefully lift them from the molds.
They should hold their shape without collapsing.
Prepare the Taco Beef
Step 8: Combine the Seasonings
In a small bowl, combine the chili powder, cumin, smoked paprika, garlic powder, onion powder, oregano, black pepper, and salt.
Mix well.
Having the seasoning mixture ready means you won’t have to measure individual spices while the beef is cooking.
Step 9: Brown the Ground Beef
Heat a large skillet over medium-high heat.
Add the ground beef.
Break it apart with your spatula.
Let it cook without constantly stirring for the first minute or two.
This gives the beef a chance to develop some browned edges.
Then continue breaking it into small crumbles.
Step 10: Add the Seasoning
Once the beef is mostly browned, add the prepared seasoning mixture.
Stir thoroughly so the spices coat all the meat.
Add the tablespoon of water.
Continue cooking for another 1–2 minutes until the water has evaporated and the beef looks moist but not wet.
Taste and adjust the seasoning if necessary.
Step 11: Prepare the Fresh Toppings
While the beef cooks, slice the jalapeño and chop the cilantro.
Dice the avocado.
Keep the avocado separate until you’re ready to assemble because it can brown after being exposed to air.
Cut the lime into wedges or squeeze the required amount of juice into a small bowl.
Step 12: Fill the Cheese Cups
Place the cooled cheese cups on a serving platter.
Spoon a small amount of taco beef into each cup.
Don’t fill them completely.
Overfilling makes them difficult to pick up and increases the chance of cracking.
Step 13: Add the Toppings
Add a small spoonful of sour cream to each cup.
Top with diced avocado, jalapeño, and cilantro.
Finish with a tiny squeeze of fresh lime.
Serve immediately.
The contrast between the crisp cheese shell and warm beef is at its best when the cups are freshly assembled.
Common Mistakes to Avoid
Baking the Cheese Too Long
The biggest mistake is assuming darker means crispier.
Very dark cheese becomes brittle and can taste bitter.
Fix: Look for bubbling cheese and golden edges rather than a completely dark surface.
Waiting Too Long Before Shaping
Once cheese crisps cool completely, they become difficult to mold.
Fix: Start shaping approximately 30–60 seconds after removing them from the oven.
Making the Cheese Circles Too Thin
Very thin cheese can create fragile cups.
Fix: Use approximately 30 grams per cup and keep the cheese layer reasonably even.
Making the Circles Too Thick
A very thick layer can remain soft in the center.
Fix: Spread each portion into a 4–5-inch circle.
Using Wet Beef
Excess moisture can soften the cheese cup.
Fix: Cook the beef until the water has evaporated and drain excess grease if necessary.
Overfilling the Cups
Too much filling can crack the shell.
Fix: Add a modest amount of beef and toppings.
Adding Toppings Too Early
If you fill the cups long before serving, moisture from sour cream and vegetables will soften the cheese.
Fix: Keep the components separate and assemble shortly before eating.
Over-Salting
Cheddar and Parmesan are already salty.
Fix: Season the beef lightly, taste it, and adjust only if necessary.
Pro Tips for Best Results
The first batch is your test batch.
Cheeses behave differently depending on their moisture content, age, and how finely they’re shredded.
Bake one or two cheese circles first.
See how much they spread.
If they spread too far, use slightly less cheese per cup.
If they don’t spread enough, make the circles slightly smaller or use a little less cheese.
Another important trick is to grate your own cheese when possible.
Pre-shredded cheese often contains ingredients that prevent the shreds from sticking together in the package. Those ingredients can sometimes affect how smoothly the cheese melts.
Freshly grated cheese tends to give you a more predictable result.
For extra-crispy cups, make sure the edges become distinctly golden.
The center should still look slightly lighter.
That gives you a good balance between crispness and structural strength.
When making the beef, don’t leave it swimming in grease.
The filling should be juicy but relatively dry.
If your beef releases a lot of fat, drain some before adding the toppings.
And finally, don’t assemble these too early.
If you’re serving them at a party, make the cheese cups and beef ahead, but keep the components separate.
Fill them shortly before putting them on the table.
Keto Benefits of Cheese
Cheese is a natural fit for many low-carbohydrate recipes because it provides fat and protein while generally containing very little carbohydrate compared with flour-based ingredients.
Here, cheese has an even more important job.
It isn’t simply a topping.
It becomes the shell.
That’s what makes these cups different.
The cheddar provides structure, flavor, and browning, while Parmesan helps create a crispier texture and adds a nutty savory note.
Because cheese varieties differ, always check the nutrition label of the specific cheese you’re using. Some cheeses contain small amounts of carbohydrates that may or may not be rounded to zero on the package.
For this recipe, the estimated carbohydrate amount is extremely low, which is why the recipe is designed around the “zero-carb” concept.
Variations You Can Try
🌶️ Spicy Taco Cheese Cups
Add extra chili powder and sliced jalapeños to the beef.
For even more heat, add a pinch of cayenne.
A little hot sauce can also be added immediately before serving.
🧄 Garlic-Lover’s Version
Increase the garlic powder slightly and add finely minced roasted garlic to the beef after cooking.
Roasted garlic gives the filling a softer, sweeter flavor.
🧀 Three-Cheese Cups
Use a mixture of cheddar, Parmesan, and Monterey Jack.
The Monterey Jack melts beautifully and gives the cups a slightly softer, creamier character.
Because the melting behavior changes, test one cup first.
🥑 Taco Guacamole Cups
Mash the avocado with lime juice, salt, and cilantro.
Add a small spoonful of guacamole to each cup.
The creamy avocado works wonderfully with the crunchy cheese.
🌿 Fresh Herb Version
Add extra cilantro and a little fresh parsley.
Finish with lime zest.
This makes the rich cheese shell taste noticeably fresher.
🫒 Mediterranean-Taco Fusion
Add chopped Kalamata olives, feta, cucumber, and parsley instead of traditional taco toppings.
This creates a fun Mediterranean-inspired variation while keeping the crispy cheese-cup concept.
🥩 Steak Version
Replace the ground beef with finely chopped cooked steak.
Season the steak with cumin, paprika, garlic, and black pepper.
Because steak is already cooked, add it near the end just long enough to warm it through.
🍗 Chicken Version
Use finely diced cooked chicken breast instead of beef.
Season it with the same spice mixture.
A little extra lime and fresh cilantro works especially well with chicken.
Alternative Cooking Methods
Oven Method
The oven is the easiest and most consistent way to make the cheese cups.
Bake at 375°F (190°C) until melted and golden.
This allows the cheese to spread evenly.
Air Fryer Method
You can make smaller cheese crisps in an air fryer, although shaping them into cups is slightly more difficult.
Place small portions of cheese on parchment designed for your air fryer and cook around 350°F (175°C) for approximately 4–6 minutes.
Watch carefully.
Because air fryers circulate hot air directly around the cheese, the edges can brown quickly.
Shape the cheese while warm.
Stovetop Method
You can melt the cheese in small rounds in a nonstick skillet.
Cook over medium heat until the cheese melts and the edges become golden.
Carefully lift each round and shape it immediately.
This method works, but I find the oven easier when making multiple cups.
Tips for This Recipe
If you’re making these for a gathering, make the cheese cups first.
They can cool completely and remain crisp as long as they’re kept in a dry, airtight container.
Prepare the taco beef separately.
Reheat it gently before serving.
Don’t add the sour cream, avocado, or other wet toppings until you’re ready to eat.
If you want maximum crunch, assemble each cup individually.
A small spoonful of beef is better than a large mound.
Think of these more like bite-sized taco cups than large tacos.
That makes them easier to eat and keeps the cheese-to-filling ratio balanced.
If a cheese cup cracks while you’re shaping it, don’t throw it away.
You can place the broken pieces over a salad, crumble them over scrambled eggs, or simply eat them as crispy cheese chips.
Not every cup has to look identical.
In fact, I prefer when they look homemade.
Optional Additions
These toppings work particularly well:
- Diced avocado
- Sour cream
- Fresh cilantro
- Fresh parsley
- Jalapeño
- Lime zest
- Fresh lime juice
- Chopped olives
- Feta
- Pickled jalapeños
- Low-carb salsa
- Diced cucumber
- Guacamole
- Chopped green onion
- Red pepper flakes
- Extra shredded cheese
If you’re keeping the recipe as close to zero carbohydrate as possible, check the nutrition labels on prepared salsa, sauces, and dairy products before using them.
Simple fresh toppings are usually easiest to control.
Serving Ideas
These cheese cups are fantastic as an appetizer.
Arrange them on a platter and let everyone grab one or two.
They’re also great for a casual taco night.
Instead of putting out tortillas, put out the crispy cheese cups and several bowls of toppings.
For a more complete dinner, serve them with:
- Avocado salad
- Lettuce and cucumber salad
- Grilled vegetables
- Cauliflower rice
- Guacamole
- Sour cream
- Fresh herbs
- A simple tomato salsa with nutrition that fits your needs
They’re also ideal for movie night.
A plate of crunchy cheese cups feels much more indulgent than a typical low-carb snack.
For entertaining, make smaller cheese circles and create miniature cups.
Fill them with a tiny amount of beef, sour cream, jalapeño, and cilantro.
They become almost like little taco appetizers.
For lunch, pair several cups with a fresh salad.
The salad provides additional volume and freshness while the cheese cups provide the rich, savory centerpiece.
Storage Recommendations
Cheese Cups
Store completely cooled cheese cups in an airtight container.
Place parchment between layers if stacking them.
Keep them in a cool, dry place for short-term storage or refrigerate if necessary.
Humidity is the enemy of crisp cheese.
If refrigerated, they may soften slightly.
Cooked Beef
Store cooked taco beef separately in an airtight container in the refrigerator for up to 3–4 days.
Reheat it in a skillet over medium heat until hot.
Fully Assembled Cups
I don’t recommend storing fully assembled cups.
Sour cream, avocado, and other moist toppings gradually soften the cheese.
Keep everything separate and assemble immediately before serving.
Freezing
The cooked taco beef can be frozen for approximately 2–3 months in a freezer-safe container.
The cheese cups themselves aren’t my favorite thing to freeze because their texture can change.
For the best crunchy result, make the cheese cups fresh.
Reheating
Never microwave the assembled cups if you want them crunchy.
For leftover cheese cups that have softened, place them in a 350°F (175°C) oven or air fryer for a few minutes until crisp again.
Watch them carefully because they can go from crisp to over-browned quickly.
Frequently Asked Questions
Are Zero-Carb Taco Cheese Cups actually zero carb?
The recipe is designed to be extremely low in carbohydrate and may calculate to 0g total carbohydrates per serving when rounded, depending on the nutrition labels of the cheese and other ingredients.
However, cheese can contain small amounts of naturally occurring carbohydrates, and different brands report them differently.
If precise carbohydrate intake matters to you, calculate the recipe using the exact products you purchase.
What cheese is best for cheese cups?
Sharp cheddar combined with Parmesan works very well.
Cheddar provides flavor and structure, while Parmesan helps create a crisp texture.
You can also experiment with Monterey Jack, Colby Jack, or other melting cheeses.
Always test a single cup if you’re changing the cheese blend.
Why did my cheese cups stick to the parchment?
The cheese may have been underbaked, or the parchment may not have been suitable for baking.
Allow the cheese to cool for about 30–60 seconds before lifting it.
A thin spatula can also help separate the edges gently.
Why did my cheese cups break?
They may have cooled too much before shaping, or they may have been baked until excessively dark and brittle.
Shape them while they’re still warm and flexible.
If they become too firm, you can sometimes warm them very briefly to make them flexible again.
Can I make these with mozzarella?
Yes.
Mozzarella can work, although it tends to produce a softer and stretchier result than cheddar.
Combining mozzarella with Parmesan can help improve crispness.
Because mozzarella has a different moisture level, test one cup before making the entire batch.
Can I use ground chicken?
Yes.
Ground chicken makes a lighter-tasting filling.
Cook it completely and avoid leaving excess moisture in the skillet.
You can use the same taco seasoning mixture.
Can I use ground turkey?
Absolutely.
Turkey works well with cumin, chili powder, paprika, garlic, and oregano.
Because turkey can be lean, avoid overcooking it.
Can I make the cheese cups ahead?
Yes.
The cheese cups can be prepared ahead and stored separately from the filling.
For the best crunch, keep them dry and assemble the tacos shortly before serving.
Can I make these in an air fryer?
Yes.
The cheese can be melted in an air fryer, but you’ll need to work with smaller portions.
Cook at approximately 350°F (175°C) and watch carefully.
Shape the cheese while warm.
What toppings are best for these cups?
Sour cream, avocado, jalapeño, cilantro, and lime are my favorites.
You can also use olives, feta, low-carb salsa, cucumber, or other toppings that fit your eating plan.
Can I freeze the cheese cups?
I prefer not to.
Freezing can affect their crisp texture.
The taco beef freezes much better, so make that ahead and prepare the cheese cups fresh when possible.
How do I keep the cups crispy?
The biggest thing is controlling moisture.
Don’t add wet toppings until serving, don’t overfill the cups, and keep the cooked beef relatively dry.
If you’re preparing them for a party, assemble them as close to serving time as possible.
Nutritional Breakdown Per Serving
The recipe makes 6 servings, with 2 cheese cups per serving.
Estimated nutrition per serving:
- Calories: approximately 445 kcal
- Protein: approximately 31 g
- Fat: approximately 34 g
- Total Carbohydrates: approximately 1 g
- Fiber: approximately 0.5 g
- Net Carbohydrates: approximately 0.5 g
- Sugar: approximately 0.5 g
- Sodium: approximately 650 mg
Depending on the specific cheese brands and nutrition labels used, the carbohydrate value may round to 0g per serving.
Because the title uses “Zero-Carb,” it’s particularly important to check the labels of your cheese and toppings if you need an exact carbohydrate calculation. The practical recipe itself is built around extremely low-carbohydrate ingredients rather than flour, tortillas, or sugary sauces.
Recipe Snapshot
Prep Time: 20 minutes
Cook Time: 20 minutes
Cooling & Shaping Time: 10 minutes
Total Time: 50 minutes
Course: Appetizer, Snack, Lunch, Dinner
Cuisine: Mexican-inspired / Keto
Servings: 6
Calories: ~445 per serving
Protein: ~31 g per serving
Zero-Carb Taco Cheese Cups Recipe

Ingredients
Cheese Cups
- 240 g shredded sharp cheddar cheese
- 60 g grated Parmesan cheese
Taco Beef
- 250 g lean ground beef
- 1 tsp chili powder
- 1 tsp ground cumin
- 1/2 tsp smoked paprika
- 1/2 tsp garlic powder
- 1/4 tsp onion powder
- 1/4 tsp dried oregano
- 1/4 tsp black pepper
- 1/4 tsp fine sea salt
- 1 tbsp water
Toppings
- 1 small jalapeño sliced
- 2 tbsp fresh cilantro chopped
- 1/2 small avocado diced
- 60 g sour cream
- 1 tbsp fresh lime juice
Instructions
- Preheat the oven to 375°F (190°C) and line a large baking sheet with parchment paper. Make sure the parchment lies flat and the baking sheet has enough room to keep the cheese rounds separated.
- Combine the shredded cheddar and grated Parmesan in a bowl. Divide the cheese mixture into 8 portions of approximately 30 grams each and place each portion on the parchment, spreading it into a loose 4–5-inch circle with space between each round.
- Bake the cheese rounds for approximately 6–9 minutes, watching closely. Remove them when the cheese is completely melted, bubbling, and golden around the edges but not deeply browned throughout.
- Allow the baked cheese rounds to cool for approximately 30–60 seconds. While they are still warm and flexible, carefully lift each round with a thin spatula and drape it over the bottom of an upside-down small bowl or ramekin. Gently press the sides down to form cups.
- Allow the cheese cups to cool on the molds for 5–10 minutes, or until completely firm and crisp. Carefully remove each cup from the mold and set aside.
- In a small bowl, combine the chili powder, cumin, smoked paprika, garlic powder, onion powder, oregano, black pepper, and sea salt.
- Heat a large skillet over medium-high heat and add the ground beef. Break it into small pieces and cook until browned and fully cooked, allowing some of the beef to sit undisturbed briefly so it develops browned edges.
- Add the prepared spice mixture and 1 tablespoon water to the beef. Stir thoroughly and cook for another 1–2 minutes until the seasoning is evenly distributed and the excess moisture has cooked away. Drain excess grease if necessary.
- Slice the jalapeño, chop the cilantro, dice the avocado, and prepare the lime juice while the beef finishes cooking.
- Place the cooled cheese cups on a serving platter and spoon a small amount of warm taco beef into each cup. Avoid overfilling so the cheese shells remain crisp and easy to pick up.
- Add a small spoonful of sour cream, followed by diced avocado, sliced jalapeño, and chopped cilantro. Finish each cup with a small squeeze of fresh lime juice.
- Serve immediately for the best contrast between the crisp cheese shell, warm seasoned beef, cool sour cream, creamy avocado, and fresh toppings.