This post may contains Amazon affiliate and other affiliate links. If you make a purchase through these links, I may earn a small commission at no extra cost to you. Your support helps me continue to provide quality content. I only recommend products I personally trust and believe will add value to your experience. For more details, please visit my Privacy Policy.
Introduction
There are days when I crave something cold, creamy, and comforting, but I also want it to leave me feeling refreshed instead of sluggish. Those are usually the afternoons when I’ve been sitting at my desk for hours, feeling a little heavy, low on energy, or simply wanting a treat that fits into the healthy habits I’ve been trying to build. That’s exactly why this Anti-Inflammatory Golden Turmeric Ice Cream has become one of my favorite homemade desserts.
The first time I experimented with turmeric in ice cream, I honestly wasn’t sure what to expect. Turmeric is something I usually associate with warm curries, soups, or golden milk, not frozen desserts. But after one spoonful, I realized how beautifully it pairs with creamy coconut milk, rich heavy cream, warming cinnamon, fresh ginger, and fragrant vanilla. Instead of tasting like a spice cabinet, the finished ice cream has a mellow, lightly earthy sweetness with hints of vanilla and subtle warmth that make every bite feel comforting.
What I appreciate most about this recipe is that it satisfies a dessert craving without feeling overwhelmingly sweet. It has a rich, velvety texture that slowly melts on your tongue, while the turmeric and ginger give it a unique flavor that’s both cozy and refreshing. It’s one of those desserts that feels special enough for guests but simple enough to keep in the freezer for an ordinary weeknight.
I also love that this recipe fits naturally into an anti-inflammatory eating pattern without feeling restrictive. It focuses on wholesome ingredients, healthy fats, warming spices, and balanced sweetness instead of relying on refined sugar. While it’s certainly a dessert first and foremost, it also feels nourishing in a way that many frozen treats simply don’t.
Because it’s keto-friendly and sugar-free, it’s perfect for anyone looking to enjoy homemade ice cream while keeping carbohydrates low. Whether you’re following a ketogenic lifestyle, reducing added sugars, or simply searching for new turmeric recipes to add to your collection, this recipe offers something a little different from the usual vanilla or chocolate options.
It’s also surprisingly practical for busy schedules. Most of the work happens in just a few minutes on the stovetop, and after that the freezer does the rest. I often prepare the base in the evening, let it chill overnight, and churn it the next day. Having a container of homemade ice cream waiting in the freezer always feels like a little gift to my future self.
If you’ve never tried turmeric in dessert before, don’t worry. The flavors are beautifully balanced, and even people who normally hesitate around turmeric are usually surprised by how creamy, delicate, and satisfying this ice cream turns out.
Why You’ll Love This Recipe
There are plenty of reasons this has become one of my favorite healthy frozen desserts.
- 🥬 Made with naturally anti-inflammatory ingredients like turmeric, ginger, and cinnamon.
- ⚡ A satisfying dessert that feels light while still being wonderfully creamy.
- 🧡 Comforting warm spices balance perfectly with cool, refreshing ice cream.
- 👩🍳 Easy enough for beginners to make at home.
- 🥣 Great for preparing ahead and storing in the freezer.
- 🔥 Naturally flavorful without relying on refined sugar.
- 💪 Healthy fats help make every serving rich and satisfying.
- 🌿 Keto-friendly and low in carbohydrates.
- 🍨 Smooth, velvety texture that rivals premium ice cream.
- 🍋 Fresh lemon zest brightens every bite.
- 🥥 Coconut milk creates incredible creaminess.
- ❄️ Perfect for warm summer afternoons or cozy evenings alike.
- 🍽️ Makes an elegant dessert for dinner parties.
- ❤️ A fun way to enjoy more turmeric in your everyday cooking.
- ✨ Easy to customize with your favorite toppings.
My Personal Experience
I’ll admit that this recipe came from pure curiosity.
I had been making golden milk regularly during cooler months, and one afternoon I caught myself wondering what those same comforting flavors would taste like as ice cream. It sounded a little unusual at first, but the idea kept coming back to me.
The first batch wasn’t perfect.
I used too much turmeric, thinking more would be better. Instead, it overpowered everything else and left the ice cream tasting a little too earthy.
The next time I reduced the turmeric slightly, added fresh grated ginger instead of powdered ginger, and increased the vanilla.
That changed everything.
The flavors suddenly felt balanced. Instead of one spice dominating, every ingredient worked together. The vanilla softened the turmeric, the cinnamon added warmth, the ginger brought freshness, and the creamy base tied everything together beautifully.
Now it’s become one of those recipes I make whenever I want something comforting without reaching for overly sweet desserts.
One of my favorite moments was serving it after a family dinner without telling anyone what it was. Everyone expected vanilla.
Instead, they took a bite, looked at each other, smiled, and immediately started guessing the ingredients.
Watching people discover turmeric in dessert is honestly part of the fun.
Even friends who usually say they “don’t like turmeric” often end up asking for another scoop.
That’s usually when I know the recipe is worth keeping.
Required Equipment
Medium Saucepan
A medium saucepan allows you to gently heat the ice cream base without scorching the dairy.
Low, gentle heat helps the spices bloom while keeping the mixture silky smooth.
Whisk
A whisk is essential for blending the turmeric, sweetener, spices, and cream together evenly.
Continuous whisking also prevents small lumps from forming.
Mixing Bowl
Use a heat-safe bowl for cooling the mixture before refrigeration.
A shallow bowl helps the base cool more quickly.
Fine Mesh Strainer (Optional)
If you’d like an extra-smooth texture, strain the mixture before chilling.
This removes tiny pieces of fresh ginger or turmeric that may remain.
Measuring Cups
Accurate measurements are especially important for homemade ice cream.
Too much liquid or sweetener can affect the final texture.
Measuring Spoons
Turmeric and cinnamon are powerful spices.
Using measuring spoons keeps their flavors balanced.
Ice Cream Maker
An ice cream maker creates the smoothest, creamiest texture.
If you don’t own one, a no-churn method also works, although the texture will be slightly denser.
Airtight Freezer Container
A shallow freezer-safe container helps the ice cream freeze evenly.
Choose one with a tight-fitting lid to reduce ice crystals.
Ice Cream Scoop
Running the scoop under warm water makes serving much easier.
It creates beautiful, smooth scoops every time.
Ingredients & Substitutions
Heavy Cream — 2 cups
Heavy cream creates the rich, luxurious texture that makes homemade ice cream so satisfying.
Its healthy fat content also contributes to the smooth mouthfeel that helps prevent icy crystals.
Substitutions
- Coconut cream for a dairy-free version.
- Half heavy cream and half Greek yogurt for a tangier texture (not keto).
Texture becomes slightly lighter with substitutions.
Full-Fat Coconut Milk — 1 cup
Coconut milk adds incredible creaminess while complementing the warm spices.
Its natural richness pairs beautifully with turmeric.
Substitutions
- Unsweetened almond milk (less creamy).
- Additional heavy cream for an even richer dessert.
Powdered Allulose — ¾ cup
Allulose keeps the ice cream soft straight from the freezer while providing gentle sweetness.
Unlike some keto sweeteners, it doesn’t crystallize as easily.
Substitutions
- Powdered monk fruit blend.
- Powdered erythritol (firmer texture).
- Powdered keto sweetener of choice.
Egg Yolks — 4 large
Egg yolks create a classic custard base.
They give the ice cream a silky texture while adding richness.
Substitutions
For an egg-free version:
- 1 teaspoon xanthan gum.
- 2 tablespoons cream cheese.
The texture changes slightly but still remains creamy.
Ground Turmeric — 2 teaspoons
Turmeric is the star ingredient.
It provides the beautiful golden color and subtle earthy warmth that gives this dessert its signature personality.
It also fits naturally into an anti-inflammatory eating pattern.
Fresh Grated Ginger — 2 teaspoons
Fresh ginger brightens the flavor and balances the richness of the cream.
It adds gentle warmth without becoming spicy.
Substitutions
- ½ teaspoon ground ginger.
Fresh ginger offers the freshest flavor.
Ground Cinnamon — 1 teaspoon
Cinnamon adds sweetness without adding sugar.
It beautifully complements both turmeric and vanilla.
Vanilla Extract — 2 teaspoons
Vanilla softens the spices and brings everything together.
Always use pure vanilla if possible.
Lemon Zest — 1 teaspoon
A small amount of fresh lemon zest brightens the entire dessert.
It keeps the rich ingredients from feeling heavy.
Pinch of Sea Salt
Just a tiny amount enhances every flavor without making the dessert salty.
How to Make Anti-Inflammatory Golden Turmeric Ice Cream
Step 1 – Prepare the Custard Base
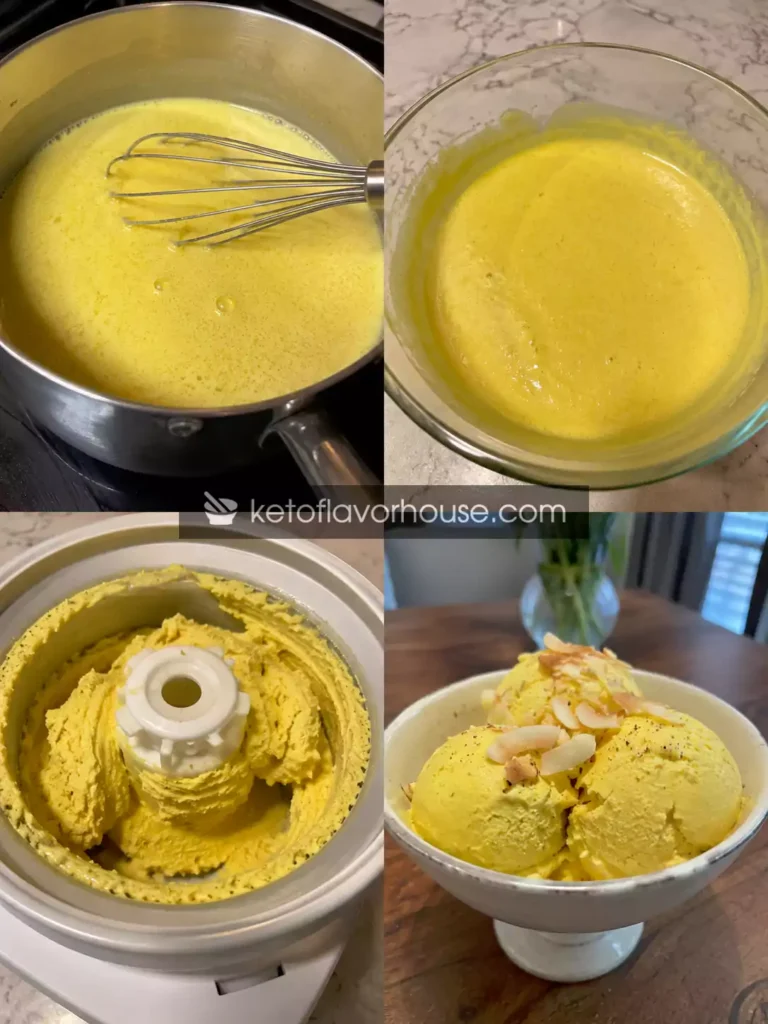
In a medium saucepan, combine the heavy cream, coconut milk, turmeric, ginger, cinnamon, and sea salt.
Warm gently over medium-low heat.
Avoid boiling.
You’ll begin to notice the spices becoming wonderfully fragrant after several minutes.
That aroma is a good sign the flavors are beginning to bloom.
Step 2 – Whisk the Egg Yolks
While the cream warms, whisk the egg yolks together with the powdered allulose until the mixture becomes lighter in color.
The sweetener should dissolve almost completely.
Take your time here.
A well-whisked custard creates a much smoother final texture.
Step 3 – Temper the Eggs
Slowly pour a small amount of the warm cream into the egg mixture while whisking constantly.
Continue adding more cream a little at a time.
This gradual process prevents scrambled eggs and creates a silky custard.
Don’t rush this step.
Patience makes all the difference.
Step 4 – Cook Until Thickened
Return everything to the saucepan.
Cook over low heat while stirring continuously with a wooden spoon or silicone spatula.
The custard is ready when it coats the back of the spoon.
Avoid boiling.
Overheating can cause the eggs to curdle.
Step 5 – Add Vanilla and Lemon Zest
Remove the pan from the heat.
Stir in the vanilla extract and fresh lemon zest.
The vanilla immediately softens the earthy turmeric notes, while the citrus brightens the entire mixture.
Step 6 – Strain and Cool
For the smoothest possible texture, pour the custard through a fine mesh strainer into a clean bowl.
Allow it to cool for about 20 minutes before covering.
Then refrigerate for at least 6 hours or overnight.
This resting period develops deeper flavor while helping the ice cream churn more efficiently.
Step 7 – Churn the Ice Cream
Pour the thoroughly chilled base into your ice cream maker.
Churn according to the manufacturer’s instructions.
The mixture gradually transforms into a thick, creamy soft-serve consistency.
Watching it happen never gets old.
Step 8 – Freeze Until Firm
Transfer the churned ice cream into a freezer-safe container.
Smooth the top with a spatula.
Cover tightly.
Freeze for another 2 to 4 hours until scoopable.
If it becomes very firm after overnight freezing, allow it to sit on the counter for 5 to 10 minutes before serving.
Common Mistakes to Avoid
Boiling the Custard
High heat can scramble the eggs.
Fix: Cook gently over low heat while stirring continuously.
Adding Too Much Turmeric
More isn’t always better.
Too much turmeric can overpower the dessert.
Fix: Stick with the recommended amount.
Skipping the Overnight Chill
Cold custard churns much better.
Fix: Chill thoroughly before using the ice cream maker.
Using Low-Fat Dairy
Low-fat dairy often produces icy homemade ice cream.
Fix: Use full-fat ingredients whenever possible.
Over-Churning
Too much churning can produce a grainy texture.
Fix: Stop once the consistency resembles soft serve.
Forgetting the Salt
Even desserts benefit from a tiny pinch of salt.
It enhances sweetness and balances the spices beautifully.
Pro Tips for Best Results
- Use fresh grated ginger instead of powdered whenever possible.
- Bloom the turmeric gently over low heat for richer flavor.
- Chill the custard overnight for the smoothest texture.
- Store a piece of parchment paper directly on the surface before freezing to minimize ice crystals.
- Let the ice cream soften for several minutes before scooping.
- Add chopped toasted pecans or walnuts for extra crunch.
- Finish with unsweetened toasted coconut for beautiful texture.
- A small squeeze of fresh lemon juice before serving can brighten the flavors even more.
- For an even creamier consistency, replace ¼ cup of the coconut milk with mascarpone cheese.
Anti-Inflammatory Benefits of Turmeric
Turmeric is one of the ingredients that gives this ice cream its distinctive golden color and gently warming flavor. While it’s often associated with savory dishes, it works surprisingly well in desserts when paired with creamy ingredients and natural flavors like vanilla, cinnamon, and ginger.
From a nutritional perspective, turmeric contains naturally occurring plant compounds that have made it a popular ingredient in wellness-focused cooking for generations. Using it in recipes is an easy way to bring more variety to your meals while enjoying its unique taste and vibrant color.
In this recipe, turmeric is paired with fresh ginger, cinnamon, coconut milk, and healthy fats from heavy cream. Together, these ingredients create a dessert that feels both comforting and balanced. The healthy fats also help carry the spice flavors throughout the ice cream, giving every bite a rich and satisfying finish.
Rather than overwhelming the dessert, turmeric adds gentle warmth and depth that complements the sweetness instead of competing with it. Even people who don’t usually cook with turmeric are often surprised by how naturally it fits into this creamy frozen treat.
Variations You Can Try
One of the reasons I come back to this recipe so often is how easy it is to customize.
Dairy-Free Version
Replace the heavy cream with full-fat coconut cream for an even richer tropical flavor.
Higher-Protein Version
Blend one scoop of an unflavored or vanilla keto-friendly protein powder into the chilled custard before churning. This creates a slightly thicker texture and adds extra protein.
Extra Ginger Version
Increase the fresh grated ginger for a brighter, spicier finish that pairs beautifully with the turmeric.
Chai-Inspired Ice Cream
Add a pinch of cardamom, cloves, and nutmeg to create a cozy chai-style flavor profile.
Lower-Carb Version
Reduce the berries or toppings and keep the recipe simple with just the creamy golden ice cream base.
No-Churn Method
Whip additional heavy cream until soft peaks form, fold it into the chilled custard, transfer to a freezer-safe container, and freeze until firm. The texture will be slightly denser but still delicious.
Crunchy Version
Fold chopped pecans, walnuts, toasted coconut flakes, or cacao nibs into the churned ice cream just before freezing for extra texture.
Citrus Twist
A little extra orange or lemon zest gives the ice cream a brighter, fresher finish that pairs wonderfully with the warm spices.
Tips for This Recipe
Making homemade ice cream can feel a little intimidating the first time, but after a batch or two, it quickly becomes second nature. Here are the tips I come back to every time I make this recipe.
- Use the freshest spices you have. Ground turmeric and cinnamon gradually lose their aroma over time, so fresher spices produce a much more vibrant flavor.
- Chill the custard completely before churning. A well-chilled base freezes faster, creating a smoother texture with smaller ice crystals.
- Don’t rush the custard. Gentle heat is your best friend. Slow cooking allows the eggs to thicken without curdling.
- Taste the custard before chilling. This is your chance to adjust the sweetness, vanilla, or spice level.
- If the turmeric flavor seems noticeable while the custard is warm, don’t worry. It mellows considerably after freezing.
- Store the finished ice cream toward the back of the freezer where the temperature stays more consistent.
- Let the container sit on the counter for 5–10 minutes before scooping. Homemade keto ice cream naturally freezes firmer than traditional ice cream.
- For beautifully round scoops, dip your scoop into warm water between servings.
- If making this for guests, garnish each bowl individually just before serving for the freshest presentation.
- Homemade ice cream is at its absolute best within the first two weeks.
Optional Additions
This recipe is delicious on its own, but sometimes I enjoy adding a little extra texture or flavor depending on the occasion.
Try adding:
- Fresh mint leaves
- Toasted coconut flakes
- Chopped pecans
- Chopped walnuts
- Sliced almonds
- Crushed macadamia nuts
- Unsweetened cacao nibs
- Sugar-free dark chocolate shavings
- Sugar-free white chocolate drizzle
- Fresh raspberries
- Fresh blackberries
- Lemon zest
- Orange zest
- Chia seeds
- Ground flaxseed
- Hemp hearts
- Collagen peptides
- Pumpkin seeds
- Sunflower seeds
- A light sprinkle of cinnamon
- Extra grated fresh ginger
Each topping adds its own personality while keeping the dessert wholesome and satisfying.
Serving Ideas
One of my favorite things about this Anti-Inflammatory Golden Turmeric Ice Cream is how versatile it is. It feels elegant enough for entertaining but simple enough for an ordinary Tuesday night.
Here are some of my favorite serving ideas:
- Serve in chilled dessert bowls with toasted coconut flakes.
- Add fresh raspberries and blueberries for extra color.
- Pair with keto shortbread cookies.
- Spoon over a slice of keto pound cake.
- Serve alongside warm keto brownies for a delicious contrast of temperatures.
- Top with chopped toasted pecans for extra crunch.
- Layer into parfait glasses with whipped cream.
- Add a drizzle of sugar-free chocolate sauce.
- Enjoy after a hearty anti-inflammatory dinner featuring grilled salmon or roasted chicken.
- Pair with fresh berries for a lighter dessert plate.
- Serve during summer cookouts or family gatherings.
- Make mini dessert cups for baby showers or holiday parties.
If you’re building a weekly meal plan, this dessert also pairs beautifully with other recipes on KetoFlavorHouse.com, including anti-inflammatory meals, keto recipes, healthy dinners, high-protein meals, and low-carb side dishes.
Storage Recommendations
Because homemade keto ice cream contains fewer stabilizers than store-bought versions, proper storage makes a big difference.
Refrigerator
This recipe isn’t designed for refrigerator storage.
It will melt quickly and lose its creamy consistency.
Always return leftovers to the freezer promptly.
Freezer
Transfer the ice cream to an airtight freezer-safe container.
Place a sheet of parchment paper or plastic wrap directly against the surface before closing the lid.
This simple trick helps reduce ice crystals.
Enjoy within 2 weeks for the best texture and flavor.
Although it remains safe longer, homemade ice cream tastes freshest during this time.
Best Container
A shallow freezer-safe container with a tight-fitting lid works best because it freezes evenly and allows easier scooping.
Serving After Freezing
Allow the container to rest on the counter for approximately 5 to 10 minutes before scooping.
This gives the healthy fats time to soften slightly, creating smooth, creamy scoops.
Frequently Asked Questions
Is this recipe keto-friendly?
Yes.
This recipe is made with keto-friendly sweeteners and low-carb ingredients while avoiding refined sugar, making it suitable for most ketogenic lifestyles.
What makes this recipe anti-inflammatory?
It features ingredients like turmeric, ginger, cinnamon, healthy fats, and coconut milk that are commonly included in wellness-focused, anti-inflammatory eating patterns.
Can I make this dairy-free?
Absolutely.
Replace the heavy cream with full-fat coconut cream.
The result is slightly richer with a more noticeable coconut flavor.
Can I make it without an ice cream maker?
Yes.
Use the no-churn variation by folding whipped heavy cream into the chilled custard before freezing.
The texture will be slightly denser but still wonderfully creamy.
Can I freeze leftovers?
Yes.
Store the ice cream in an airtight container for up to two weeks for the best quality.
Why is homemade keto ice cream harder than store-bought?
Traditional commercial ice cream contains more sugar, which keeps it softer.
Since keto recipes use much less sugar, allowing the ice cream to soften on the counter before scooping gives the best results.
Can I add protein powder?
Yes.
An unflavored or vanilla keto-friendly protein powder mixes beautifully into the chilled custard before churning.
It slightly thickens the texture while increasing the protein content.
Nutritional Breakdown (Per Serving)
Approximate values based on 8 servings.
- Calories: 305
- Protein: 5g
- Fat: 31g
- Total Carbohydrates: 8g
- Dietary Fiber: 2g
- Net Carbohydrates: 6g
- Sugar: 1g
- Sodium: 95mg
Nutrition values are estimates and may vary depending on the exact ingredients used.
Recipe Snapshot
| Prep Time | 20 minutes |
| Cook Time | 15 minutes |
| Chill Time | 6 hours |
| Freeze Time | 3 hours |
| Total Time | 9 hours 35 minutes |
| Course | Dessert |
| Cuisine | American |
| Servings | 8 servings |
| Calories | 305 |
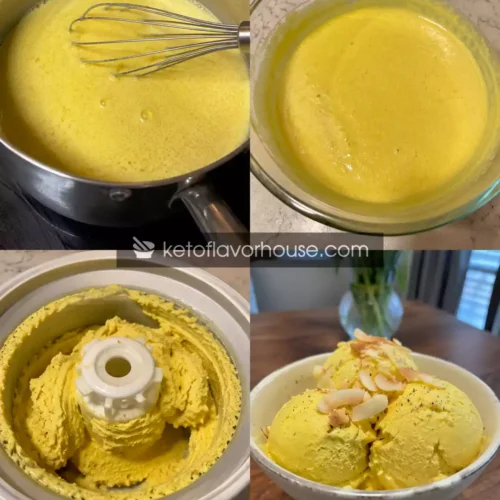
Anti-Inflammatory Golden Turmeric Ice Cream (Creamy, Keto & Sugar-Free)

Ingredients
- 2 cups heavy cream
- 1 cup full-fat coconut milk
- ¾ cup powdered allulose
- 4 large egg yolks
- 2 teaspoons ground turmeric
- 2 teaspoons freshly grated ginger
- 1 teaspoon ground cinnamon
- 2 teaspoons vanilla extract
- 1 teaspoon finely grated lemon zest
- Pinch of sea salt
Instructions
- Combine the heavy cream, coconut milk, ground turmeric, grated ginger, cinnamon, and sea salt in a medium saucepan. Warm the mixture over medium-low heat, whisking occasionally until it becomes hot and fragrant. Do not allow it to boil.
- In a separate mixing bowl, whisk the egg yolks together with the powdered allulose until the mixture becomes lighter in color and slightly thickened.
- Slowly ladle a small amount of the warm cream mixture into the egg yolks while whisking continuously. Repeat several times until the eggs are gradually warmed, then pour the tempered egg mixture back into the saucepan.
- Cook the custard over low heat, stirring constantly with a silicone spatula or wooden spoon until it thickens enough to coat the back of the spoon. Avoid boiling to prevent the eggs from curdling.
- Remove the saucepan from the heat and stir in the vanilla extract and freshly grated lemon zest until fully incorporated.
- Pour the custard through a fine mesh strainer into a clean bowl if desired for an extra-smooth texture. Allow it to cool slightly, then cover and refrigerate for at least 6 hours or overnight.
- Once thoroughly chilled, pour the custard into your ice cream maker and churn according to the manufacturer’s instructions until it reaches the consistency of soft-serve ice cream.
- Transfer the churned ice cream to a freezer-safe airtight container. Smooth the surface with a spatula, place parchment paper directly on top if desired, cover tightly, and freeze for 2 to 4 hours until firm.
- Before serving, allow the ice cream to sit at room temperature for 5 to 10 minutes. Scoop into chilled bowls and garnish with toasted coconut, chopped nuts, fresh berries, or an extra sprinkle of cinnamon if desired.