This post may contains Amazon affiliate and other affiliate links. If you make a purchase through these links, I may earn a small commission at no extra cost to you. Your support helps me continue to provide quality content. I only recommend products I personally trust and believe will add value to your experience. For more details, please visit my Privacy Policy.
Introduction
There are days when your body just feels… off. You wake up a little heavier than usual, your energy dips mid-morning, and even your favorite meals don’t feel as satisfying. I’ve had plenty of those days—especially when I’ve been relying too much on processed snacks or sugary treats that promise comfort but leave me feeling bloated and sluggish.
That’s exactly where these anti-inflammatory brownie cookie bars came into my life.
I remember one evening, craving something deeply chocolatey, soft, and indulgent—but without the aftermath of fatigue or that uncomfortable heaviness. I didn’t want a “diet dessert.” I wanted something that felt real, satisfying, and nourishing at the same time. That’s how this recipe was born.
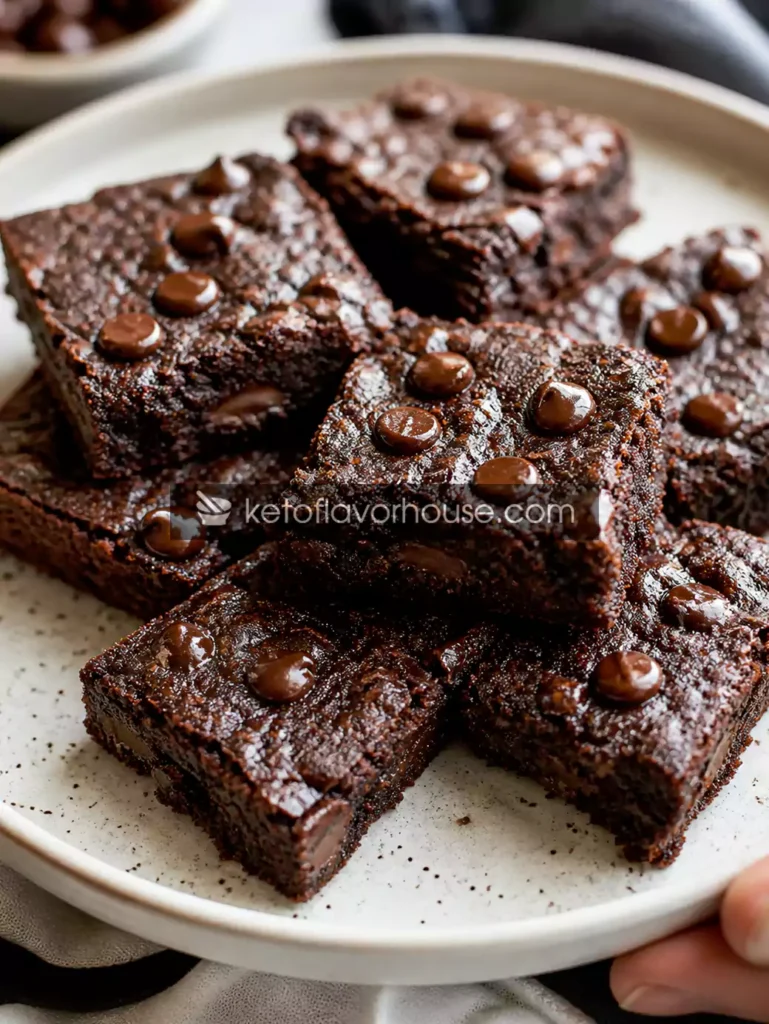
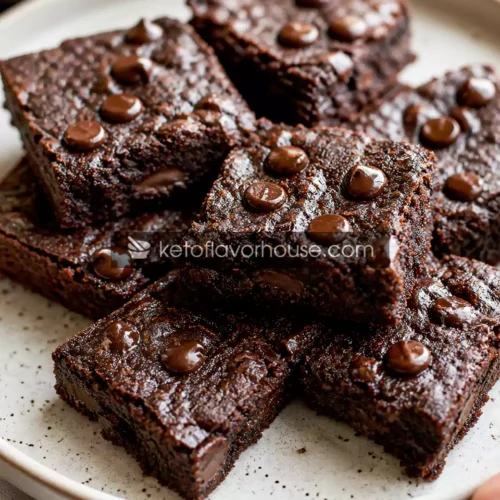
These Anti-Inflammatory Brownie Cookie Bars (Healthy, High-Protein & Gluten-Free) strike that perfect balance. They’re rich and fudgy like brownies, slightly chewy like cookies, and made with ingredients that support a more balanced, feel-good way of eating.
They’re ideal if you:
- Feel bloated after traditional desserts
- Want something sweet without the crash
- Are trying to eat more whole, anti-inflammatory foods
- Still want your desserts to actually taste amazing
This isn’t about restriction. It’s about feeling good after you eat—and still enjoying every bite.
💚 Why You’ll Love This Recipe
- 🥬 Anti-inflammatory ingredients – Made with almond flour, cocoa, and healthy fats that support balance
- ⚡ Supports digestion and energy – No refined sugar crashes or heavy after-feel
- 🍽️ Satisfying and balanced – High-protein and rich enough to keep cravings away
- 👩🍳 Easy to make – Simple ingredients, one bowl, no complicated steps
- 🧡 Flavor, texture, and comfort – Fudgy, soft, slightly chewy, and deeply chocolatey
🧠 My Personal Experience
The first time I made these, I didn’t expect much. I thought, “Okay, this might be another ‘healthy dessert’ that tastes… fine.”
But when I took that first bite—warm, soft, slightly gooey in the center—I paused.
It tasted like something I would actually crave.
What surprised me more was how I felt afterward. No heaviness. No sugar crash. Just satisfied. I didn’t feel the need to keep snacking or go looking for something else.
The next morning? No bloating. No sluggishness. Just steady energy.
That’s when I knew this wasn’t just another recipe. It was something I’d keep coming back to.
🧰 Required Equipment
Mixing Bowl
You’ll need a medium to large bowl to combine all ingredients. A wider bowl helps you mix evenly without overworking the batter.
Whisk or Spatula
A whisk helps blend wet ingredients smoothly, while a spatula ensures you fold everything together without overmixing.
Baking Pan (8×8 inch recommended)
This size gives the perfect thickness—soft center with slightly firm edges.
Parchment Paper
Prevents sticking and makes removal easy. It also helps maintain the structure of these delicate bars.
Oven
Preheat properly. Even baking is key to achieving that perfect brownie-cookie texture.
🥬 Ingredients & Substitutions
Almond Flour – 1 cup
Role: Forms the base, giving structure and softness
Anti-inflammatory benefit: Rich in healthy fats and vitamin E
Substitution: Coconut flour (use less—about 1/3 cup, as it absorbs more moisture)
Effect: Coconut flour makes bars slightly drier and more cake-like
Unsweetened Cocoa Powder – 1/3 cup
Role: Provides deep chocolate flavor
Benefit: Contains antioxidants that support overall wellness
Substitution: Raw cacao powder for a richer, slightly bitter taste
Eggs – 2 large
Role: Bind ingredients and create structure
Benefit: High-quality protein source
Substitution: Flax eggs (2 tbsp flax + 5 tbsp water)
Effect: Slightly softer, more delicate texture
Almond Butter – 1/2 cup
Role: Adds richness and moisture
Benefit: Healthy fats that support satiety
Substitution: Peanut butter or cashew butter
Effect: Flavor will vary slightly depending on nut used
Coconut Oil (melted) – 1/4 cup
Role: Keeps bars moist and tender
Benefit: Supports stable energy levels
Substitution: Olive oil (milder flavor recommended)
Natural Sweetener (Erythritol/Monk Fruit) – 1/2 cup
Role: Adds sweetness without sugar spikes
Substitution: Honey or maple syrup
Effect: Adds moisture but increases carbs
Vanilla Extract – 1 tsp
Enhances overall flavor
Baking Powder – 1/2 tsp
Gives slight lift and softness
Dark Chocolate Chips (optional) – 1/4 cup
Adds texture and indulgence
👩🍳 How to Make Anti-Inflammatory Brownie Cookie Bars
Step 1: Prepare Your Baking Pan
Line your pan with parchment paper, leaving some overhang. This makes removal easy later. Lightly grease if needed.
Tip: Don’t skip this—these bars are soft and can stick easily.
Step 2: Preheat the Oven
Set your oven to 175°C (350°F).
Tip: A properly preheated oven ensures even cooking and prevents dryness.
Step 3: Mix Wet Ingredients
In a bowl, whisk together:
- Eggs
- Almond butter
- Melted coconut oil
- Vanilla extract
Mix until smooth and creamy.
Tip: Make sure coconut oil isn’t too hot—it can cook the eggs.
Step 4: Add Dry Ingredients
Add:
- Almond flour
- Cocoa powder
- Sweetener
- Baking powder
Mix gently until combined.
Tip: Avoid overmixing—it can make bars dense instead of soft.
Step 5: Fold in Chocolate Chips
Gently fold in chocolate chips if using.
Step 6: Spread the Batter
Pour into your prepared pan and spread evenly.
Tip: Slightly wet your spatula to smooth the surface easily.
Step 7: Bake
Bake for 12–15 minutes.
Tip: The center should still be slightly soft—it firms up as it cools.
Step 8: Cool Completely
Let bars cool in the pan before cutting.
Tip: Cutting too early will make them fall apart.
⚠️ Common Mistakes to Avoid
- Overbaking: Leads to dry, crumbly bars
→ Fix: Remove when center is slightly soft - Using processed oils: Can affect flavor and quality
→ Fix: Stick to coconut or olive oil - Too much sweetener: Can create an artificial aftertaste
→ Fix: Measure carefully - Skipping cooling time: Causes breakage
→ Fix: Let bars fully set
🔥 Pro Tips for Best Results
- Add a pinch of turmeric for an extra anti-inflammatory boost (won’t affect taste much)
- Mix in chopped walnuts for texture and omega-3s
- Use high-quality cocoa powder for deeper flavor
- Slightly underbake for that fudgy center
🧬 Anti-Inflammatory Benefits of Cocoa
Cocoa is more than just flavor—it’s packed with antioxidants that help support the body’s natural balance. It contributes to a more nourishing dessert experience while still delivering that rich, indulgent taste we all crave.
Combined with healthy fats and protein, it creates a dessert that feels both comforting and supportive.
🌿 Variations You Can Try
- Add espresso powder for a mocha twist
- Make it dairy-free (already is if using dairy-free chocolate)
- Increase protein with a scoop of chocolate protein powder
- Swirl in almond butter for a marbled effect
🍽️ Tips for This Recipe
- Always measure flour properly—too much makes bars dense
- Use room temperature eggs for smoother batter
- Don’t rush baking—watch texture, not just time
➕ Optional Additions
- Chia seeds
- Ground flaxseed
- Collagen peptides
- Cinnamon or nutmeg
🍴 Serving Ideas
- Enjoy as a midday snack
- Pair with coffee or tea
- Serve as a post-dinner dessert
- Great for meal prep treats
🧊 Storage Recommendations
- Fridge: Up to 5 days in airtight container
- Freezer: Up to 2 months
- Reheat: Warm slightly for best texture
❓ Frequently Asked Questions
1. Can I make these dairy-free?
Yes, just use dairy-free chocolate chips.
2. Are these keto-friendly?
Yes, if using low-carb sweeteners.
3. Can I replace almond flour?
Coconut flour works, but adjust quantity.
4. Why are my bars dry?
Likely overbaked—reduce baking time.
5. Can I add protein powder?
Yes, but add a bit more moisture.
6. Can I make them vegan?
Use flax eggs instead of regular eggs.
7. How do I know they’re done?
Edges set, center slightly soft.
🧮 Nutritional Breakdown (Per Serving)
- Calories: 180
- Protein: 7g
- Fat: 14g
- Total Carbs: 8g
- Net Carbs: 4g
📌 Recipe Snapshot
- Prep Time: 10 minutes
- Cook Time: 15 minutes
- Total Time: 25 minutes
- Course: Dessert
- Cuisine: Healthy / Low-Carb
- Servings: 9 bars
- Calories: 180
Anti-Inflammatory Brownie Cookie Bars Recipe
Ingredients
- 1 cup almond flour
- 1/3 cup cocoa powder
- 2 eggs
- 1/2 cup almond butter
- 1/4 cup coconut oil
- 1/2 cup sweetener
- 1 tsp vanilla extract
- 1/2 tsp baking powder
- 1/4 cup chocolate chips optional
Instructions
- Preheat your oven to 175°C (350°F) and take a moment to line an 8×8-inch baking pan with parchment paper, leaving a slight overhang on the sides so you can easily lift the bars out later. If your parchment tends to move, lightly grease the pan underneath to hold it in place.
- In a medium mixing bowl, crack the eggs and whisk them gently until slightly frothy. Add the almond butter, making sure it’s smooth and well-stirred beforehand, then pour in the melted coconut oil and vanilla extract. Whisk everything together until the mixture becomes glossy, creamy, and fully combined with no streaks of oil.
- Before adding dry ingredients, ensure your coconut oil isn’t too hot—this prevents scrambling the eggs. The mixture should feel warm but not hot to the touch.
- Add the almond flour, unsweetened cocoa powder, sweetener, and baking powder directly into the wet mixture. Using a spatula, gently fold everything together instead of aggressively mixing. This helps maintain a soft, fudgy texture rather than making the bars dense.
- As you mix, press out any small lumps of almond flour or cocoa powder against the side of the bowl to ensure a smooth, even batter. The final mixture should be thick, rich, and slightly glossy.
- If you’re using chocolate chips, fold them in at this stage. Distribute them evenly throughout the batter so every bite has a bit of melted chocolate goodness.
- Transfer the batter into your prepared baking pan. Use a spatula to spread it evenly into the corners, smoothing the top. If the batter sticks, lightly dampen your spatula or fingers with a little water or oil for a clean finish.
- Tap the pan gently on the counter once or twice to remove any trapped air bubbles and level out the surface.
- Place the pan into the preheated oven and bake for 12–15 minutes. Keep an eye on it around the 12-minute mark—the edges should look set, but the center should still appear slightly soft and underdone. This is key for that brownie-like fudgy texture.
- Avoid overbaking. The bars will continue to firm up as they cool, so pulling them out at the right time ensures they stay moist and tender instead of dry.
- Remove the pan from the oven and let it rest at room temperature. Do not attempt to cut the bars while they’re hot, as they will be too soft and may fall apart.
- Allow the bars to cool completely in the pan for at least 30–45 minutes. This step helps them set properly and makes slicing much easier.
- Once fully cooled, lift the bars out using the parchment paper overhang and place them on a flat surface. Use a sharp knife to cut into even squares or rectangles, wiping the knife between cuts for clean edges.
- For the best texture and flavor, let the bars sit for an additional 10–15 minutes after slicing, or chill them slightly if you prefer a firmer bite.
- Serve as they are, or slightly warm for a softer, gooier center.