This post may contains Amazon affiliate and other affiliate links. If you make a purchase through these links, I may earn a small commission at no extra cost to you. Your support helps me continue to provide quality content. I only recommend products I personally trust and believe will add value to your experience. For more details, please visit my Privacy Policy.
Introduction
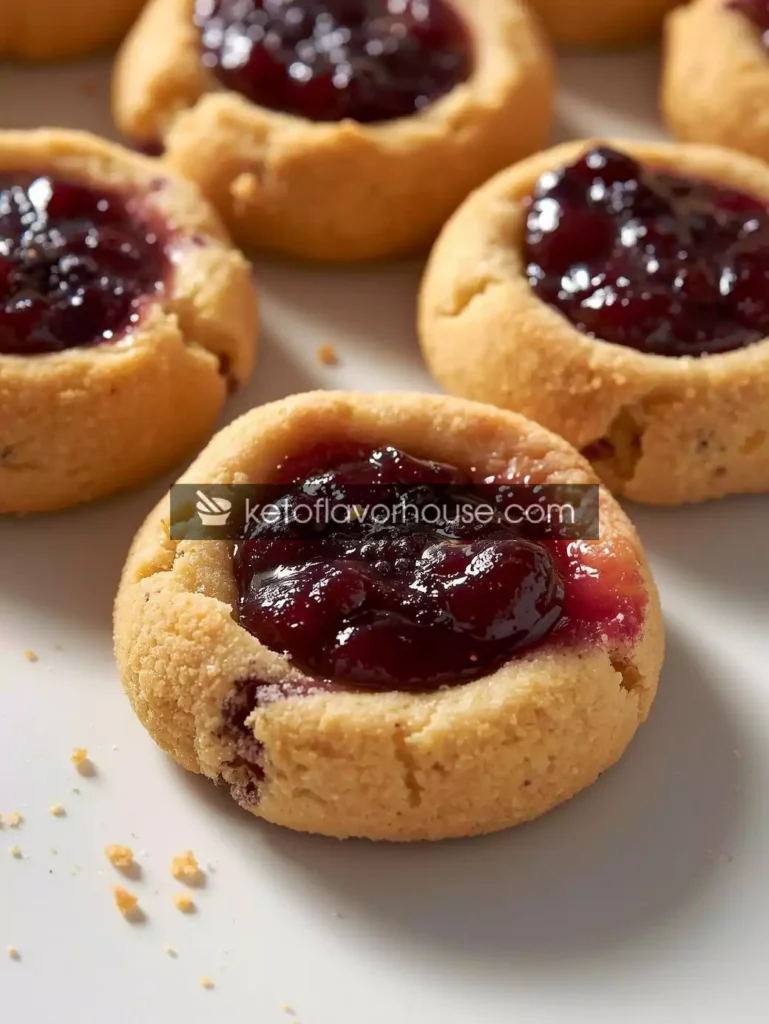
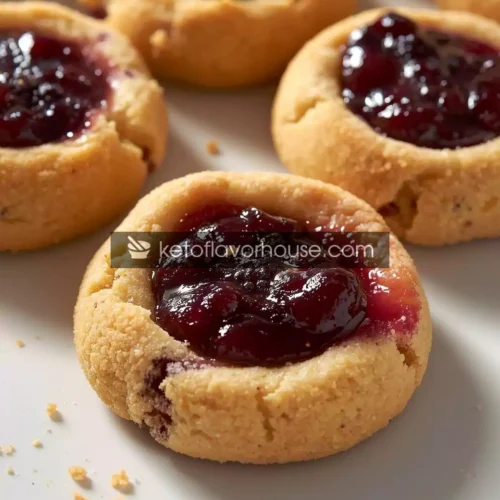
There’s something about the smell of freshly baked cookies that instantly takes me back to my childhood kitchen. But after undergoing bariatric surgery, indulging in traditional cookies became a challenge—too much sugar, too many carbs, and often too large to enjoy safely. That’s why I developed this Bariatric Low-Sugar No-Flour Thumbprint Cookies recipe. It’s a keto-friendly, protein-packed dessert that satisfies my sweet tooth while staying safe and manageable for bariatric eaters.
From the moment these cookies come out of the oven, you’ll notice their soft, chewy texture paired with a tiny dollop of sugar-free jam in the center. They’re the perfect treat when you crave something sweet without compromising your dietary goals. Whether you’re post-bariatric, following a low-carb plan, or just want a healthier dessert, these cookies are made for you.
This recipe is a game-changer because it combines low sugar, no flour, and high protein, making it one of the most bariatric-friendly cookie options you can enjoy. And the best part? They’re simple enough for a weekday treat yet elegant enough for sharing with family or friends.
Why You’ll Love This Recipe
- 🍪 Chewy & Soft Texture: Perfectly soft in the center and slightly firm on the edges.
- 💪 Protein-Packed: Keeps you full without spiking your blood sugar.
- 🩺 Bariatric-Friendly: Low sugar, portion-controlled, easy to digest.
- ⏱ Quick Prep: Ready in under 30 minutes from start to finish.
- 👨👩👧👦 Family-Friendly: Everyone can enjoy these guilt-free treats.
My Personal Experience
The first time I made these cookies, I was craving something sweet that didn’t derail my bariatric progress. I remember testing a batch with sugar-free jam and being amazed at how chewy and flavorful they turned out. I even had my younger cousin, who’s a cookie connoisseur, try them—and he didn’t notice they were sugar-free or flourless! That’s when I knew I had a winner recipe for anyone looking to enjoy a dessert without guilt.
Required Equipment
Baking Sheet
Essential for even baking. Line it with parchment paper or a silicone mat to prevent sticking and make cleanup easy.
Mixing Bowl
A large mixing bowl helps combine ingredients thoroughly without spillage. Alternatives: medium-sized bowl if making a smaller batch.
Electric Mixer or Whisk
For creamier batter and easier incorporation of peanut butter and sweetener. A hand whisk works but may require extra effort.
Spoon or Cookie Scoop
Ensures uniform cookie size for consistent baking.
Cooling Rack
Allows cookies to cool evenly and prevents sogginess.
Ingredients & Substitutions
- 1 cup natural peanut butter – Provides protein and healthy fats. Can substitute with almond or cashew butter for a slightly different flavor.
- 1/4 cup low-carb sweetener – Keeps sugar minimal. Erythritol or monk fruit work well.
- 1 large egg – Helps bind the dough. Can substitute with 1 flax egg (1 tbsp flaxseed + 3 tbsp water) if vegan.
- 1 tsp vanilla extract – Adds flavor depth.
- 1/4 tsp salt – Balances sweetness. Optional if using salted nut butter.
- 2–3 tbsp sugar-free jam – Classic thumbprint filling. Raspberry or strawberry are best.
Each ingredient was chosen with bariatric needs in mind: high protein, low sugar, and low carb, while still producing a rich and satisfying cookie.
How to Make Bariatric Low-Sugar No-Flour Thumbprint Cookies
Step 1: Preheat the Oven
Preheat your oven to 350°F (175°C). Line a baking sheet with parchment paper. This prevents sticking and ensures even baking.
Step 2: Mix the Ingredients
In a large bowl, combine peanut butter, sweetener, egg, vanilla, and salt. Mix until smooth. Don’t overmix—just enough to combine ingredients.
Tip: If using a hand whisk, make sure peanut butter is softened for easier mixing.
Step 3: Form the Cookies
Using a spoon or cookie scoop, form small balls of dough. Place them on the prepared baking sheet, leaving 2 inches between each.
Step 4: Create the Thumbprint
Press your thumb (or the back of a spoon) into the center of each cookie to create a well for the jam.
Tip: Chill the dough for 10 minutes if it’s too sticky.
Step 5: Add the Jam
Fill each indentation with 1/2 tsp of sugar-free jam. Be careful not to overfill to avoid spreading.
Step 6: Bake
Bake for 10–12 minutes until the edges are slightly golden but centers remain soft.
Oven Alternative: Air fryer at 320°F for 8–10 minutes. Keep an eye to avoid burning.
Step 7: Cool
Allow cookies to cool on the baking sheet for 5 minutes, then transfer to a cooling rack. This prevents sogginess and ensures perfect texture.
Common Mistakes to Avoid
- Overmixing dough – can make cookies dense.
- Overfilling jam – will cause spreading and uneven baking.
- Using cold peanut butter – harder to mix, may crack during baking.
Pro Tips for Best Results
- Slightly underbake for chewier cookies.
- Use room-temperature ingredients for even mixing.
- Rotate the baking sheet halfway for even cooking.
Bariatric Nutrition & Strategy
Peanut butter provides healthy fats and protein, helping post-bariatric patients feel full with controlled portions. Low sugar and no flour make these cookies ideal for avoiding spikes in blood sugar. Pairing them with a protein shake or Greek yogurt makes a balanced mini-meal or snack.
Variations You Can Try
- Almond butter instead of peanut butter.
- Mini sugar-free chocolate chips in the center.
- Different jam flavors like blueberry or apricot.
Tips for This Recipe
- Serve fresh for soft cookies.
- Store in an airtight container to maintain texture.
- Can sprinkle cinnamon or cocoa powder on top before baking for extra flavor.
Optional Additions
- Chopped nuts for crunch (ensure small pieces for bariatric safety).
- Coconut flakes for subtle flavor.
Serving Ideas
- Afternoon snack with coffee or tea.
- Party platter dessert.
- Meal prep snack for portion-controlled treats.
Storage Recommendations
- Fridge: 5–7 days in airtight container.
- Freezer: Up to 2 months; thaw before serving.
- Reheating: Microwave 10–15 seconds or enjoy at room temperature.
Frequently Asked Questions (FAQ)
Q1: Can I freeze these cookies?
Yes! Freeze in a single layer, then transfer to a zip-top bag. Thaw before serving.
Q2: Can I use almond butter instead of peanut butter?
Absolutely. Almond butter is slightly milder but still bariatric-friendly.
Q3: How is this recipe good for bariatric diets?
Low sugar, high protein, and portion-controlled size make it safe and satisfying for post-bariatric patients.
Q4: Can I bake in an air fryer?
Yes, use 320°F for 8–10 minutes. Check halfway to avoid overbaking.
Q5: Can I replace the jam with chocolate?
Yes, use sugar-free chocolate chips for a chocolate-filled thumbprint.
Q6: How do I prevent cookies from spreading?
Chill dough 10 minutes before baking and avoid overfilling jam.
Q7: Are these safe for diabetic patients?
Yes, the low sugar and high protein content help maintain blood sugar stability.
- Calories: 150 kcal
- Protein: 6 g
- Fat: 12 g
- Total Carbs: 6 g
- Fiber: 2 g
- Net Carbs: 4 g
- Sugar: 1 g
- Sodium: 80 mg
Recipe Snapshot
- Prep Time: 10 minutes
- Cook Time: 12 minutes
- Total Time: 22 minutes
- Course: Dessert / Snack
- Cuisine: Keto / Bariatric-Friendly
- Servings: 12
- Calories: 150 kcal per 2 cookies
Bariatric Low-Sugar No-Flour Thumbprint Cookies (Keto & Protein-Packed Dessert) Recipe
Ingredients
- 1 cup peanut butter
- 1/4 cup low-carb sweetener
- 1 egg
- 1 tsp vanilla
- 1/4 tsp salt
- 2 –3 tbsp sugar-free jam
Instructions
- Preheat oven to 350°F; line baking sheet.
- Mix peanut butter, sweetener, egg, vanilla, salt.
- Form dough balls; place on sheet.
- Press thumbprint into center.
- Fill with 1/2 tsp jam.
- Bake 10–12 min; edges golden.
- Cool on rack.