This post may contains Amazon affiliate and other affiliate links. If you make a purchase through these links, I may earn a small commission at no extra cost to you. Your support helps me continue to provide quality content. I only recommend products I personally trust and believe will add value to your experience. For more details, please visit my Privacy Policy.
Introduction
There are nights when all you want is something warm, comforting, and packed with flavor — the kind of dinner that feels cozy after a long day but doesn’t leave you feeling heavy afterward. That’s exactly why this anti-inflammatory honey butter chicken has become one of my favorite healthier comfort food dinners.
I originally started making lighter versions of sticky honey chicken because traditional takeout-style versions often left me feeling sluggish, bloated, and overly full afterward. They were delicious in the moment, but the combination of heavy frying oils, excess sugar, and overly rich sauces never made me feel particularly balanced. I wanted something that still had that irresistible glossy honey-garlic coating and crispy edges, but with ingredients that felt fresher and more nourishing.
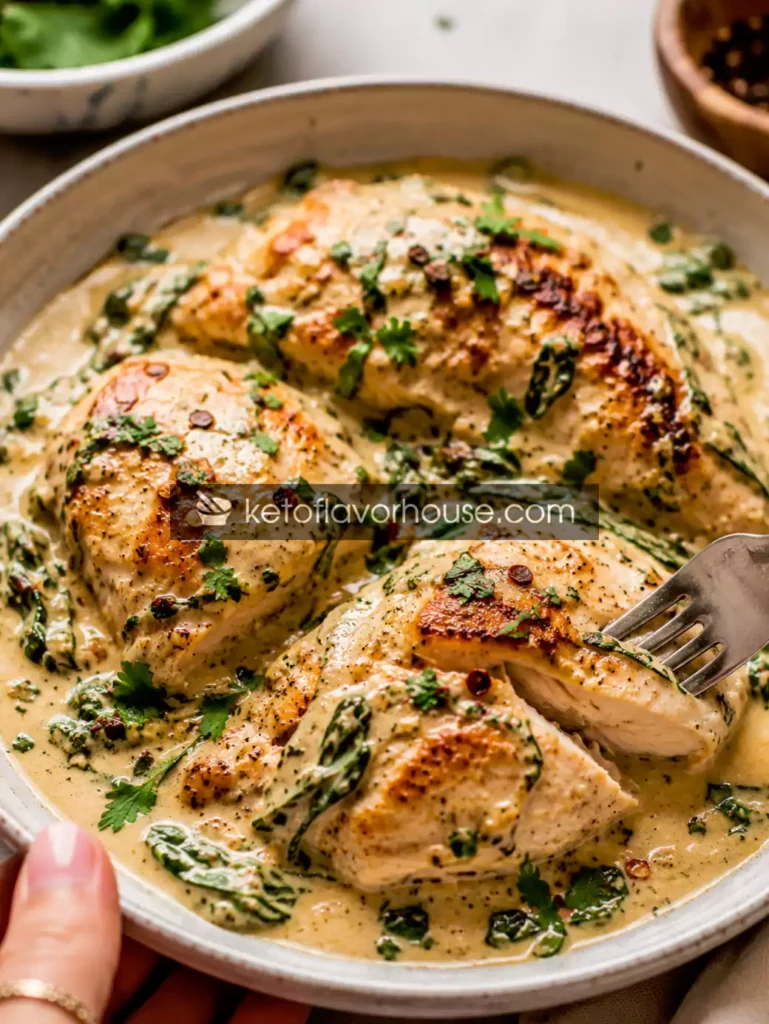
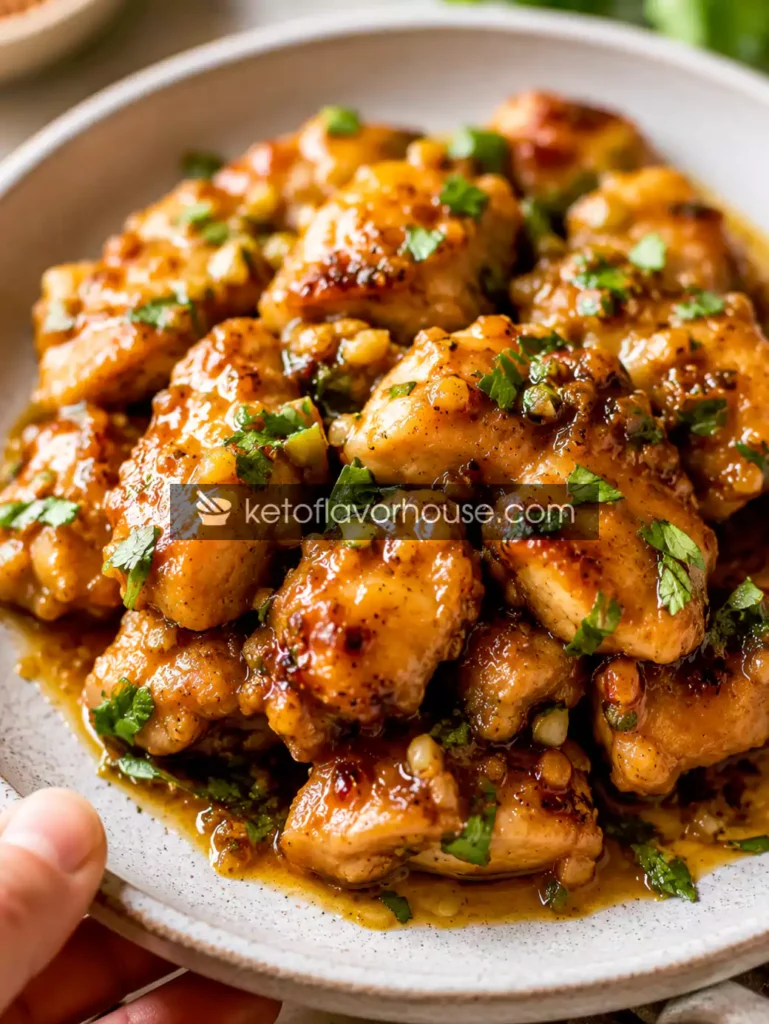
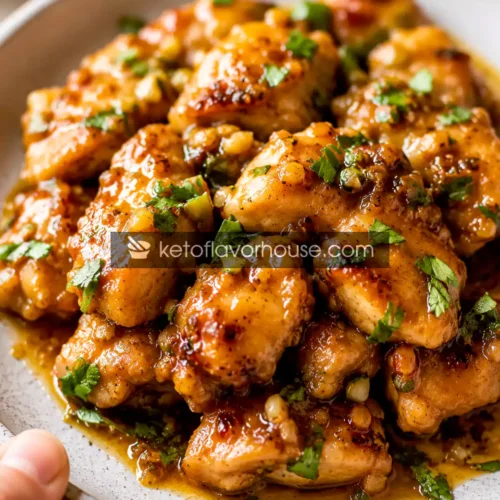
This Anti-Inflammatory Honey Butter Chicken (Healthy High-Protein Dinner) brings together everything I love about classic honey chicken while using more balanced ingredients that fit beautifully into an anti-inflammatory eating routine. Tender chicken is lightly coated, pan-seared until golden, then tossed in a silky honey butter sauce with garlic, ginger, turmeric, and olive oil for a flavor-packed dinner that feels comforting without being overly heavy.
One of the things I love most about this recipe is how satisfying it feels. The protein keeps you full, the sauce is sweet-savory with just enough richness, and the anti-inflammatory ingredients like ginger, garlic, and turmeric add warmth and depth without overpowering the dish.
It’s the kind of dinner that works beautifully for busy weeknights, meal prep lunches, cozy weekend dinners, or even healthier takeout cravings at home. Pair it with roasted vegetables, rice, cauliflower rice, or a simple salad, and you have a meal that feels indulgent while still supporting balanced eating habits.
And honestly? The sticky honey garlic sauce alone makes this recipe impossible not to crave.
💚 Why You’ll Love This Recipe
- 🥬 Made with anti-inflammatory ingredients like garlic, ginger, turmeric, and olive oil
- ⚡ Balanced protein and healthy fats help support steady energy
- 🍽️ Sweet, savory, and satisfying without feeling overly heavy
- 👩🍳 Easy enough for busy weeknight dinners
- 🧡 Sticky honey butter sauce tastes comforting and restaurant-quality
- 🌶️ Easy to customize with vegetables and spice levels
- 🍗 High-protein meal that feels indulgent while staying balanced
- 🥦 Pairs beautifully with anti-inflammatory side dishes
🧠 My Personal Experience
This recipe actually came from one of those nights when I was craving takeout but didn’t want the heavy feeling that usually came afterward. I wanted something sticky, garlicky, slightly sweet, and comforting — but made with ingredients that felt cleaner and more balanced.
The first time I tested this version, I immediately noticed how much lighter it felt compared to traditional honey chicken. The chicken stayed crispy without deep frying, and the sauce had enough richness to feel comforting without becoming overly greasy or sugary.
I also loved how the ginger and garlic balanced the sweetness naturally. Instead of tasting overly sugary, the sauce felt warm, savory, and deeply flavorful. Adding turmeric gave it subtle warmth and a beautiful golden color without making it taste earthy or overpowering.
Now it’s one of those dinners I make when I want comfort food that still leaves me feeling energized afterward instead of weighed down. It’s especially perfect during busy weeks because leftovers taste incredible the next day too.
🧰 Required Equipment
Large Skillet or Nonstick Pan
A large skillet helps the chicken cook evenly while developing golden crispy edges.
Avoid overcrowding the pan because crowded chicken steams instead of browning properly.
Mixing Bowls
You’ll need one bowl for coating the chicken and another small bowl for mixing the sauce ingredients.
Whisk
A whisk helps blend the sauce smoothly so the honey, butter, soy sauce, and spices combine evenly.
Tongs or Spatula
Tongs make flipping the chicken easier while keeping the coating intact.
Sharp Knife and Cutting Board
Needed for trimming and cutting the chicken into evenly sized pieces.
Uniform pieces cook more evenly and stay juicy.
🥬 Ingredients & Substitutions
Chicken Breast or Chicken Thighs – 1½ pounds
Chicken provides lean protein and creates the hearty base of the recipe.
Anti-Inflammatory Benefit:
Lean protein supports balanced meals and helps keep you satisfied longer.
Substitutions:
- Chicken thighs for juicier texture
- Turkey breast
- Tofu for vegetarian option
Chicken thighs create richer flavor while chicken breast stays lighter.
Almond Flour – ½ cup
Almond flour creates a light crispy coating without needing traditional flour.
Anti-Inflammatory Benefit:
Almond flour contains healthy fats and is less processed than refined white flour.
Substitutions:
- Whole wheat flour
- Gluten-free flour blend
Cornstarch – 2 tablespoons
A small amount of cornstarch helps create crispiness.
Substitutions:
- Arrowroot powder
- Tapioca starch
Olive Oil – 2 tablespoons
Olive oil helps crisp the chicken while adding richness.
Anti-Inflammatory Benefit:
Extra virgin olive oil contains beneficial fats and antioxidant compounds.
Substitutions:
- Avocado oil
- Ghee
Avoid heavily refined frying oils when possible.
Butter – 2 tablespoons
Butter adds richness and gives the sauce its silky texture.
Substitutions:
- Ghee
- Dairy-free butter
Raw Honey – 3 tablespoons
Honey creates the signature sticky sweetness.
Anti-Inflammatory Benefit:
Raw honey contains natural antioxidants and creates sweetness with less processing than refined sugar.
Substitutions:
- Maple syrup
- Coconut nectar
Garlic – 4 cloves minced
Garlic adds bold savory flavor.
Anti-Inflammatory Benefit:
Garlic is commonly included in anti-inflammatory recipes because of its beneficial sulfur compounds.
Fresh Ginger – 1 tablespoon grated
Ginger balances the sweetness beautifully.
Anti-Inflammatory Benefit:
Ginger supports digestion and adds warming anti-inflammatory properties.
Low-Sodium Soy Sauce – 3 tablespoons
Soy sauce adds salty umami depth.
Substitutions:
- Coconut aminos
- Tamari
Turmeric – ½ teaspoon
Turmeric adds warmth and subtle earthy flavor.
Anti-Inflammatory Benefit:
Turmeric contains curcumin, a well-known anti-inflammatory compound.
Black Pepper – ¼ teaspoon
Black pepper enhances the turmeric flavor.
Green Onions – for garnish
Adds freshness and color.
👩🍳 How to Make Anti-Inflammatory Honey Butter Chicken (Healthy High-Protein Dinner)
Step 1: Prepare the Chicken
Cut the chicken into evenly sized bite-sized pieces and pat them dry with paper towels.
Dry chicken helps the coating stick better and creates crispier edges during cooking.
Season lightly with salt and pepper.
Step 2: Coat the Chicken
In a large bowl, combine almond flour and cornstarch.
Add the chicken pieces and toss thoroughly until lightly coated on all sides.
The coating should be thin and even rather than thick or heavy.
Step 3: Make the Sauce
In a small bowl, whisk together the honey, soy sauce, minced garlic, grated ginger, turmeric, and black pepper.
Mix until smooth and fully combined.
The sauce should smell sweet, savory, warm, and fragrant.
Step 4: Cook the Chicken
Heat olive oil in a large skillet over medium heat.
Add the chicken pieces in a single layer and cook for about 4–5 minutes per side until golden brown and fully cooked through.
Avoid overcrowding the skillet because crowded chicken releases moisture and loses crispiness.
Cook in batches if necessary.
Step 5: Add the Butter
Reduce the heat slightly and add the butter to the skillet.
Allow it to melt gently around the chicken.
The butter adds richness while helping the sauce coat the chicken beautifully.
Step 6: Add the Sauce
Pour the honey garlic sauce into the skillet and stir continuously for about 2–3 minutes.
The sauce will bubble and thicken into a glossy coating that clings to the chicken.
Avoid cooking the sauce too long because honey can burn quickly.
Step 7: Finish and Garnish
Remove from heat once the sauce thickens and evenly coats the chicken.
Top with sliced green onions and optional sesame seeds before serving.
⚠️ Common Mistakes to Avoid
Overcrowding the Pan
Too much chicken in the skillet creates steam instead of browning.
Fix:
Cook in batches for crispy edges.
Burning the Honey Sauce
Honey burns quickly over high heat.
Fix:
Reduce heat before adding the sauce.
Using Too Much Coating
A heavy coating creates gummy texture instead of crispness.
Fix:
Use a light even layer only.
Using Refined Oils
Highly processed oils can overpower the clean flavor.
Fix:
Use olive oil or avocado oil.
Overcooking the Chicken
Dry chicken loses tenderness quickly.
Fix:
Cook until just done and remove promptly.
🔥 Pro Tips for Best Results
- Use chicken thighs for extra juicy texture
- Add extra ginger for brighter flavor
- Include a pinch of cayenne for heat
- Use fresh garlic instead of jarred
- Let the chicken rest briefly before saucing
- Add steamed broccoli directly into the skillet
- Sprinkle sesame seeds before serving
- Add turmeric gradually for balanced flavor
- Finish with fresh lime juice for brightness
🧬 Anti-Inflammatory Benefits of Garlic and Ginger
Garlic and ginger are two ingredients I almost always use when creating anti-inflammatory comfort food recipes because they add enormous flavor while helping meals feel fresher and more balanced.
Garlic adds deep savory richness that makes sauces taste fuller and more satisfying without relying on excessive butter or processed ingredients. It also contains natural sulfur compounds that support overall wellness.
Ginger brings warmth and brightness that balance sweet sauces beautifully. It helps cut through richness and gives the dish a fresher, lighter flavor profile overall.
Combined with olive oil, turmeric, and lean chicken, these ingredients create a comfort-food dinner that feels satisfying while still fitting into a more balanced eating routine.
🌿 Variations You Can Try
Spicy Honey Chicken
Add:
- Sriracha
- Chili flakes
- Cayenne pepper
Perfect for extra heat lovers.
Air Fryer Version
Air fry the coated chicken for crispier texture with less oil.
Dairy-Free Version
Replace butter with:
- Olive oil
- Dairy-free butter
- Avocado oil
Extra Vegetable Version
Add:
- Broccoli
- Bell peppers
- Snap peas
- Zucchini
Lower-Carb Version
Serve with:
- Cauliflower rice
- Roasted vegetables
- Cabbage stir fry
🍽️ Tips for This Recipe
- Prep the sauce ahead for faster cooking
- Use fresh ginger for best flavor
- Pat chicken dry thoroughly before coating
- Serve immediately for best texture
- Avoid overheating honey sauce
- Slice green onions fresh before serving
➕ Optional Additions
- Sesame seeds
- Chili oil
- Lime juice
- Steamed broccoli
- Spinach
- Crushed red pepper
- Coconut aminos
- Fresh cilantro
🍴 Serving Ideas
This chicken pairs beautifully with:
- Jasmine rice
- Brown rice
- Cauliflower rice
- Roasted broccoli
- Garlic green beans
- Stir-fried vegetables
- Asian cucumber salad
- Quinoa bowls
Perfect for:
- Weeknight dinners
- Meal prep lunches
- High-protein dinners
- Comfort food cravings
- Family meals
🧊 Storage Recommendations
Refrigerator
Store leftovers in an airtight container for up to 4 days.
Freezer
Freeze cooked chicken for up to 2 months.
Thaw overnight before reheating.
Reheating Tips
Reheat gently in a skillet over low heat with a splash of water to loosen the sauce.
Avoid microwaving too long because the chicken can dry out.
❓ Frequently Asked Questions
Can I use chicken thighs instead of breasts?
Absolutely. Chicken thighs stay especially juicy and flavorful.
Is this recipe very sweet?
No. The garlic, ginger, and soy sauce balance the honey beautifully.
Can I air fry the chicken?
Yes. Air frying works very well for crispy texture.
Can I make this dairy-free?
Yes. Replace butter with olive oil or dairy-free butter.
What vegetables pair best with this dish?
Broccoli, snap peas, zucchini, and bell peppers all work wonderfully.
Can I meal prep this recipe?
Yes. The flavors hold up very well for meal prep lunches.
Is turmeric noticeable in flavor?
Not strongly. It adds warmth and color without overpowering the sauce.
🧮 Nutritional Breakdown (Per Serving)
Approximate values:
- Calories: 385
- Protein: 34g
- Fat: 16g
- Total Carbs: 18g
- Net Carbs: 13g
📌 Recipe Snapshot
- Prep Time: 15 minutes
- Cook Time: 20 minutes
- Total Time: 35 minutes
- Course: Dinner
- Cuisine: American-Inspired
- Servings: 4
- Calories: 385
Anti-Inflammatory Honey Butter Chicken Recipe
Ingredients
- 1½ pounds chicken breast or thighs
- ½ cup almond flour
- 2 tablespoons cornstarch
- 2 tablespoons olive oil
- 2 tablespoons butter
- 3 tablespoons raw honey
- 4 garlic cloves minced
- 1 tablespoon fresh grated ginger
- 3 tablespoons low-sodium soy sauce
- ½ teaspoon turmeric
- ¼ teaspoon black pepper
- Green onions for garnish
Optional:
- Sesame seeds
- Chili flakes
- Lime juice
- Broccoli
Instructions
- Place the chicken on a cutting board and cut it into evenly sized bite-sized pieces so everything cooks at the same rate. Try to keep the pieces relatively uniform to avoid some pieces drying out while others are still undercooked. Once cut, use paper towels to pat the chicken very dry on all sides. Removing excess moisture is important because dry chicken develops a much crispier golden coating when cooked instead of steaming in the skillet.
- Transfer the chicken pieces to a large bowl and season lightly with salt and black pepper. Toss everything together so the seasoning coats the chicken evenly. This simple seasoning step helps build flavor directly into the chicken before the sauce is added later.
- In a separate large bowl, combine the almond flour and cornstarch until evenly mixed. Add the seasoned chicken pieces and toss thoroughly until each piece is lightly coated. The coating should be thin and even rather than thick or heavy. This light coating helps create crispy edges while still keeping the chicken tender and juicy inside.
- In another bowl or measuring cup, whisk together the honey, soy sauce, minced garlic, grated ginger, turmeric, and black pepper until smooth and fully combined. The mixture should smell sweet, savory, warm, and slightly spicy from the ginger and garlic. Whisking everything together ahead of time helps the sauce cook evenly later without clumping or separating.
- Heat the olive oil in a large skillet over medium heat until the oil becomes lightly shimmering but not smoking. Allowing the pan to heat properly before adding the chicken helps create a beautiful golden crust and prevents sticking.
- Carefully place the coated chicken pieces into the skillet in a single layer, making sure not to overcrowd the pan. Cook for about 4–5 minutes on the first side without moving the chicken too much so it can develop a crispy golden surface. Flip the pieces and continue cooking for another 4–5 minutes until the chicken is fully cooked through and beautifully browned on all sides. If needed, cook in batches to keep the chicken crisp instead of crowded and steamed.
- Lower the heat slightly and add the butter directly into the skillet around the chicken. Let it melt slowly and coat the pan gently. The butter adds richness to the sauce and helps create that glossy honey butter texture that clings perfectly to the chicken without becoming greasy.
- Pour the prepared honey garlic sauce into the skillet and immediately begin stirring the chicken gently to coat every piece evenly. Continue cooking for about 2–3 minutes while stirring frequently. The sauce will begin bubbling and thickening into a shiny glaze that wraps around the chicken beautifully. Keep the heat controlled during this step because honey can burn quickly if the skillet becomes too hot.
- Once the sauce has thickened and the chicken looks glossy and fully coated, remove the skillet from the heat. Sprinkle freshly sliced green onions and optional sesame seeds over the top for extra freshness, texture, and color. Serve immediately while the chicken is still hot and sticky for the best flavor and texture.