This post may contains Amazon affiliate and other affiliate links. If you make a purchase through these links, I may earn a small commission at no extra cost to you. Your support helps me continue to provide quality content. I only recommend products I personally trust and believe will add value to your experience. For more details, please visit my Privacy Policy.
Estimated SmartPoints: approximately 3–5 per serving | Makes 4 servings (8 slices)
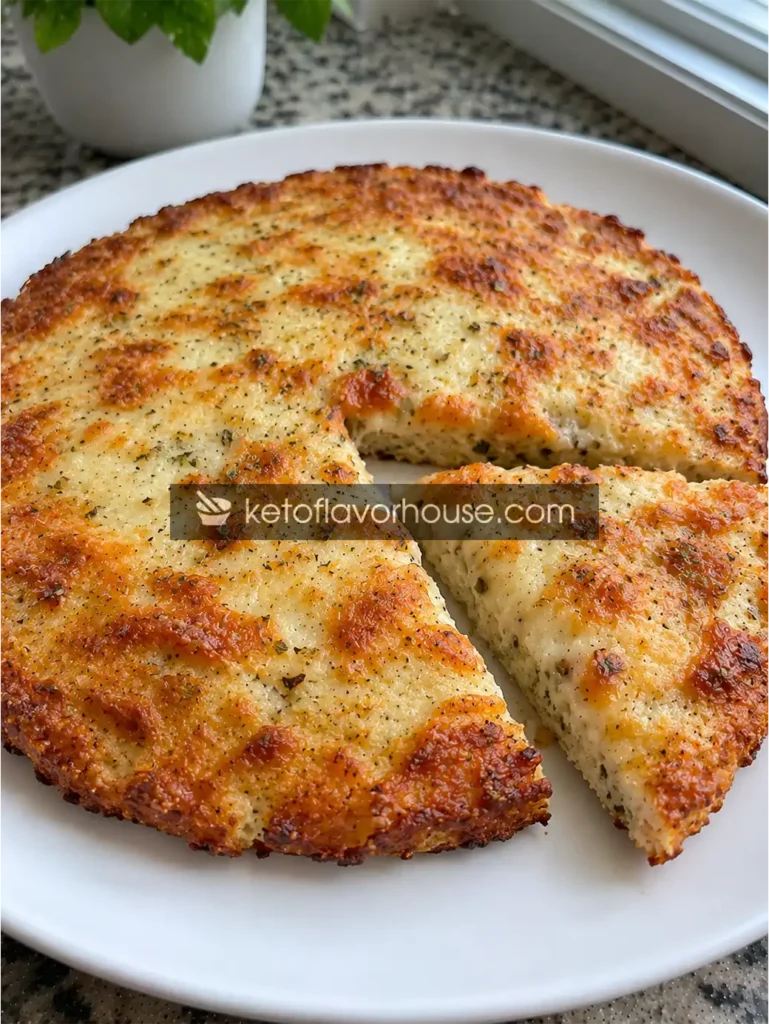
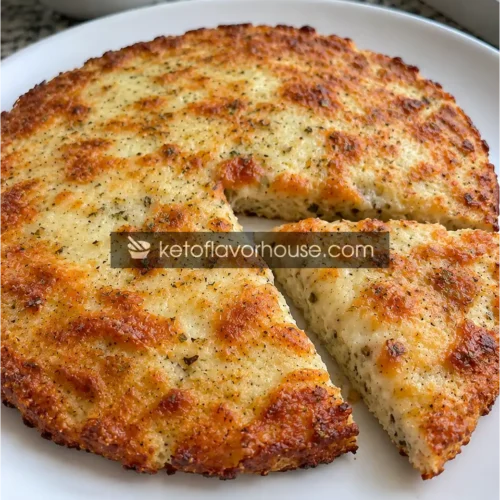
If pizza night is one of those meals you don’t want to give up, this Weight Watchers Cheesy Cauliflower Pizza Crust is a delicious way to change things up without relying on traditional flour-based dough. It bakes into a savory, golden crust with crisp edges, a tender center, and plenty of cheesy flavor. The cauliflower gives it structure, while mozzarella, Parmesan, and egg help hold everything together.
The best part is that this recipe is for the crust itself, so you can finish it with your favorite pizza sauce, vegetables, and measured toppings. That makes it easy to build a personal pizza that fits your taste and your daily Points budget. The estimate below is for the crust only; adding mozzarella, pepperoni, chicken, or other toppings will change the total.
Estimated SmartPoints: 3–5 per serving, based on four servings and the ingredient quantities below. This is an independent estimate, not an official WW calculation. Your current WW app may show a different result depending on your plan and ingredient brands.
Why You’ll Love This Weight Watchers Cheesy Cauliflower Pizza Crust
Pizza-night flavor
Mozzarella, Parmesan, garlic, and Italian seasoning give the crust a savory, familiar pizza flavor.
Cauliflower base
Finely riced cauliflower replaces the traditional flour base and adds vegetable texture and fiber.
Cheesy structure
Egg and cheese bind the cauliflower so the baked crust can be cut into slices and topped.
Flexible portions
Cut the crust into eight slices and plan two slices per serving, then account for toppings separately.
It gives you a pizza-inspired meal without regular dough
Cauliflower crust has a different texture from a classic yeast-raised pizza base, and that is worth knowing before you start. It is more tender and less stretchy, with a slightly crisp outside when baked properly. The cheese adds a rich, savory taste that makes the crust feel more satisfying than plain roasted cauliflower.
You can choose your own toppings
Because this recipe focuses on the crust, you are not locked into one topping combination. Try a thin layer of pizza sauce with mushrooms and bell peppers, or add grilled chicken, spinach, and a measured amount of mozzarella. You can also make individual portions with different toppings for family members.
It is useful for meal planning
The crust can be baked ahead, cooled, and refrigerated before you add toppings. That gives you a head start on a busy evening. For the best texture, bake the topped crust shortly before serving rather than storing it assembled with sauce for several days.
It helps make vegetables part of a familiar meal
Cauliflower has a mild flavor, especially when it is finely grated, cooked, and seasoned. It does not disappear completely, but the garlic, herbs, and cheese make it blend naturally into a pizza-style crust. This can be a practical way to add a vegetable-based option to a meal that might otherwise be built around regular dough.
WW SmartPoints Information
For this recipe, the estimated calculation uses four servings, with each serving equal to one-quarter of the finished crust, or approximately two of its eight slices.
| Recipe detail | Estimate |
|---|---|
| Estimated SmartPoints per serving | 3–5 |
| Estimated SmartPoints for whole crust | 12–20 |
| Servings | 4 |
| Slices | 8 |
| Slices per serving | 2 |
| Calories per serving | Approximately 150–175 |
| Protein per serving | Approximately 12–14 g |
These are planning estimates, not verified WW app values. The estimate is based on the cauliflower, egg, part-skim mozzarella, and Parmesan in the crust. Cheese is the main ingredient contributing Points; the exact amount depends on the brand and the Points system being used. Egg treatment and personal plan settings may also affect the result.
The estimate does not include pizza sauce, extra cheese, meat, or other toppings. If you add toppings, enter the complete finished recipe into your WW app and divide by the number of portions you actually make. WW plans and member-specific settings can change, so use your current app as the final reference.
Crust-only Points & nutrition snapshot
Practical adjustment: measure the cheese rather than adding it by handful. A different cheese quantity or brand requires a fresh Points calculation.
Independent estimate for the crust only. Check your current WW app for your personal result.
My Personal Cooking Notes
The most important part of making cauliflower pizza crust is managing moisture. Cauliflower contains a surprising amount of water, and that water does not simply disappear when you mix the vegetable with cheese and egg. If you skip the draining step, the mixture can look promising in the bowl but bake into a soft, fragile base that is difficult to lift.
I would pay particular attention to the texture after squeezing the cooked cauliflower. It should feel damp but not wet, and you should not see water dripping from it. Once it is dry enough, the egg and cheese can bind the mixture more effectively. Spread it in an even layer rather than making the middle thick and the edges thin; an uneven crust will brown inconsistently.
For serving, I like the idea of keeping the toppings simple and allowing the crust to do its job. A thin layer of tomato sauce, mushrooms, bell peppers, and a little extra mozzarella make a familiar combination. If you want a more filling meal, grilled chicken is a useful addition. Just remember that toppings change both the nutrition and the Points estimate.
Required Equipment
Food Processor or Box Grater
A food processor makes quick work of turning cauliflower florets into small, rice-like pieces. Use short pulses and stop when the pieces resemble grains of rice. Avoid processing continuously until the cauliflower becomes a puree. A box grater also works; use the medium or large holes and grate carefully.
Large Microwave-Safe Bowl or Steamer
The cauliflower needs to be cooked until tender before it is squeezed dry. A microwave-safe bowl with a loose cover is convenient, while a steamer basket over simmering water is another good option. You want tender cauliflower, not browned or deeply roasted pieces.
Clean Kitchen Towel or Cheesecloth
This is one of the most important tools for the recipe. A clean, lint-free kitchen towel or several layers of cheesecloth help you squeeze excess moisture from the cooked cauliflower. Use a towel you do not mind washing thoroughly afterward.
Mixing Bowl
Choose a bowl large enough to combine the cauliflower, egg, mozzarella, Parmesan, and seasonings without spilling. A wide bowl makes it easier to distribute the cheese evenly and check that there are no pockets of plain cauliflower.
Baking Sheet and Parchment Paper
A flat baking sheet gives the crust room to bake evenly. Parchment paper helps prevent sticking and makes it easier to transfer the crust after baking. Do not assume that greasing an unlined pan will provide the same release.
Spatula or Large Spoon
Use a sturdy spatula to spread and press the mixture into a thin, even circle or rectangle. The goal is a compact layer with no loose edges or obvious holes. A small offset spatula can help smooth the surface, but an ordinary spoon works well.
Oven and Cooling Rack
The oven bakes the crust and helps dry its surface. A cooling rack allows steam to escape after baking, reducing the chance that condensation will soften the bottom. Let the crust set before you try to move or slice it.
Ingredients and Substitutions
This recipe makes one medium cauliflower crust, cut into eight slices and served as four portions. The ingredient quantities below are for the crust only, not a fully topped pizza.
- 1 large head cauliflower (about 2 to 2½ pounds whole; use approximately 4 cups finely riced cauliflower before cooking): This is the base of the crust. It supplies the bulk, mild flavor, and vegetable texture. The final amount can vary depending on the size of the head and how much stem is removed. If using packaged cauliflower rice, measure approximately 4 cups and check whether it is fresh or frozen.
- 1 large egg: The egg helps bind the cauliflower and cheese mixture as it bakes. It contributes protein and fat and helps the crust hold together. A flax egg is not my first choice here because it may produce a softer, less cohesive result.
- 1 cup (about 112 g) shredded part-skim mozzarella: This adds the familiar cheesy flavor and helps the crust hold its shape. Weighing or measuring the cheese matters because cheese is one of the main contributors to the recipe’s Points and calories. Reduced-fat mozzarella may work, but its melting and browning behavior can differ by brand.
- 2 tablespoons (about 10 g) finely grated Parmesan: Parmesan gives the crust a more savory, concentrated cheese flavor. Its strong taste means a small amount can make a noticeable difference. Finely grated Parmesan distributes more evenly than large shavings.
- ½ teaspoon garlic powder: Adds savory depth throughout the crust. Garlic powder is easier to distribute evenly than fresh minced garlic, which can add moisture.
- ½ teaspoon Italian seasoning: A blend of dried herbs gives the crust a pizza-inspired aroma. If your blend contains salt, adjust the added salt accordingly.
- ¼ teaspoon fine salt, or to taste: Helps season the cauliflower. The cheeses already contain sodium, so start modestly.
- ⅛ teaspoon black pepper: Adds a mild peppery finish without overwhelming the cheese and herbs.
Ingredient choices that matter
Fresh versus frozen cauliflower rice: Fresh cauliflower is easy to process and gives you control over the size of the pieces. Frozen cauliflower rice is convenient, but it must be thawed and drained very thoroughly. Frozen vegetables can release considerable water as they cook, so squeezing is especially important.
Part-skim versus regular mozzarella: Part-skim mozzarella is a practical option for keeping the recipe more moderate in fat and calories. Regular mozzarella can produce a richer crust, but the nutrition and Points estimate will likely increase. Reduced-fat cheeses do not all melt in the same way, so choose one that melts well.
Parmesan amount: Parmesan is included for flavor rather than bulk. You can omit it, but the crust will taste less savory. If you replace it with more mozzarella, the texture may become softer and the Points calculation will change.
Seasonings: Italian seasoning and garlic powder are flexible. Add dried oregano or basil if you prefer a stronger herb flavor. Avoid adding wet ingredients such as fresh tomato or a large amount of minced garlic directly to the crust mixture.
Ingredient swap guide
| Original | Possible swap | What changes |
|---|---|---|
| Part-skim mozzarella | Regular mozzarella | Richer flavor and potentially more fat, calories, and Points. |
| Fresh cauliflower | Frozen cauliflower rice | Convenient, but thaw and squeeze very thoroughly to prevent a wet crust. |
| Parmesan | Omit or use a measured alternative hard cheese | Omitting reduces cheese in the mixture but also reduces savory depth and may affect structure. |
| Italian seasoning | Oregano, basil, or an herb blend | Mostly a flavor change; check salt in prepared blends. |
Swaps change nutrition and may change Points. Recalculate the complete recipe using the exact products and quantities you choose.
How to Make Weight Watchers Cheesy Cauliflower Pizza Crust
The key to a crust that holds together is a three-part process: cook the cauliflower, remove excess moisture, and bake the crust until it is set before adding toppings. Give each stage enough time. Rushing the moisture-removal step is the most common reason cauliflower crust turns out soft.
Step 1: Prepare the cauliflower
Preheat the oven to 400°F (200°C). Line a large baking sheet with parchment paper.
Remove the leaves and tough core from the cauliflower. Cut the head into florets, then pulse them in a food processor until the pieces look like small grains of rice. Work in batches if needed. Do not fill the processor too tightly, because the pieces near the blade may turn mushy while larger pieces remain chunky.
You need about 4 cups of riced cauliflower. Transfer it to a large microwave-safe bowl, cover loosely, and microwave for approximately 5–7 minutes, or until tender. Alternatively, steam it in a steamer basket until tender. The exact time depends on the size of the pieces and your appliance.
Let the cauliflower cool enough to handle. It should be soft but not watery. If you notice liquid collecting at the bottom of the bowl, drain it before moving to the next step.
Step 2: Squeeze out the moisture
Place the cooked cauliflower in the center of a clean kitchen towel or several layers of cheesecloth. Gather the edges and squeeze firmly over the sink. Take care if the cauliflower is still hot; allow it to cool further or use heat-safe gloves.
Keep squeezing until very little liquid comes out. Open the towel, loosen the cauliflower, and squeeze again if it still feels wet. The finished cauliflower should be moist enough to combine with the other ingredients, but it should not drip or look glossy with water.
This step makes a real difference. Excess water can prevent the crust from setting properly, even if you bake it for longer. If the cauliflower is still very wet, the mixture may spread too easily and the finished base may break when lifted.
Step 3: Mix the crust ingredients
Transfer the squeezed cauliflower to a mixing bowl. Add the egg, part-skim mozzarella, Parmesan, garlic powder, Italian seasoning, salt, and black pepper.
Mix until everything is evenly distributed. The mixture should hold together when you press a small amount between your fingers. It will not look like bread dough, and it should not be kneadable. Instead, it should resemble a moist, thick mixture that can be pressed into shape.
If you see pockets of plain cauliflower, keep mixing gently until the cheese and egg are distributed throughout. Avoid adding extra egg or cheese just because the mixture looks different from conventional pizza dough. Extra ingredients change the recipe’s nutrition and Points.
Step 4: Shape the crust
Transfer the mixture to the parchment-lined baking sheet. Use a spatula or the back of a spoon to press it into a circle about 10–11 inches across, or shape it into a rectangle if that fits your pan better.
Aim for an even thickness of approximately ¼ inch. Press the mixture firmly so there are no loose pieces around the edges. Keep the center and outer edge at a similar thickness. If the center is much thicker, it may remain soft while the edges become overly browned.
Leave a small, neat border around the outside. You do not need to build a thick raised rim; a compact, even crust is easier to bake and slice.
Step 5: Bake until golden and set
Bake at 400°F for approximately 25–30 minutes. Begin checking around the 22-minute mark because ovens and crust thickness vary.
Look for a surface that feels set, edges that are golden, and some light browning across the top. The crust should no longer look wet in the middle. If the edges are browning too quickly while the center still looks soft, continue baking and check every few minutes.
Do not try to lift the crust immediately. It is delicate while hot, and it becomes easier to handle as it rests. Let it cool on the baking sheet for about 5–10 minutes before adding toppings or transferring it.
Step 6: Add toppings and finish the pizza
For a pizza-style meal, spread a thin layer of pizza sauce over the baked crust. Add your chosen toppings and a measured amount of cheese. Keep the topping layer fairly light; too much sauce or heavy, watery vegetables can soften the base.
Return the topped crust to the oven for approximately 5–8 minutes, or until the toppings are hot and any added cheese has melted. If you use cooked chicken or other cooked protein, it only needs to heat through. Raw meat should never be placed on this partly baked crust with the expectation that the short finishing time will cook it safely.
Let the finished pizza rest for a few minutes before slicing. Use a sharp knife or pizza cutter and support the crust as you cut. A short rest helps the cheese set and makes the slices easier to serve.
From cauliflower to pizza crust
Rice and cook
Pulse florets into rice-sized pieces, then microwave or steam until tender.
Look for: soft pieces, not puree.
Squeeze thoroughly
Wrap the cooked cauliflower in a towel and press out as much liquid as possible.
Look for: damp, fluffy cauliflower without dripping water.
Bind and season
Combine cauliflower with egg, mozzarella, Parmesan, and seasonings.
Look for: a mixture that holds when pressed.
Press evenly
Spread into a compact circle or rectangle about ¼ inch thick.
Look for: an even layer with no loose edges.
Set the crust
Bake at 400°F for about 25–30 minutes, checking for a dry, golden surface.
Look for: browned edges and a set center.
Top and serve
Add a light layer of toppings, bake until hot, then rest before slicing.
Look for: melted toppings and slices that hold together.
Common Mistakes to Avoid
Leaving too much water in the cauliflower
This is the biggest issue with homemade cauliflower crust. Cauliflower releases water as it cooks, and even a little excess moisture can make the mixture difficult to shape. The middle may stay soft, and slices may fall apart when served.
How to avoid it: Squeeze the cooked cauliflower in a towel until it stops releasing noticeable liquid. Do not rely on draining it in a colander alone. If you are using frozen cauliflower rice, thaw it completely before squeezing.
Making the crust too thick
A thick cauliflower base takes longer to dry and set. The outside may become quite brown before the center is firm enough to support toppings.
How to avoid it: Spread the mixture evenly to approximately ¼ inch thick. If you want a smaller pizza, make a smaller circle rather than piling the mixture higher.
Using large pieces of cauliflower
Large pieces create an uneven mixture. Some areas may hold together while other areas crumble, leaving weak spots in the crust.
How to avoid it: Process the florets into rice-sized pieces. Stop before they become a puree. If using pre-riced cauliflower, break up any large clumps before cooking.
Adding toppings before the crust is baked
The first bake is what sets the cauliflower mixture. Adding sauce and toppings too early introduces more moisture and weight before the base has become firm.
How to avoid it: Bake the plain crust first until the surface is golden and set. Add toppings only after this initial bake.
Using too much sauce
A thick layer of sauce can soak into the crust, particularly if the crust is still warm and tender. Watery vegetables can have a similar effect.
How to avoid it: Use a thin layer of sauce and cook watery vegetables such as mushrooms before adding them. Let the finished pizza rest briefly before slicing.
Cutting the crust while it is too hot
The cheese and egg mixture needs a little time to settle. Slicing immediately can pull apart the center and make the crust seem less sturdy than it really is.
How to avoid it: Rest the baked crust for 5–10 minutes before topping or transferring, then rest the finished pizza for a few minutes before cutting.
Pro Tips for the Best Cauliflower Pizza Crust
- Squeeze twice if needed. After the first squeeze, loosen the cauliflower in the towel and press again. This is particularly helpful when working with frozen cauliflower rice.
- Use finely grated Parmesan. It spreads through the mixture more evenly and gives a savory flavor without needing a large amount.
- Measure your mozzarella. A generous handful can easily become more than the recipe calls for. Measuring helps keep the texture and Points estimate consistent.
- Use parchment paper. It makes the crust easier to release and reduces the need for extra oil.
- Keep the surface level. An even crust browns more consistently and is less likely to have a soggy center.
- Pre-cook watery toppings. Mushrooms, spinach, and some other vegetables release moisture. Cook and drain them before topping the pizza.
- Do not overload it. A cauliflower crust is more delicate than traditional dough. A moderate amount of sauce and toppings gives the best chance of keeping the slices intact.
- Let it rest. A few minutes of cooling makes the crust easier to handle and improves slicing.
Troubleshooting: What Went Wrong?
Cauliflower crust troubleshooting
The most useful prevention step is still thorough moisture removal before mixing.
Weight Watchers Nutrition and Meal-Planning Tips
A cauliflower crust can be a useful alternative when you want a pizza-inspired meal with a vegetable-based foundation. However, it is important to look at the complete recipe rather than assuming that a cauliflower ingredient automatically makes the dish low in Points. The cheese and egg are important for structure, flavor, and nutrition, and they also affect the final calculation.
Think about the whole plate
The crust is only one part of the meal. A generous layer of cheese, a heavy hand with oil, or high-Points toppings can change the total quickly. On the other hand, a measured amount of sauce, plenty of vegetables, and a lean protein topping can create a satisfying pizza-style dinner.
Try combinations such as:
- Chicken and vegetables: Add cooked chicken breast, mushrooms, and bell peppers for a protein-forward topping.
- Garden vegetable: Use a thin layer of tomato sauce with mushrooms, spinach, onions, and peppers.
- Tomato and basil: Add sliced tomatoes, fresh basil, and a measured amount of mozzarella.
- Turkey pepperoni: Use a measured portion of turkey pepperoni rather than assuming all pepperoni products have the same nutrition or Points.
Make portions easy to track
This recipe is designed to make eight slices. For the estimate in this article, two slices equal one of four servings. If you cut the crust into six larger slices or eight smaller ones, the total recipe Points do not change; the Points per portion will change with the serving size.
If you are preparing the pizza for a family, you can cut it into the number of portions that makes sense for your meal. Just enter the full recipe and divide by the actual number of servings rather than relying on the original estimate.
Add protein thoughtfully
The crust provides some protein from the egg and cheese, but toppings can contribute more. Cooked chicken breast, shrimp, or other lean proteins can make the pizza more substantial. Measure any extra cheese and check the label on prepared meats, because sodium, fat, calories, and Points vary between products.
Remember that Points and nutrition are different measures
Calories, protein, carbohydrates, fat, and fiber help describe the nutritional profile, but they do not directly tell you the Points value. WW’s calculation depends on the current program and its treatment of specific ingredients. A high-protein ingredient is not automatically zero Points for every member, and a lower-calorie product is not necessarily lower in Points. Use your personal app to calculate the finished recipe.
Variations You Can Try
The basic crust is deliberately simple, which makes it easy to adjust the flavor. Keep the moisture and binding ingredients in mind whenever you experiment. If you add wet vegetables or change the cheese, the mixture may behave differently.
Garlic Parmesan Crust
Increase the garlic powder slightly and add another small pinch of Parmesan, measuring the extra cheese. This creates a stronger garlic-and-cheese flavor that works especially well with chicken, spinach, or mushrooms. Additional Parmesan will change the calories, fat, sodium, and estimated Points, so recalculate if you make this adjustment.
Spicy Italian Crust
Add a pinch of crushed red pepper flakes and a little extra oregano. The heat gives the crust a bolder flavor without requiring a major change to the base ingredients. This is a seasoning variation, so it should have little nutritional impact when used in small amounts.
Herb and Basil Crust
Add dried basil or oregano to the cauliflower mixture, or sprinkle fresh basil over the finished pizza. Fresh herbs are best added near the end so their flavor stays bright. This is an easy way to make the crust taste more like a traditional Italian-inspired pizza.
Extra-Cheesy Crust
You can increase the mozzarella, but be aware that it changes more than the flavor. More cheese adds fat, calories, protein, and potentially more Points. It may also make the crust softer or oilier depending on the cheese brand. Measure the extra amount and recalculate the whole recipe rather than assuming the original estimate still applies.
Individual Mini Crusts
Instead of making one large crust, divide the mixture into four smaller rounds. Keep them evenly shaped and similar in thickness so they bake at roughly the same rate. Smaller crusts can be convenient for meal prep or for serving different toppings, although you should check them earlier because their edges may brown faster.
Tips for Serving and Portioning
The crust is easiest to serve when it has cooled slightly and the toppings are not too heavy. A pizza cutter works well, but a sharp chef’s knife can also make clean slices. If the crust seems delicate, use a thin spatula to support each slice as you move it to a plate.
For consistent portions, cut the finished crust into eight slices before serving. Two slices make one of the four portions used for the nutrition and Points estimates in this article. If you are sharing it as a side dish or appetizer, you may cut smaller pieces, but remember that those are not the same serving size used in the estimate.
A few simple presentation ideas:
- Add fresh basil after baking for color and a fresh herbal aroma.
- Use a small amount of sauce so the crust remains visible.
- Spread toppings evenly rather than piling them in the center.
- Cut with a sharp pizza wheel after the pizza has rested.
- Serve with a simple green salad or roasted vegetables for a more complete meal.
Optional Toppings and Additions
Because the recipe is a crust rather than a fully topped pizza, you can make it fit different meals. Here are some combinations to consider.
- Tomato pizza sauce: A thin layer gives the crust classic pizza flavor. Check the label and measure the amount because sauces differ in added sugar, sodium, and Points.
- Cooked chicken breast: Adds lean protein and makes the pizza more filling. Use cooked, seasoned chicken and distribute it evenly.
- Turkey pepperoni: Adds a familiar pepperoni flavor. Compare brands because turkey pepperoni products vary in fat, sodium, and Points.
- Mushrooms and bell peppers: Add savory flavor, color, and vegetable texture. Cook mushrooms first to remove some of their moisture.
- Spinach: Adds color and works well with mozzarella. Wilt and drain it before using so it does not release excess water onto the crust.
- Extra mozzarella: Creates a cheesier finish, but increases calories, fat, and estimated Points. Measure it rather than sprinkling freely.
- Fresh basil or parsley: Adds freshness and color with a relatively small amount. Sprinkle it over the pizza after baking.
Serving Ideas
This crust can be served as a simple weeknight dinner, a lighter pizza-style lunch, or a base for individual pizzas. The best pairing depends on the toppings you choose. Since the crust already contains cauliflower, cheese, and egg, a fresh vegetable side or lean protein topping can round out the meal.
Ways to serve your cauliflower pizza crust
Storage Recommendations
Cauliflower crust is best when freshly baked, but you can prepare it ahead. The important thing is to cool it properly and store it separately from wet toppings.
Refrigerating the baked crust
Let the plain baked crust cool completely on a rack. Transfer it to an airtight container or wrap it securely and refrigerate at 40°F (4°C) or below. For best quality, use it within 3–4 days. Keep sauce and toppings separate until you are ready to finish the pizza.
If you have already topped and baked the pizza, refrigerate leftovers promptly in a shallow airtight container. Do not leave the pizza at room temperature for more than two hours, or more than one hour when the temperature is above 90°F.
Freezing the crust
You can freeze the plain, fully baked crust. Let it cool completely, place it on a tray until firm, then wrap it well or transfer it to a freezer-safe container with parchment between layers. For best quality, use within about 1–2 months.
Thaw it in the refrigerator before adding toppings. The texture may be slightly softer after freezing, so return it to the oven briefly to warm and crisp the surface before topping.
Reheating
For the best texture, reheat the plain crust in a 375°F oven for several minutes until warm. If it is already topped, heat until the toppings are hot throughout. An air fryer can also work for individual slices; use a moderate temperature and check frequently because the edges can brown quickly.
Reheating the same ingredients does not materially change the recipe’s Points. However, adding oil, cheese, or other toppings will change the calculation.
Make-ahead and storage timeline
Cool completely
Let steam escape on a rack before wrapping or storing.
3–4 days
Keep at 40°F or below in an airtight container. Store toppings separately when possible.
Oven or air fryer
Warm until hot throughout. Check frequently to avoid over-browning.
Best within 1–2 months
Freeze the plain baked crust, wrapped well. Thaw in the refrigerator before topping.
Refrigerate perishable food within two hours, or within one hour in temperatures above 90°F. Storage times assume prompt refrigeration and proper handling.
Frequently Asked Questions
1. Does cauliflower pizza crust taste like regular pizza dough?
Not exactly. Traditional pizza dough has a chewy, bread-like texture, while cauliflower crust is more tender and compact. This version gets its savory flavor from mozzarella, Parmesan, garlic, and Italian seasoning. When the cauliflower is squeezed properly and the crust is baked until golden, it can be sturdy enough to hold a moderate amount of toppings.
2. How do I stop cauliflower pizza crust from falling apart?
The most important step is removing excess moisture from the cooked cauliflower. Use a clean kitchen towel or cheesecloth and squeeze firmly. Also make sure the egg and cheese are evenly mixed throughout the cauliflower. Press the mixture into a compact, even layer and bake it until the center is set before adding toppings. Allowing it to rest before slicing also helps.
3. Can I use frozen cauliflower rice?
Yes. Frozen cauliflower rice is convenient, but it needs to be thawed and drained thoroughly. Cook it according to the package directions or until tender, then let it cool enough to handle and squeeze out as much liquid as possible. Do not use it while it is still icy or watery, because that extra moisture can make the crust difficult to set.
4. Can I make the crust ahead of time?
Yes. Bake the plain crust, let it cool completely, and refrigerate it in an airtight container. For best quality, use it within 3–4 days. Add sauce and toppings shortly before serving, then bake until hot. Storing the crust separately from sauce helps prevent it from becoming soggy.
5. Can I freeze cauliflower pizza crust?
Yes. Freeze the fully baked, untopped crust after it has cooled completely. Wrap it securely or place it in a freezer-safe container with parchment between layers. For best quality, use it within about 1–2 months. Thaw in the refrigerator and warm it in the oven before adding toppings. The texture may be a little softer after freezing.
6. How can I reduce the Weight Watchers Points?
Start by measuring the cheese accurately, because mozzarella and Parmesan are the main Points contributors in this crust. You can test a smaller cheese quantity, but do not remove too much: the cheese helps bind the cauliflower and contributes to the flavor and structure. Any adjustment changes the recipe, so enter the new quantities into your current WW app rather than assuming the original estimate still applies.
7. Will my WW app show the same Points as this recipe?
It may not. The 3–5 Points estimate per serving is an independent planning estimate, not an official WW calculation. Your result can depend on your current WW plan, account-specific settings, exact cheese brands, and the ingredients you add as toppings. For the most accurate personal result, enter the complete ingredient list and actual serving count into your app.
Nutritional Breakdown Per Serving
The following estimates are for one-quarter of the plain crust, or two slices when the crust is cut into eight slices. They do not include sauce or toppings.
| Nutrient | Estimated amount |
|---|---|
| Calories | 150–175 |
| Protein | 12–14 g |
| Fat | 8–10 g |
| Total carbohydrates | 9–12 g |
| Fiber | 2–3 g |
| Net carbohydrates | 7–9 g |
| Sugar | 2–3 g |
| Sodium | 350–500 mg |
| Estimated SmartPoints | 3–5 |
These are approximate values based on typical ingredients and may vary with the size of the cauliflower head, the amount of cauliflower retained after squeezing, and the specific cheese brands. Net carbohydrates are calculated as total carbohydrates minus fiber. Net carbs are not the same as WW Points.
Recipe Snapshot
- Prep Time: 25 minutes
- Cook Time: 30 minutes
- Total Time: Approximately 55 minutes
- Course: Main Course, Pizza Crust
- Cuisine: American-inspired
- Servings: 4
- Yield: 1 medium crust, cut into 8 slices
- Calories: Approximately 150–175 per serving
- Estimated SmartPoints: Approximately 3–5 per serving, crust only
A Note Before You Make It
The secret to a good cauliflower pizza crust is not complicated, but it does require patience when squeezing out the moisture. Take your time with that step, measure the cheese, and bake the crust until it is genuinely set before adding toppings. Once you have the base ready, you can make it your own with vegetables, chicken, or turkey pepperoni while keeping track of the ingredients that affect your personal Points budget.

Ingredients
- 1 large head cauliflower about 2 to 2½ pounds whole; use approximately 4 cups finely riced cauliflower before cooking
- 1 large egg
- 1 cup about 112 g shredded part-skim mozzarella
- 2 tablespoons about 10 g finely grated Parmesan
- ½ teaspoon garlic powder
- ½ teaspoon Italian seasoning
- ¼ teaspoon fine salt or to taste
- ⅛ teaspoon black pepper
Instructions
- Preheat the oven to 400°F (200°C). Line a large baking sheet with parchment paper.
- Remove the leaves and tough core from the cauliflower. Cut into florets and pulse in a food processor until rice-sized. Measure approximately 4 cups.
- Place the cauliflower in a microwave-safe bowl, cover loosely, and microwave for 5–7 minutes until tender. Alternatively, steam until tender.
- Let the cauliflower cool enough to handle. Transfer it to a clean kitchen towel or cheesecloth and squeeze firmly until very little liquid remains.
- Place the squeezed cauliflower in a mixing bowl. Add the egg, mozzarella, Parmesan, garlic powder, Italian seasoning, salt, and black pepper. Mix until evenly combined.
- Transfer the mixture to the prepared baking sheet. Press into a 10–11-inch circle, approximately ¼ inch thick, keeping the thickness even.
- Bake for 25–30 minutes, checking from around 22 minutes, until the surface is set and the edges are golden.
- Let the crust rest for 5–10 minutes. Add measured sauce and toppings if desired, then return to the oven for 5–8 minutes until hot and melted.
- Rest the finished pizza briefly before slicing into eight pieces.